CCTV DVR Push Notifications using Raspberry Pi
This goal of this article is to document how to enable mobile push notifications on any CCTV DVR using Raspberry Pi. The problem that this project aims to solves is this: many surveillance DVRs that are currently installed around the world were manufactured before the invention of push notifications for iOS and Android mobile devices. In addition, there are still many CCTV manufacturers that have not yet developed push notifications even if they have mobile apps that enable access their DVRs. CCTV Camera Pros speaks to many customers around the world that want to enable push alerts, but do not want to replace their existing DVR. This can be done by adding a Raspberry Pi to your security system and using the source code that I will provide that integrates with a free push notification service from Instapush.
You may also be interested in this article: How-to setup mobile push notifications to iPhone and Android apps using Zavio IP cameras.
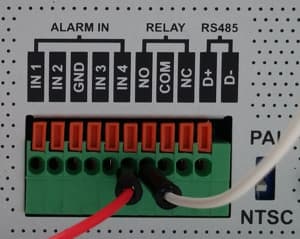
If you are going to attempt to use this project with your DVR, there is one prerequisite: your DVR MUST have an alarm relay output. Alarm in / alarm out ports are very typical even on older security DVRs. Look on the back of your DVR. If it has alarm inputs and outputs, they will look something like this. The relay outputs can usually be identified with the labels NO / NC / COM, which stands for normally open, normally closed, and common.
Unfortunately, if your DVR does not have these alarm output ports, you will not be able to enable push notifications using this Raspberry Pi project.
Setup DVR Alarm Output to Send Push Messages through Raspberry Pi
This project builds off of the “How to Send Push Notifications with Raspberry Pi” project that I published last week. Actually, the Python code that this project uses is almost identical to that one. I just replace the magnetic door sensor as the trigger for the push message with the alarm output of the DVR. I also added an LED output that turns on when the alarm is triggered, but that part is optional. Some of the steps below will reference that project because the setup is the same.
- Setup Push Service at Instapush & Install Mobile App
- Wire DVR Alarm Relay to Raspberry Pi
- Configure DVR Alarm Output
- Install Python Code
- Run Python Code
- Trigger DVR Alarm to Send Push Message
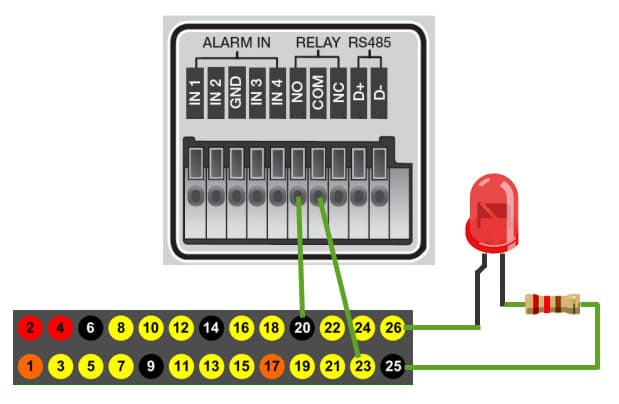
Wire DVR Alarm Relay Output to Raspberry Pi
Here is how my Raspberry Pi is wired for this project. Please note that the LED wired to GPIO 26 is optional. I included it so that I can easily see when the DVR alarm is on. If you decide that you want to use an LED, you should connect a resistor in-line with the LED. I used a 220Ω resistor. The reduces the power that the LED receives and prolongs its life.
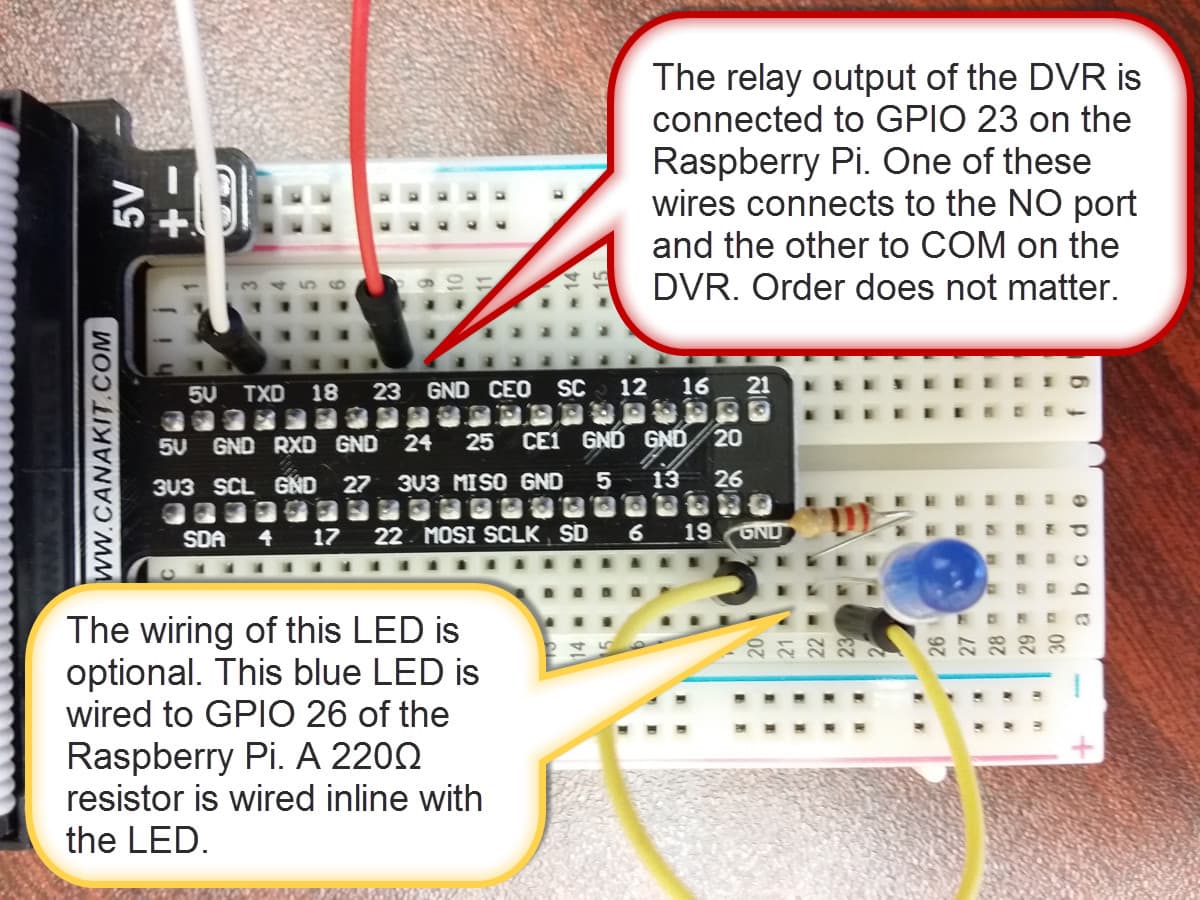
Here is another view of how the alarm relay output and LED are wired to the Raspberry Pi.
Configure DVR Alarm Relay Output
Different surveillance DVR models support different types of events that can trigger their alarm relay output(s). This part of the project setup is done on your DVR. The iDVR-PRO surveillance DVR supports the following types of alarms. Any of these can be used to trigger the push alert if you are using an iDVR-PRO.
- Alarm Sensor – you can setup external alarm inputs to trigger an alarm relay output.
- Video Motion Detection – motion detection from any camera.
- Video Loss – video being lost on any camera.
- Disk Drive Alert – disk drive system events such as disk full, failure, overwrite started.
- Network Event – network events such as remote login failure, Internet connection failure, and DDNS update failure.
- Panic Recording – initiation of panic recording.
- System Event – system boot-up warning, login failure, fan failure.
- Tamper Detection – DVR tampering detected.
So again, the type of event / alarm that you can use will depend on your DVR. This part of the project setup is completely independent of your Raspberry Pi. You should follow the instructions for setting up alarm output on your DVR. Here are the alarm setup instructions for the iDVR-PRO, which you may be able to use to improvise if your DVR does not have instructions.
Install Python Code
Here is the python application that I wrote. The comments in the code should explain pretty well what is going on. Name your program dvrPush.py. I am pretty sure that the formatting of the code will be messed up when I paste it into this blog post, so you can download the Python source here.
Be sure to enter your Instapush application ID and secret in those variable values in the code.
# ------------- Begin doorSensor.py ------------------ #

import pycurl, json

from StringIO import StringIO

import RPi.GPIO as GPIO
# LED Setup
ALARM_IN = 23
LED = 26 # removed this line if you do not setup the LED
#setup GPIO using Broadcom SOC channel numbering
GPIO.setmode(GPIO.BCM)
# set to pull-up (normally closed position)
GPIO.setup(ALARM_IN, GPIO.IN, pull_up_down=GPIO.PUD_UP)
GPIO.setup(LED, GPIO.OUT) # removed this line if you do not setup the LED
GPIO.output(LED, False) # removed this line if you do not setup the LED
#setup InstaPush variables
appID = “” # add Instapush application ID here
appSecret = “” # add Instapush application secret here
pushEvent = “DoorAlert”
pushMessage = “Door Opened!”
# use this to capture the response from our push API call
buffer = StringIO()
# use Curl to post to the Instapush API
c = pycurl.Curl()
# set API URL
c.setopt(c.URL, ‘https://api.instapush.im/v1/post’)
#setup custom headers for authentication variables and content type
c.setopt(c.HTTPHEADER, [‘x-instapush-appid: ‘ + appID,
‘x-instapush-appsecret: ‘ + appSecret,
‘Content-Type: application/json’])
# create a dict structure for the JSON data to post
json_fields = {}
# setup JSON values
json_fields[‘event’]=pushEvent
json_fields[‘trackers’] = {}
json_fields[‘trackers’][‘message’]=pushMessage
#print(json_fields)
postfields = json.dumps(json_fields)
# make sure to send the JSON with post
c.setopt(c.POSTFIELDS, postfields)
# set this so we can capture the resposne in our buffer
c.setopt(c.WRITEFUNCTION, buffer.write)
# uncomment to see the post sent
#c.setopt(c.VERBOSE, True)
# setup an indefinite loop that looks for the door to be opened / closed
while True:
# DVR Alarm received
GPIO.wait_for_edge(ALARM_IN, GPIO.RISING)
GPIO.output(LED, True) # removed this line if you do not setup the LED
print(“DVR Alarm Started!\n”)
# send the push request to Instapush
c.perform()
# capture the response from the Instapush server
body= buffer.getvalue()
# print the response from the Instapush API call
print(body)
# reset the response buffer
buffer.truncate(0)
buffer.seek(0)
# DVR alarm has stopped
GPIO.wait_for_edge(ALARM_IN, GPIO.FALLING)
GPIO.output(LED, False) # removed this line if you do not setup the LED
print(“DVR Alarm Ended.\n”)
# cleanup
c.close()
GPIO.cleanup()
# ——————– End doorSensor.py ——————– #
Save the Python script on your Raspberry Pi.
Run Python Code
To test the push notification, run the dvrPush.py application. While the app is running. Trigger the alarm output on your DVR. How you do this will depend on the type of event you configured on your DVR to trigger the relay. You will see the following printed on the screen of your Raspberry Pi when the alarm is sent from the DVR to Rpi. The first line is the command to start the program. The second line is printed when the DVR triggers the relay output. Immediately following is a printout of the response received from the push API service. Last, we print when the event on the DVR has ended and the relay is opened.
pi@raspberrypi ~ $ sudo python dvrPush.py
Door Opened!
{“msg”:”Notification Sent Successfully”,”error”:false,”status”:200}
Door Closed!
Send Push Notification
A second or two after you trigger the DVR alarm, you should receive the push notification on your iOS or Android app. Here is what the push message looks like on an Android Samsung Galaxy. It works just as awesome on iOS.