Enable HTTP POST on Cameras and NVRs
Before your server can receive AI detection events, you need to enable HTTP POST on the device that will send them. This page walks through the web interface setup for both IP cameras and NVRs.
- IP Camera (direct) — camera sends HTTP POST directly to your server. Requires the camera to be on your local network via a PoE switch (not through NVR PoE ports).
- NVR (forwarded) — NVR receives events from connected cameras and forwards them to your server. Use this when cameras are connected to the NVR's built-in PoE ports, or when you want a single endpoint for all cameras.
- Both — for maximum flexibility, configure the NVR to forward alarm events with images, and configure individual cameras to send
trajectreal-time tracking data directly. Your server receives both streams.
IP Camera Setup
Step 1: Access the Camera Web Interface
Open a web browser and navigate to your camera's IP address. Log in with administrator credentials.
Step 2: Navigate to HTTP POST Settings
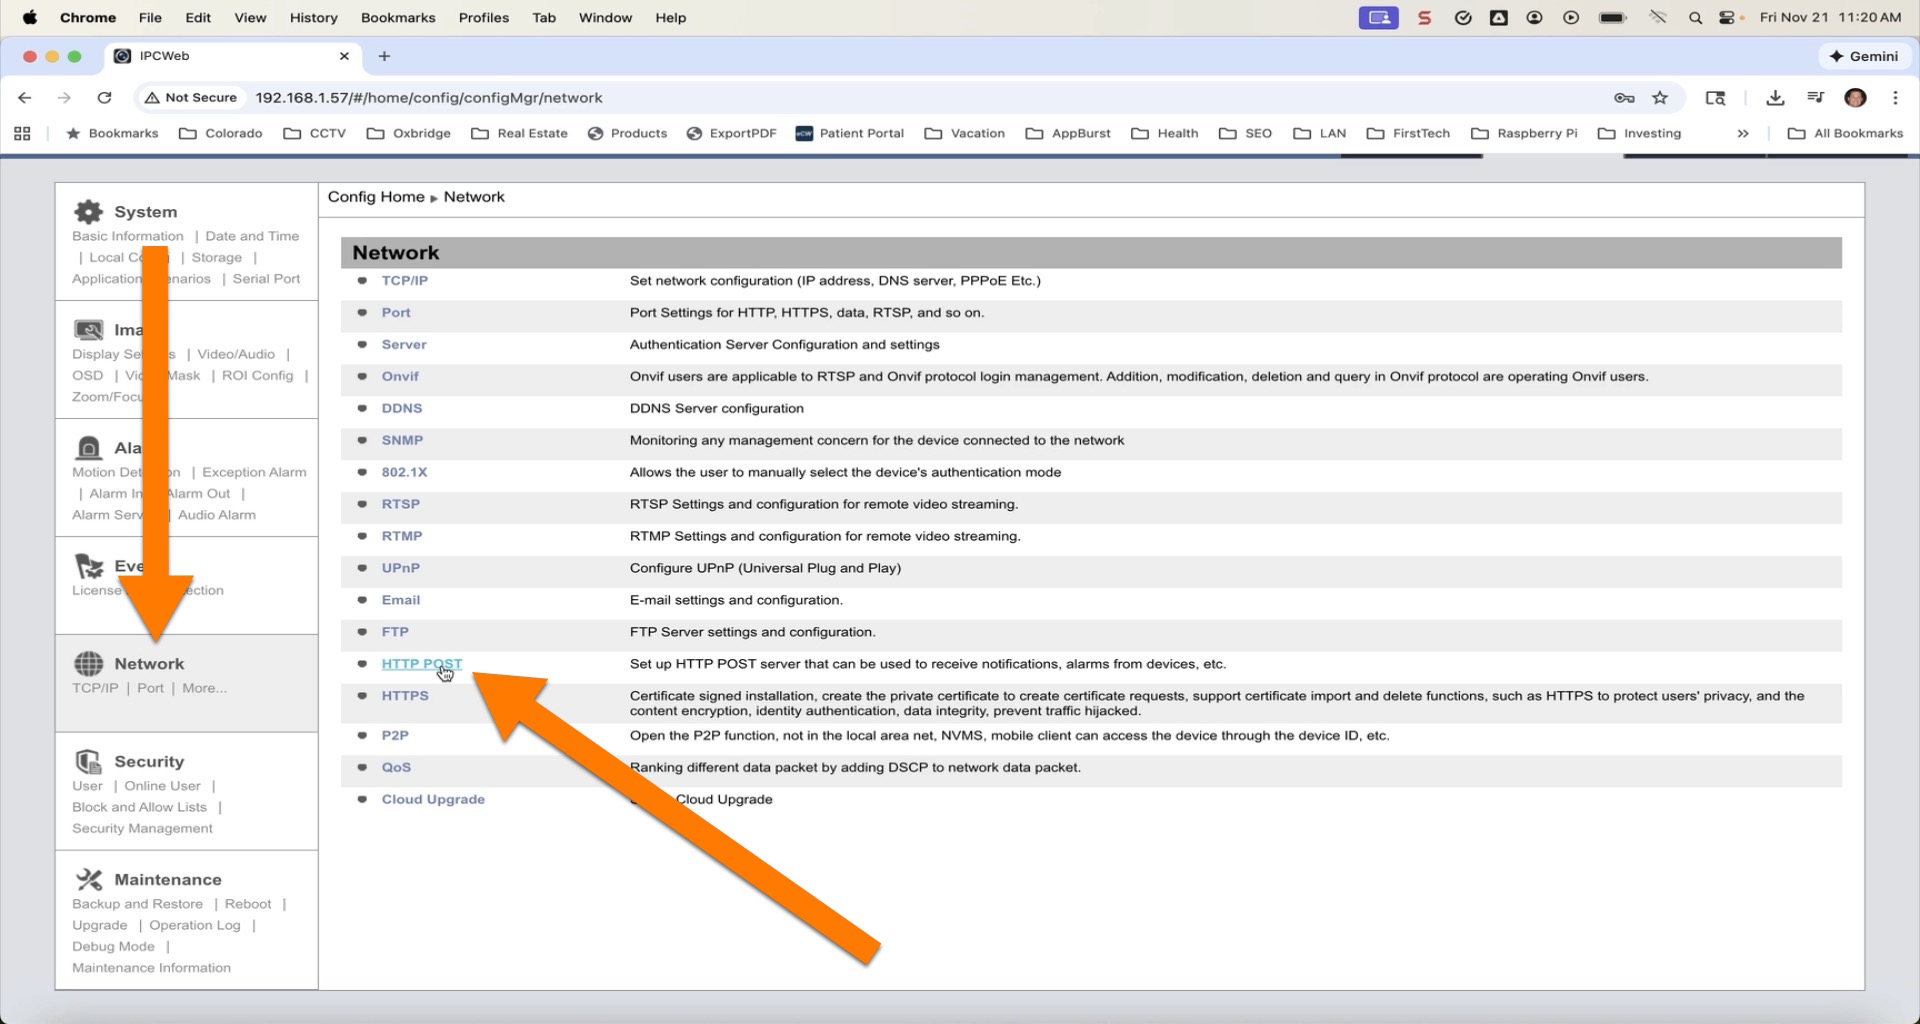
In the left menu, click Network. On the Network page, click the HTTP POST tab.
Step 3: Edit the Configuration
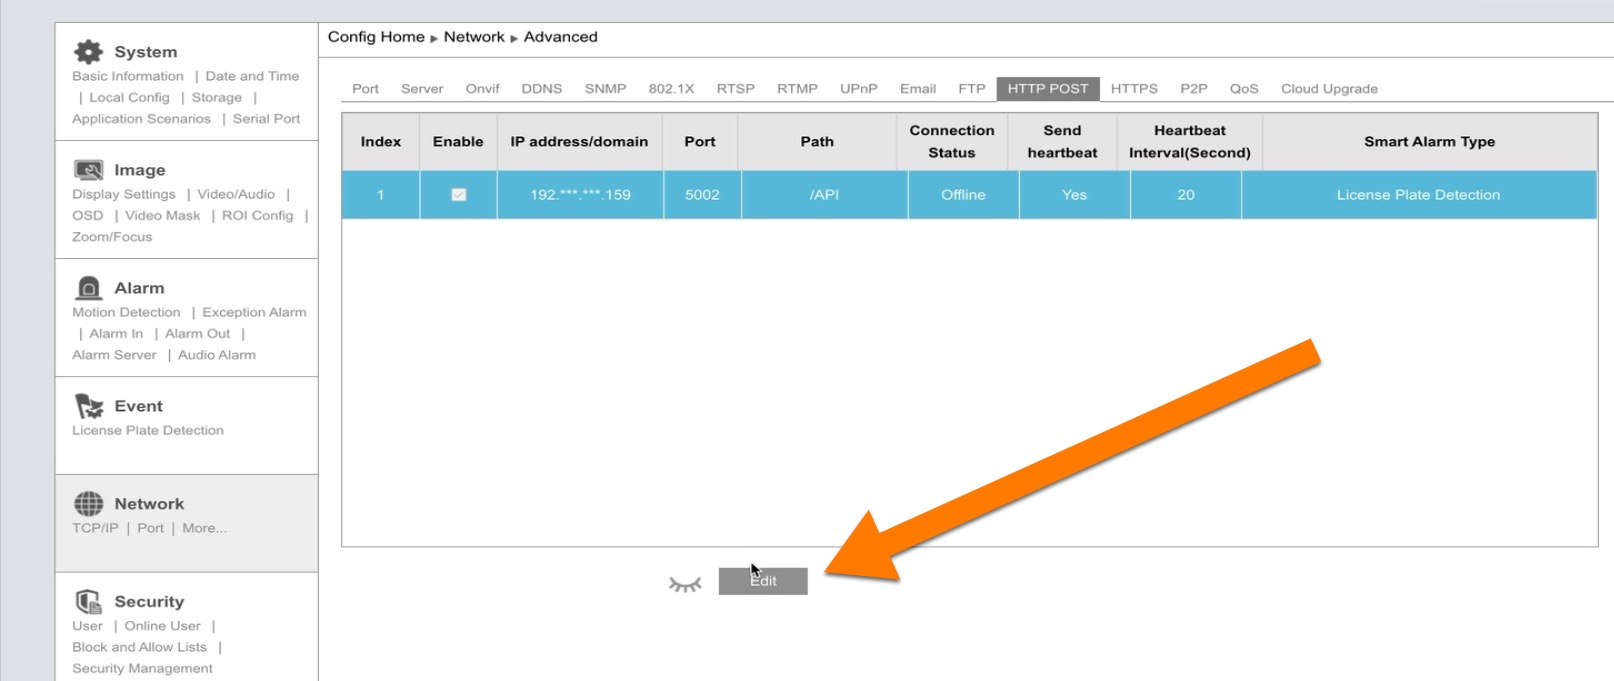
The HTTP POST screen shows a table of configured server destinations. Click the Edit button to modify the configuration.
Click Add to create a new server entry. Fill in your API server details:
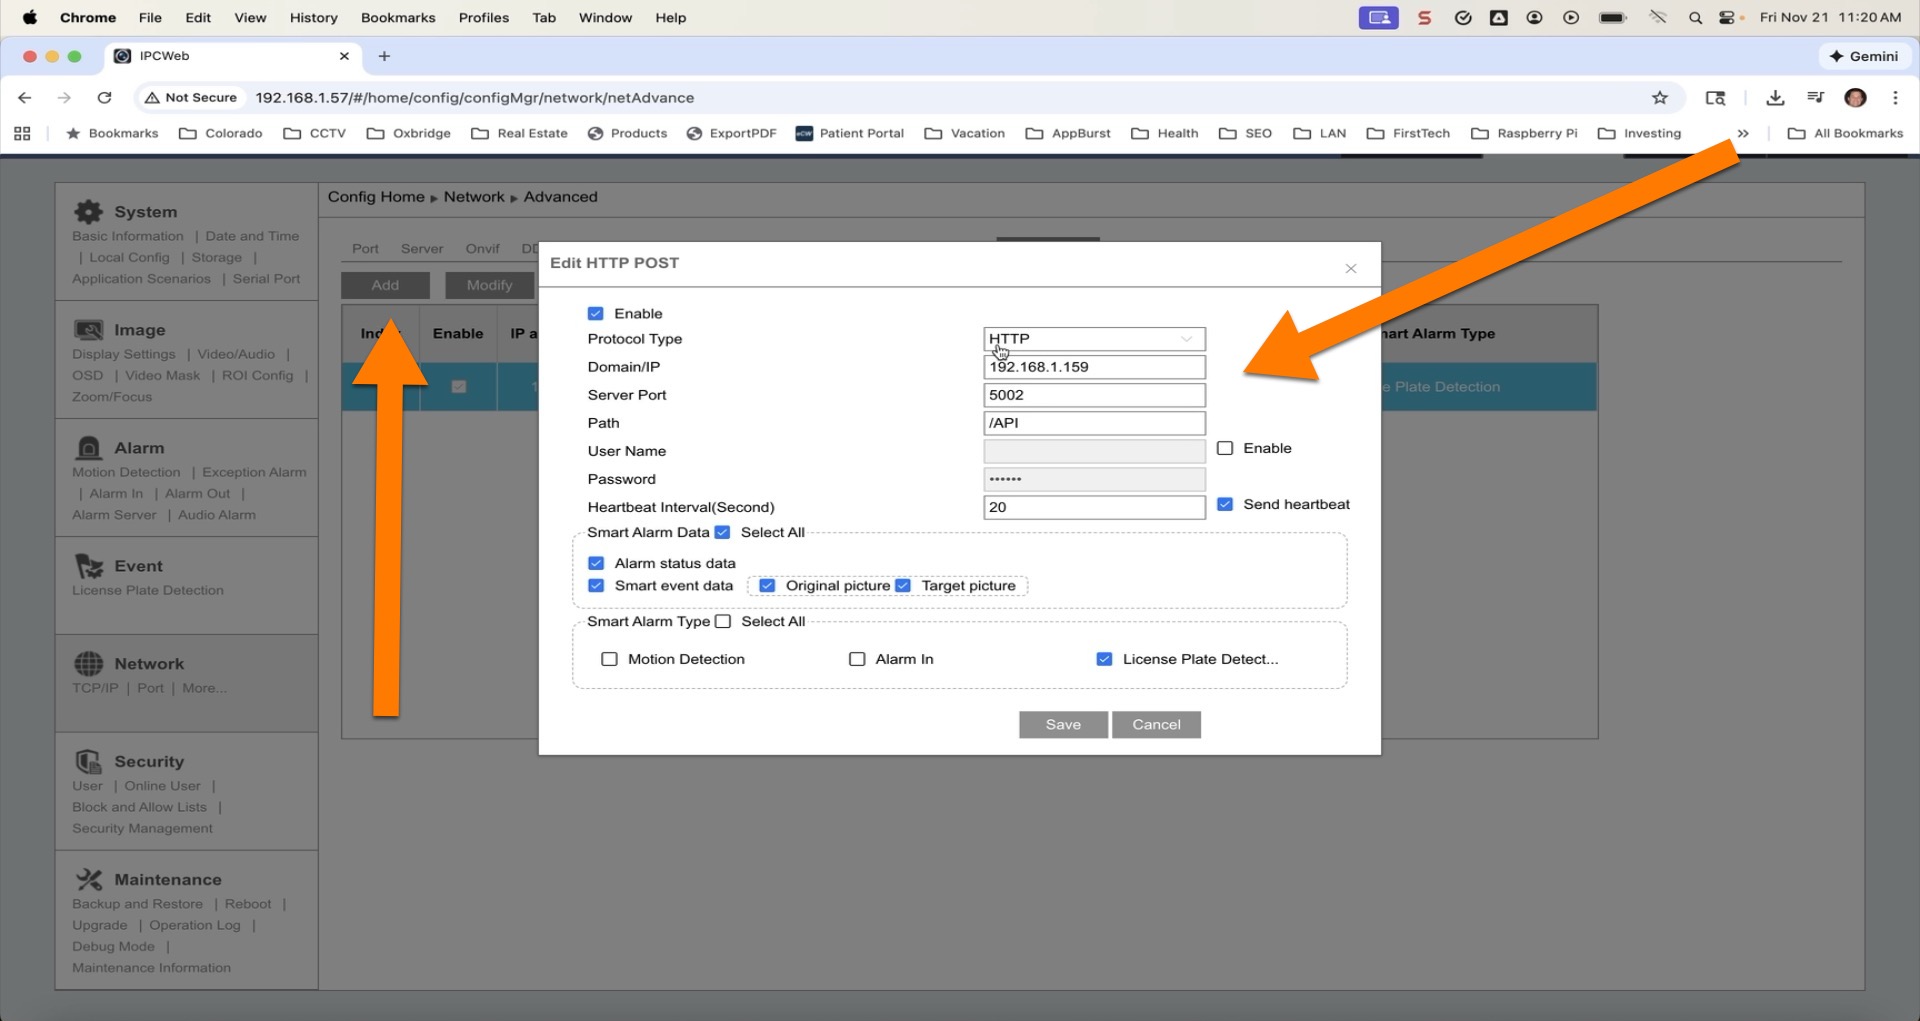
Configure the following settings:
| Setting | Description | Example |
|---|---|---|
| Enable | Check to activate HTTP POST | Checked |
| Protocol Type | http or https | http |
| Domain/IP | IP address of your API server | 192.168.0.53 |
| Server Port | Port your server listens on | 5002 |
| Path | URL path for the webhook endpoint | /API |
| User Name / Password | Optional authentication for your server | Leave unchecked unless your server requires it |
| Heartbeat Interval | Seconds between keepalive messages | 90 |
| Send heartbeat | Check to receive periodic keepalive POSTs | Checked |
Step 4: Select Smart Alarm Data
Choose what data to include with each event:
| Option | What It Sends | When to Use |
|---|---|---|
| Alarm status data | Alarm on/off state changes (~660 bytes) | When you need to know when detection starts and stops |
| Smart track data | Continuous real-time target tracking (~1.7 KB at ~7/sec) | When you need live bounding box coordinates for tracking targets across the frame |
| Smart event data | Detection event with coordinates (~2-3 KB) | When you need detection events with classification data |
| Original picture | Full-frame JPEG snapshot (~418 KB) | When you want an overview image of the scene |
| Target picture | Cropped target JPEG (~92 KB) | When you want a close-up of the detected person, vehicle, or plate |
For most applications, enable Smart event data + Original picture + Target picture to receive complete detection events with images. Add Smart track data if you need continuous real-time object tracking (e.g., for PTZ auto-follow or trajectory analysis).
Step 5: Select Smart Alarm Types
Check which AI detection types should trigger HTTP POST events:
| Alarm Type | Detection |
|---|---|
| Region Intrusion | Person or vehicle enters a defined zone |
| Line Crossing | Person or vehicle crosses a virtual tripwire |
| Region Entrance | Target enters a zone |
| Region Exiting | Target exits a zone |
| Target Counting by Line | Count targets crossing a line |
| Target Counting by Area | Count targets in a zone |
| Motion Detection | Any motion (not AI-filtered) |
| Video Metadata | Full-frame object detection data |
| Loitering Detection | Person stays in a zone too long |
| Illegal Parking Detection | Vehicle parked in a restricted zone |
AI detection rules (intrusion zones, tripwires, etc.) must be configured separately in the camera's Event settings before the camera will generate these alarm types. Enabling them here only controls whether events are forwarded via HTTP POST.
Step 6: Save
Click Save to apply the configuration. The camera will begin sending HTTP POST events to your server immediately when detections occur.
NVR Setup
Step 1: Access the NVR Web Interface
Open a web browser and navigate to your NVR's IP address. Log in with administrator credentials.
Step 2: Navigate to HTTP POST Settings
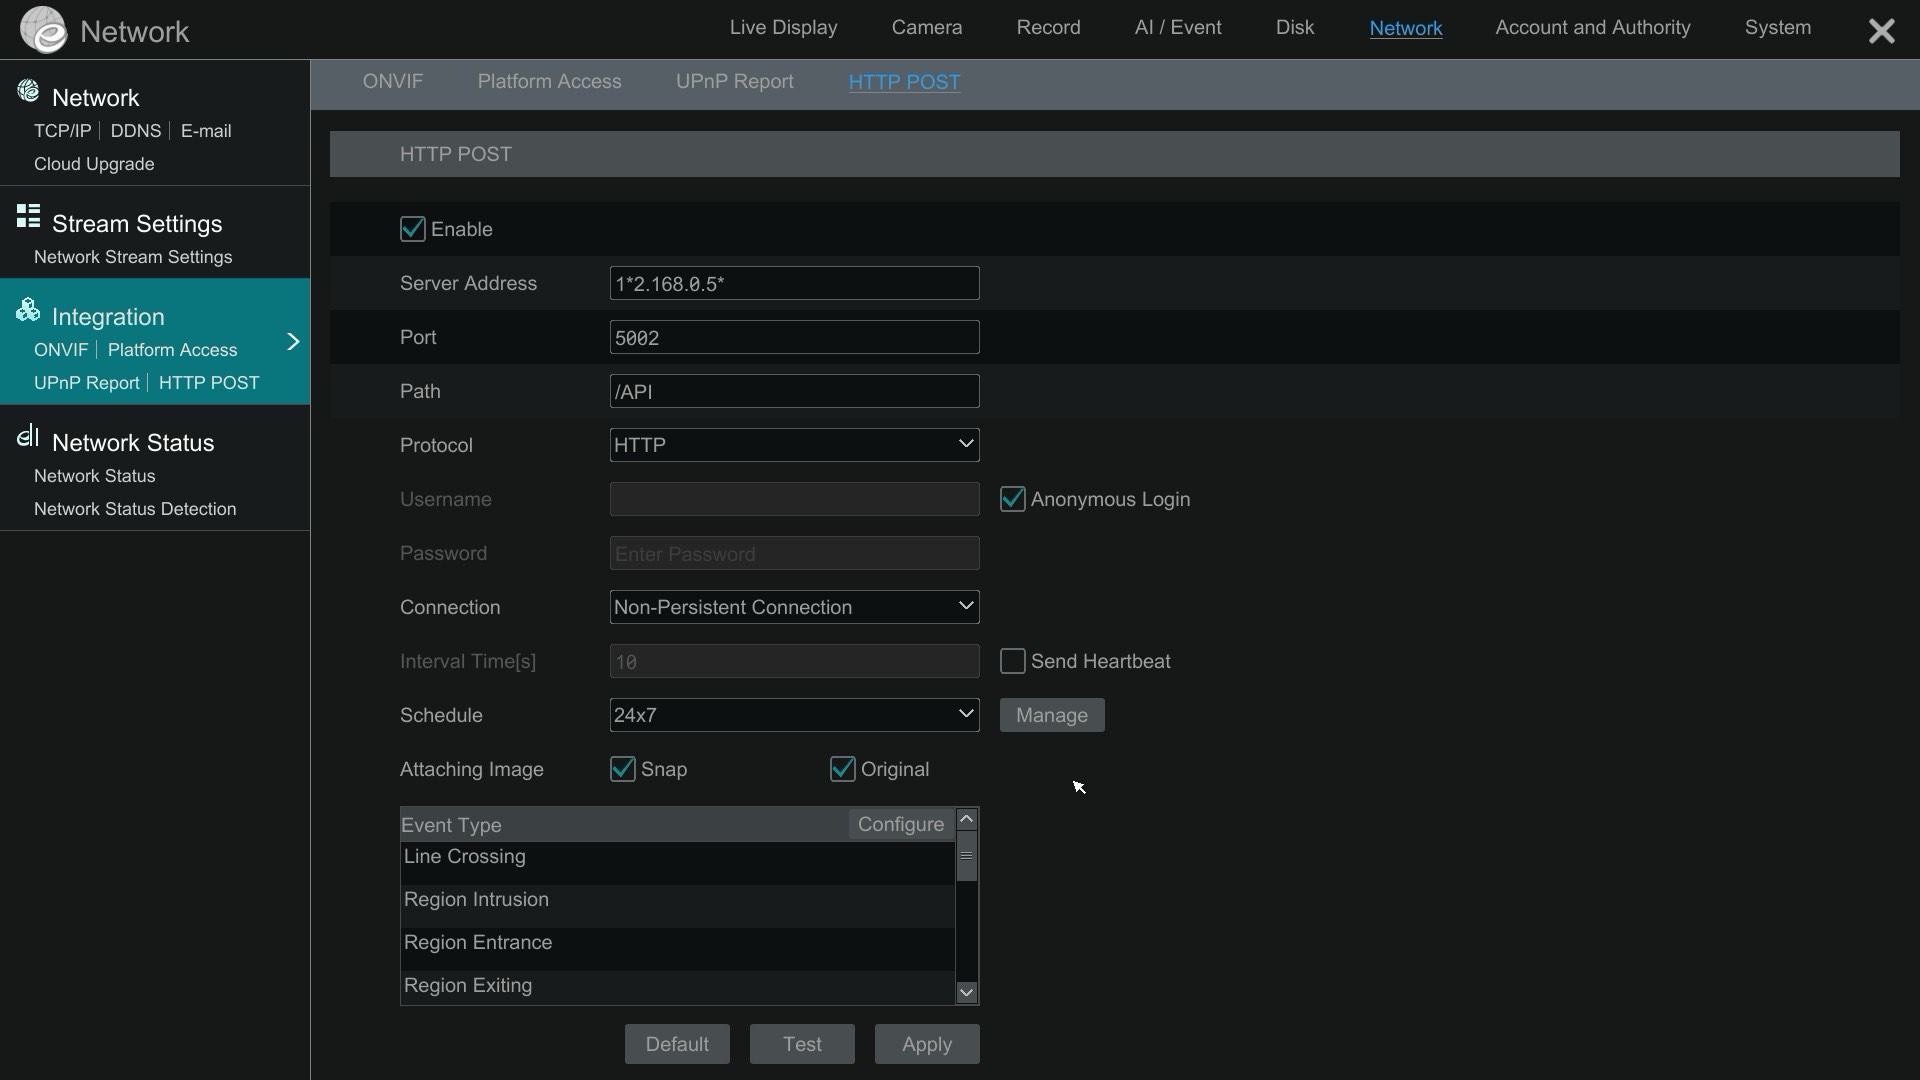
Navigate to Network in the top menu bar, then click HTTP POST in the submenu. In the left sidebar, you'll find it under Integration > HTTP POST.
Step 3: Enable and Configure
Check Enable to activate HTTP POST, then enter your server details:
| Setting | Description | Example |
|---|---|---|
| Server Address | IP address of your API server | 192.168.0.53 |
| Port | Port your server listens on | 5002 |
| Path | URL path for the webhook endpoint | /API |
| Protocol | HTTP or HTTPS | HTTP |
| Connection | Non-Persistent Connection or Persistent Connection | Non-Persistent Connection |
| Anonymous Login | Check if your server doesn't require authentication | Checked |
| Interval Time(s) | Heartbeat interval in seconds | 10 |
| Schedule | When to send events (24x7 or custom schedule) | 24x7 |
Step 4: Configure Image Options
Under Attaching Image, choose what images to include with forwarded events:
| Option | What's Sent | Typical Size |
|---|---|---|
| Snap + Original | Cropped target + full scene overview | ~524 KB per event |
| Original only | Full scene overview | ~418 KB |
| Snap only | Cropped target (person/vehicle/plate) | ~92 KB |
| Neither | Event data only, no images | ~1 KB |
Step 5: Select Event Types
Click the Configure button next to Event Type to open the event selection dialog:
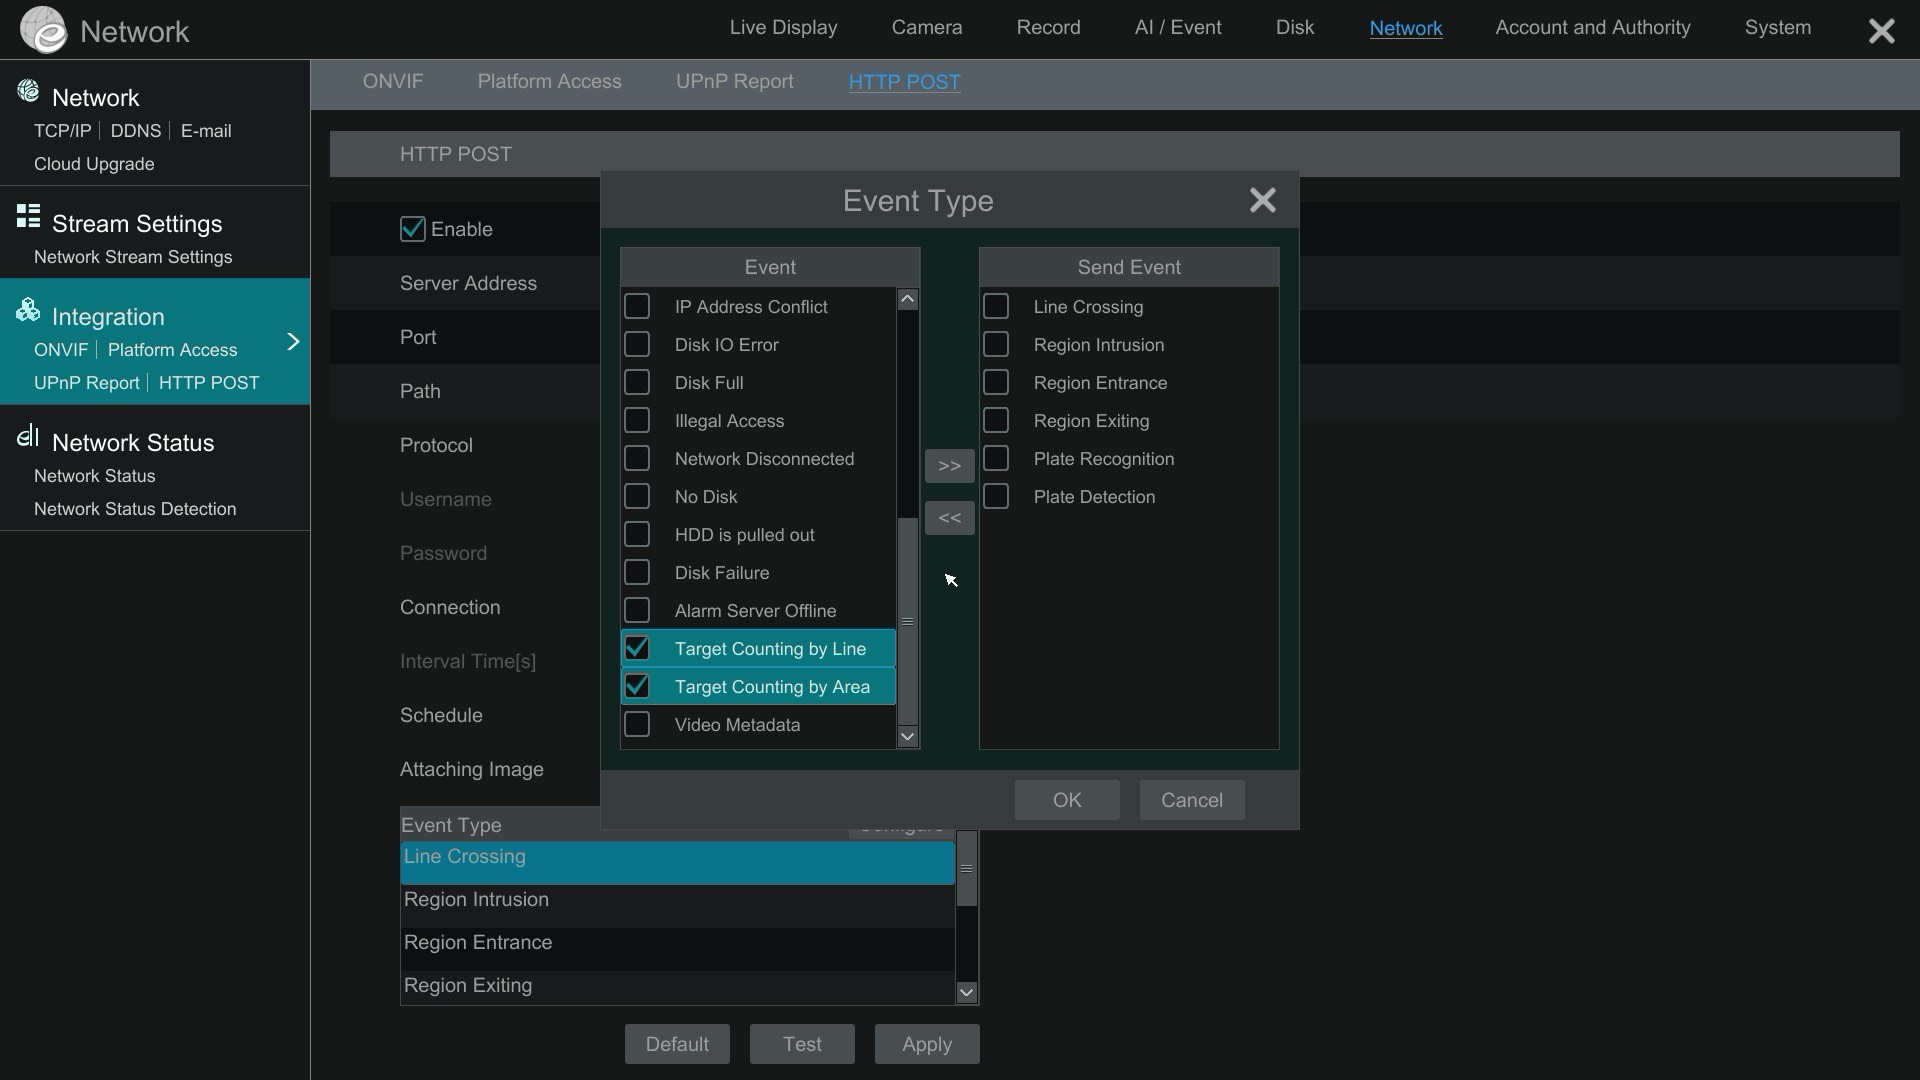
The left Event column shows all available event types. The right Send Event column shows which events will be forwarded via HTTP POST.
- Select event types from the left list (e.g., Line Crossing, Region Intrusion, Plate Recognition)
- Click the >> button to move them to the Send Event column
- Click OK
- Click Apply on the HTTP POST screen
Step 6: Test the Connection
If your server is running, click the Test button to verify the NVR can reach your server. A successful test confirms network connectivity between the NVR and your application.
Verify Events Are Arriving
The quickest way to verify your setup is to run the Python alarm server from the GitHub repository:
git clone https://github.com/mikehaldas/IP-Camera-API.git
cd IP-Camera-API
pip install xmltodict
python alarm-server.py
Then trigger a detection event (walk in front of a camera with an intrusion zone configured). You should see event data printed to the console within seconds.
Troubleshooting
| Problem | Check |
|---|---|
| No events received | Is your server listening on the correct port? Can the camera/NVR reach your server's IP? |
| Events arrive but no images | Check image/picture options in the HTTP POST configuration |
| Intermittent events | Check the heartbeat interval — if your server doesn't respond to keepalives, the connection drops |
| Events from camera but not NVR (or vice versa) | Camera direct and NVR forwarded are independent configurations — set up both if you want both |
| AI alarm types not firing | AI detection rules (intrusion zones, tripwires) must be enabled in the camera's Event settings separately |
Next Steps
- Webhook Event Notification API — XML format reference, detection types, and code examples for processing events
- Authentication — how API request authentication works
- Supported Products — which cameras and NVRs support HTTP POST