Home Assistant Security Camera Integration
Viewtron AI security cameras integrate with Home Assistant via MQTT auto-discovery. The camera runs all AI processing on-device — license plate recognition, human detection, vehicle detection, and face detection — then sends events to a lightweight bridge that publishes them as native Home Assistant sensors. No Frigate, no Coral TPU, no cloud API, no subscription.
Viewtron IP Camera → HTTP POST (XML) → Viewtron Bridge → MQTT → Home Assistant
The bridge is built on the Viewtron Python SDK and handles both IPC (v1.x) and NVR (v2.0) event formats automatically.
What Home Assistant Receives
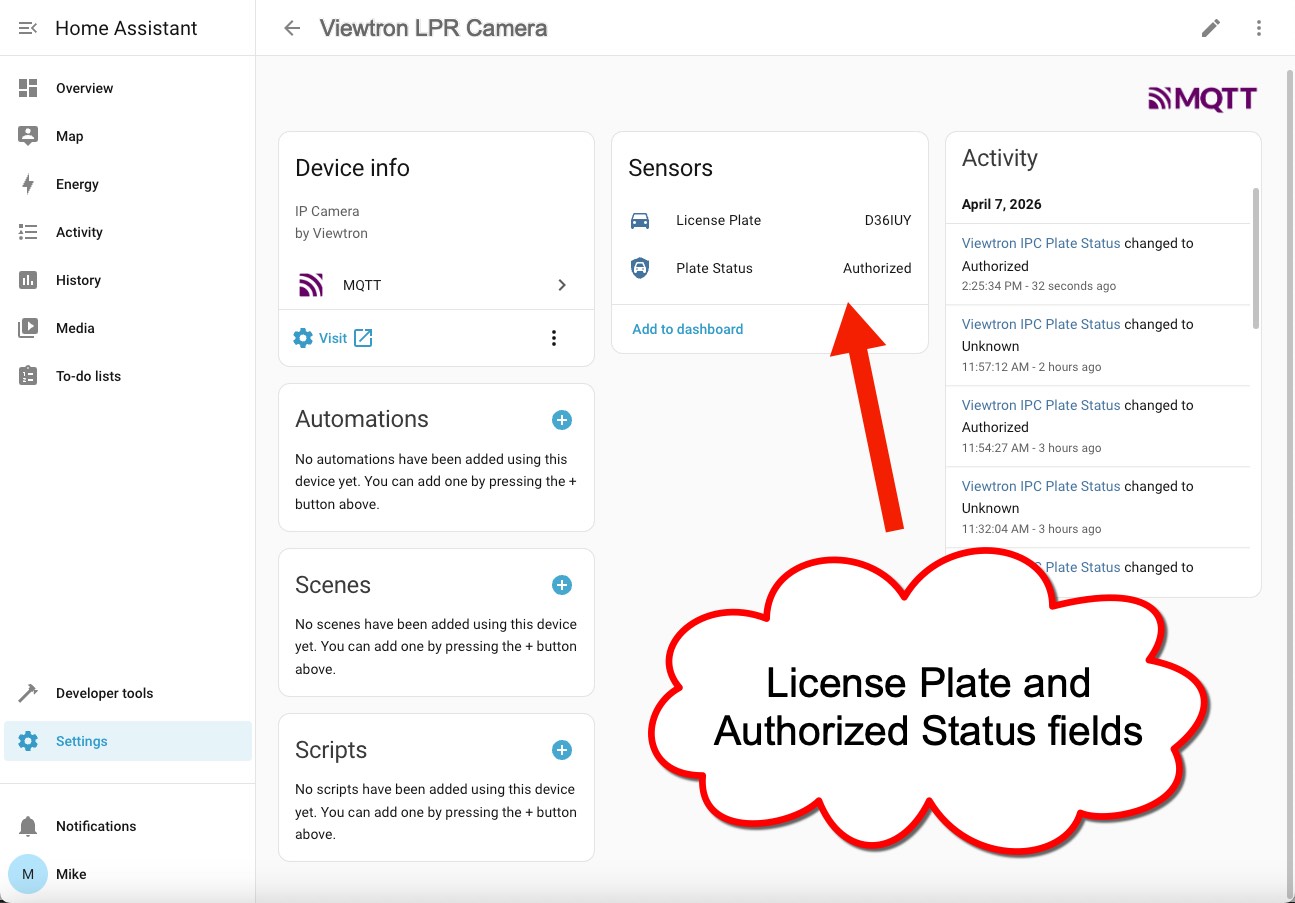
When a license plate is detected, four entities appear on the Viewtron device in Home Assistant:
| Entity | Entity ID | What It Shows | Example |
|---|---|---|---|
| License Plate | sensor.viewtron_<camera>_license_plate | The plate number that was read | ABC1234 |
| Status | sensor.viewtron_<camera>_status | The plate's group in the camera's or NVR's plate database | whiteList |
| Overview | image.viewtron_<camera>_overview | Full scene image at the time of the plate read | JPEG image |
| Plate | image.viewtron_<camera>_plate | Cropped close-up of the license plate | JPEG image |
How Entity IDs Are Named
Home Assistant builds each entity ID from the device name. The bridge names the device "Viewtron" plus the camera name, or uses the camera name as-is if it already starts with "Viewtron". If the event does not include a camera name, the device is named "Viewtron" plus the camera's IP address. For example:
| Camera | Device name in HA | Entity IDs |
|---|---|---|
Named Viewtron IPC | Viewtron IPC | sensor.viewtron_ipc_license_plate, sensor.viewtron_ipc_status |
Named Driveway | Viewtron Driveway | sensor.viewtron_driveway_license_plate, sensor.viewtron_driveway_status |
No name, IP 192.168.0.50 | Viewtron 192.168.0.50 | sensor.viewtron_192_168_0_50_license_plate, sensor.viewtron_192_168_0_50_status |
The examples on this page use viewtron_ipc. Check Settings > Devices & Services > MQTT for the exact entity IDs on your system.
Plate Status Values
The Status sensor shows the plate group exactly as the camera or NVR reports it. Values are case-sensitive, so whiteList in an automation will not match Whitelist or whitelist.
IP camera (IPC direct):
| Status | Camera UI label | Meaning |
|---|---|---|
whiteList | Allow list | Plate is on the camera's allow list |
blackList | Block list | Plate is on the camera's block list |
temporaryList | Temporary vehicle | Plate is on the temporary list and within its valid date range |
Unknown | (none) | Plate is not in the camera's database, or a listed plate with an expired date range |
NVR: plate groups are user-defined. You create the groups on the NVR and name them whatever you want (for example "Residents" or "Delivery"). The Status sensor shows the group name the plate belongs to, or Unknown if the plate is not in any group. Use your own group names, spelled exactly as on the NVR, in your automations.
Date range validation applies to all list types — not just temporary plates. An allow list or block list plate with an expired end date will also come through as Unknown. The camera validates dates internally and simply omits the vehicleListType field when a plate is outside its valid range.
Supported Detection Types
| Detection | HA Entity | Status |
|---|---|---|
| License Plate Recognition (LPR) | sensor.viewtron_<camera>_license_plate + sensor.viewtron_<camera>_status, plus image.viewtron_<camera>_overview and image.viewtron_<camera>_plate | Tested and supported |
| Human / Vehicle Detection | binary_sensor.viewtron_<camera>_intrusion | Coming soon |
| Face Detection | binary_sensor.viewtron_<camera>_face_detected | Coming soon |
| Object Counting | sensor.viewtron_<camera>_object_count | Coming soon |
| Object Detection (video metadata) | binary_sensor.viewtron_<camera>_object_detected | Coming soon |
All detection types use the same bridge architecture. Entities auto-discover via MQTT — no manual YAML configuration in Home Assistant.
How the other entities behave (bridge 1.1.0 and later):
- Binary sensors (Intrusion, Face Detected, Object Detected) turn on with each event and back off 30 seconds after the last one. Change this with
off_delayinconfig.yaml. The event details, includingtarget_type(person,car,motor), are attributes. - Object Count is a number: how many objects the camera has counted since the bridge started, with a per-type breakdown in the
count_by_typeattribute. It usesstate_class: total_increasing, so Home Assistant statistics and utility meters treat a bridge restart as a reset. Use a utility meter for daily or hourly counts. - Images: events with pictures create their own image entities:
image.viewtron_<camera>_intrusion_overview/_intrusion_target,_face_overview/_face_target,_counting_overview/_counting_targetand_object_overview/_object_target. They are separate from the LPR Overview and Plate images, so a person or counting crop never replaces the last plate.
What You Can Automate
- Gate and garage access — open gates and garage doors when an allow list or temporary plate is recognized
- Unknown vehicle alerts — send a phone notification with the plate number when an unrecognized vehicle arrives
- Person detection lighting — turn on driveway or porch lights when a person is detected at night
- Intrusion alarms — trigger sirens or alarm panels when someone enters a restricted zone after hours
- Face-based access control — unlock doors when a recognized face is detected
- Vehicle counting — track how many vehicles enter and exit a parking area throughout the day
- PTZ camera presets — move a PTZ camera to a preset position when an event triggers
Installation
Docker (Recommended)
The Docker install uses the published image, so there is nothing to clone or build. You need Docker and an MQTT broker (see MQTT Broker below if you don't have one).
docker run -d --name viewtron-bridge --restart unless-stopped \
  --network host \
  -e BRIDGE_PORT=5002 \
  -e MQTT_BROKER=localhost \
  ghcr.io/mikehaldas/viewtron-bridge:latest
The container restarts on boot. To update later, pull the new image and recreate the container:
docker pull ghcr.io/mikehaldas/viewtron-bridge:latest
docker rm -f viewtron-bridge
# then run the same docker run command again
To build the image yourself instead, run docker build -t viewtron-bridge https://github.com/mikehaldas/viewtron-home-assistant.git#main:viewtron-bridge and use viewtron-bridge as the image name in the docker run command.
Optional environment variables:
| Variable | Default | Description |
|---|---|---|
BRIDGE_PORT | 5002 | Port the bridge listens on for camera HTTP POST events |
MQTT_BROKER | localhost | MQTT broker hostname or IP |
MQTT_PORT | 1883 | MQTT broker port |
MQTT_USERNAME | (empty) | MQTT username (if broker requires auth) |
MQTT_PASSWORD | (empty) | MQTT password |
SAVE_IMAGES | false | Save event images to disk |
Manual Install
git clone https://github.com/mikehaldas/viewtron-home-assistant.git
cd viewtron-home-assistant
python3 -m venv venv
source venv/bin/activate
pip install -r requirements.txt
cp config.yaml.example config.yaml
# Edit config.yaml with your MQTT broker address
python3 viewtron-bridge/viewtron_bridge.py
Run the bridge from the viewtron-home-assistant folder, where your config.yaml is. To start it again later:
cd viewtron-home-assistant
source venv/bin/activate
python3 viewtron-bridge/viewtron_bridge.py
The bridge prints the config file it loaded on startup. It looks for config.yaml in the current folder first, then in the repo folder. To keep the config somewhere else, pass it explicitly with --config /path/to/config.yaml (or set VIEWTRON_BRIDGE_CONFIG). The viewtron-bridge/config.yaml file is the Home Assistant add-on manifest, not a bridge config, and the bridge skips it.
To start the bridge on boot, create a systemd service. See the full setup guide on GitHub.
MQTT Broker
The bridge requires an MQTT broker. Most Home Assistant users already have Mosquitto running.
Home Assistant OS: Settings > Apps (on Home Assistant versions before 2026.2 this was Settings > Add-ons > Add-on Store) > search "Mosquitto broker" > Install > Start.
Docker / Linux: Run Mosquitto in Docker:
docker run -d --name mosquitto --restart unless-stopped \
  -p 1883:1883 eclipse-mosquitto:2 \
  sh -c 'echo -e "listener 1883\nallow_anonymous true" > /mosquitto/config/mosquitto.conf && exec mosquitto -c /mosquitto/config/mosquitto.conf'
Then add the MQTT integration in Home Assistant: Settings > Devices & Services > Add Integration > MQTT.
Camera Setup
1. Configure AI Detection
Enable the detection type you want on your camera. For LPR cameras, enable License Plate Detection and draw the detection zone. For AI cameras, configure intrusion zones with person/vehicle filters.
See the application guides for detection-specific setup instructions, or the HTTP POST Setup guide for webhook configuration.
2. Point HTTP POST at the Bridge
In the camera's web interface, open Network. The Network landing page lists this feature as HTTP POST. Once opened, the breadcrumb is Network > Advanced, and the tab or edit dialog may be labeled HTTP Notification or HTTP POST, depending on the camera firmware. On an NVR, use Network > HTTP POST (or Integration > HTTP POST in the sidebar).
Then click Edit > Add and configure:
- Push Protocol Version: V1 (required for reliable images in Home Assistant; V2 may send alarm events without pictures)
- Domain/IP: the machine running the Viewtron bridge
- Server Port:
5002(or your configuredBRIDGE_PORT) - Path:
/API - Smart Alarm Data: check Smart event data, Original picture, and Target picture
- Smart Alarm Type: the detection types you want (for LPR, License Plate Detection)
Click Save. No reboot is needed; the camera starts sending as soon as the settings are saved. For the full settings table and screenshots, see the viewtron-home-assistant README or the HTTP POST Setup guide.
3. Verify in Home Assistant
The first time a camera sends an event, a Viewtron device appears automatically in Home Assistant under Settings > Devices & Services > MQTT. No restart required.
Example Automations
Replace viewtron_ipc with your camera's part of the entity ID (see How Entity IDs Are Named).
The plate examples trigger on every plate read, then check the status in a condition. The timestamp attribute on the Status sensor changes with each read, so the trigger fires even when the status stays the same. A plain to: "Unknown" or to: "whiteList" trigger only fires when the status changes, so it would miss the second of two unknown vehicles in a row, or a second allow list car right after the first.
Open garage door for allow list and temporary plates:
- alias: "Open garage for allowed plates"
  trigger:
    - platform: state
      entity_id: sensor.viewtron_ipc_status
      attribute: timestamp
  condition:
    - condition: template
      value_template: "{{ states('sensor.viewtron_ipc_status') in ['whiteList', 'temporaryList'] }}"  # NVR: use your group names
  action:
    - service: cover.open_cover
      target:
        entity_id: cover.garage_door
Send phone notification for unknown vehicles:
- alias: "Alert on unknown vehicle"
  trigger:
    - platform: state
      entity_id: sensor.viewtron_ipc_status
      attribute: timestamp
  condition:
    - condition: state
      entity_id: sensor.viewtron_ipc_status
      state: "Unknown"
  action:
    - service: notify.mobile_app_phone
      data:
        title: "Unknown vehicle detected"
        message: "Plate {{ states('sensor.viewtron_ipc_license_plate') }} detected"
Turn on lights when person detected at night:
- alias: "Driveway lights on person detection"
  trigger:
    - platform: state
      entity_id: binary_sensor.viewtron_ipc_intrusion
      to: "on"
  condition:
    - condition: sun
      after: sunset
  action:
    - service: light.turn_on
      target:
        entity_id: light.driveway
How the Bridge Works
The Viewtron bridge is built on the Viewtron Python SDK (pip install viewtron). The SDK parses the camera's XML events into Python objects, and the bridge translates those into MQTT messages with Home Assistant auto-discovery payloads.
- Camera detects an event (plate read, person, face) and sends an HTTP POST with XML data
- Bridge receives the XML and parses it using the
viewtronSDK — version detection is automatic - Bridge publishes the event to MQTT with HA discovery config
- Home Assistant creates/updates sensors automatically
- Your automations trigger based on sensor state changes
The bridge handles both IPC direct (v1.x) and NVR forwarded (v2.0) event formats. You can connect cameras directly to the bridge, or have an NVR forward events from all connected cameras.
Viewtron vs. ONVIF in Home Assistant
Home Assistant's built-in ONVIF integration provides video streaming and basic motion detection. Viewtron cameras support ONVIF for video streams, but the Viewtron integration goes further:
| Capability | ONVIF | Viewtron Integration |
|---|---|---|
| Live video stream | Yes | Use ONVIF for video |
| Basic motion detection | Yes | Yes |
| License plate recognition | No | Yes — plate number, plate group, plate image |
| Human vs. vehicle classification | No | Yes — AI classifies person, car, motorcycle |
| Face detection | No | Yes — with attributes (age, sex, glasses, mask on NVR) |
| Vehicle attributes | No | Yes — brand, color, type, model (NVR v2.0) |
| Object counting | No | Yes — entrance/exit counts by line or area |
| Plate database management | No | Yes — via Python SDK |
Use both: ONVIF for video streaming in your HA dashboard, and the Viewtron integration for AI detection events and automations.
Managing the Plate Database
The LPR camera maintains an on-camera plate database with allow list, block list, and temporary entries. You can manage plates through:
- Camera web interface — add plates manually or bulk import from CSV
- Viewtron Python SDK — manage plates programmatically:
from viewtron import ViewtronCamera

camera = ViewtronCamera("192.168.0.20", "admin", "password")

# Add a plate (group_id "1", the default, is the allow list)
camera.add_plate("ABC1234")
camera.modify_plate("ABC1234", owner="Mike")

# Query the database
plates = camera.get_plates()

# Remove a plate
camera.delete_plate("ABC1234")
See the LPR Config API reference for the full plate database API.
Compatible Cameras
Any Viewtron IP camera or NVR with HTTP POST support works with this integration. Recommended models:
| Model | Detection Types | Best For |
|---|---|---|
| LPR-IP4 | License plate recognition | Driveways, gates, parking entrances |
| AI security cameras | Human, vehicle, face detection | Perimeter security, access control |
| NVRs | All types (forwarded from cameras) | Multi-camera systems |
All Viewtron products are NDAA compliant.
Resources
- GitHub: viewtron-home-assistant — bridge source code, Docker image, example automations
- Python SDK: viewtron on PyPI —
pip install viewtron - Docker Image:
ghcr.io/mikehaldas/viewtron-bridge:latest
Related Documentation
- Viewtron Python SDK — the SDK that powers this integration
- License Plate Recognition — LPR application guide with webhook format details
- Human Detection — person and vehicle detection events
- Face Detection — face detection and recognition
- Webhook Event Notification — complete webhook setup reference
- HTTP POST Setup — camera webhook configuration
Video Guides & Blog Posts
- LPR Camera API Setup and Demo — video walkthrough of configuring LPR webhooks and viewing live plate reads
- ANPR / LPR Camera System Overview — camera installation, plate capture zones, and system design
- LPR Camera for Home Use — residential driveway and garage setup with the LPR-IP4
- LPR Camera Installation Best Practices — mounting angles, distances, and IR illumination for reliable plate capture
Questions & Development Inquiries
- Email: mike@viewtron.com
- Phone: 561-433-8488
- Forum: NVR Webhook Setup Guide
Mike Haldas is available for questions, consultation, and custom software development for Viewtron API related projects. Email details about your project to mike@viewtron.com.