Network IP Camera Digital IO Alarm Input / Output Setup
I have been wanting to work on a project for sometime now that involves using the digital IO ports (alarm input / output) of a network IP camera. Digtal IO is also referred to as burglar alarm in / alarm out and is one of the most underutilized and coolest functions that some IP cameras offer. This article documents the project that I completed this week using a Zavio F3110 IP camera, a simple push button momentary switch (panic button), and a very low voltage LED (2.6 volt, 28mA).
The goal of the project was to trigger an alarm input on the IP camera using the push button as a panic button and to also trigger an alarm output by turning the LED on/off. In addition, we configured the Zavio camera to also FTP upload a snapshot image to a remote server when the panic button is pressed.
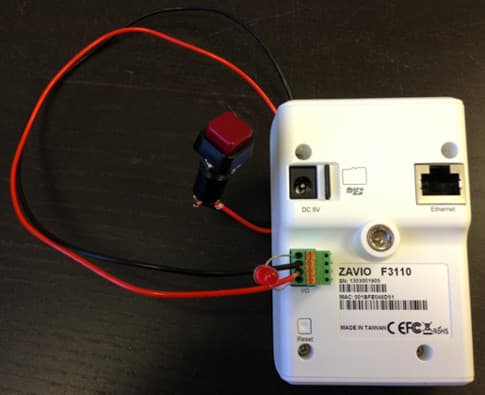
Here is a picture that shows how the input and output ports of the IP camera was wired to the panic button and LED.
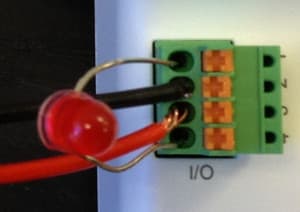
Here is a close up of the terminal block.
Here is an electrical diagram from the cameras product manual.

Please note that I did not have to use a relay relay or diode to test a simple low voltage LED, but to connect electrical devices which require more power that the camera outputs, an external relay would be required.
Digital IO Setup
Here are the settings that I made on the Zavio IP camera. As with any IP camera, I accessed the camera configuration by directly connecting to the camera in a web browser from a computer on the same network as the camera. Please note that this setup will work for all current Zavio camera models that support alarm in/out functions. Also note that the concepts described in this setup will apply to most other IP camera brands, but the setup screens will obviously be different.
After accessing the Zavio camera main menu, I select System > Digital I/O. On the digital IO screen, I set input one to grounded circuit and output one to open circuit.
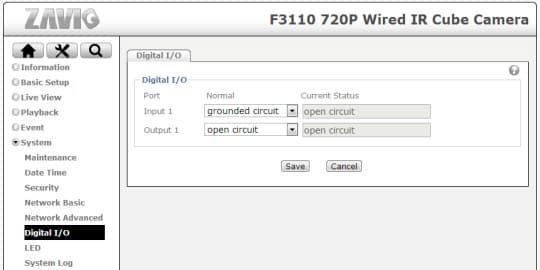
I configured the alarm in / out of the camera to respond in the following way.
- When the panic button is pressed, the circuit that is normally closed (grounded), momentarily opens (power is interrupted) which triggers an alarm
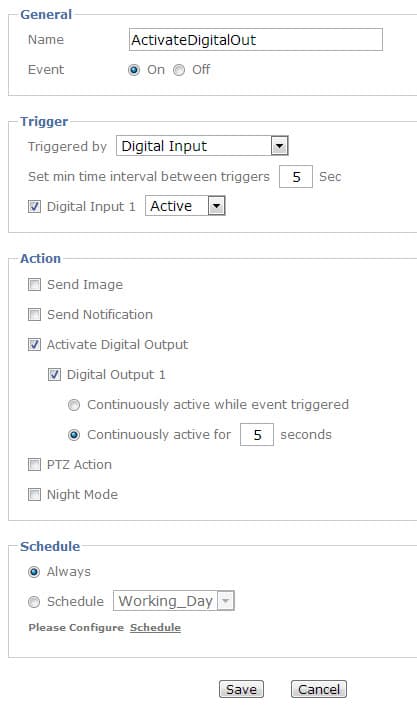
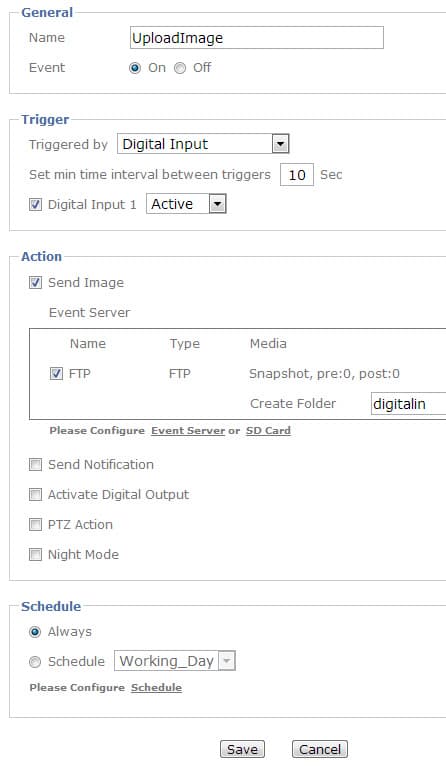
- The alarm will cause the camera to trigger two events: a) The LED connected to the output port will close for 5 seconds (power is enabled). This causes the LED to light up. b) A snapshot will be taken by the camera and FTP uploaded to a remote server.
Alarm Event Action Configuration
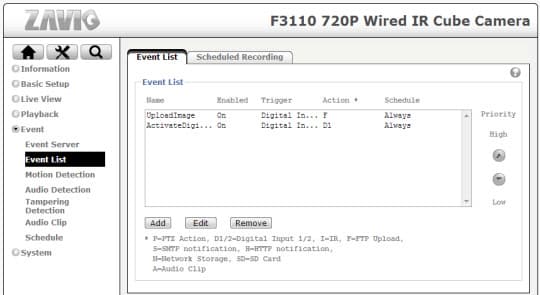
The actions that the camera takes when the alarm input is triggered are configured as follows. From the camera configuration screen I select Event > Event List. This is where the two event actions are configured.
Here is the configuration of the event that triggers the digital alarm output of the camera.
Here is the alarm configuration screen that triggers the camera to FTP upload a snapshot image to a remote server.
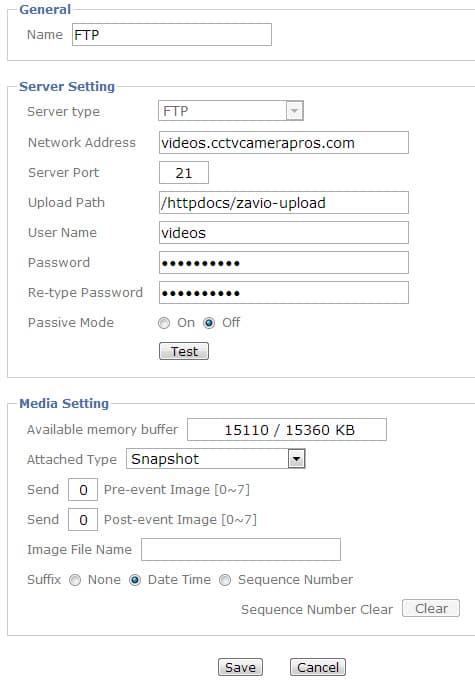
Please note that to configure the image upload to a remote server, there is a second step which is to configure an event server. Actually, the event server must be configured before the event is created. To create an event server, click Event > Event Server. These are the settings that I used for my FTP event server.
Here is one of the snapshots that was taken while we experimented with this project.
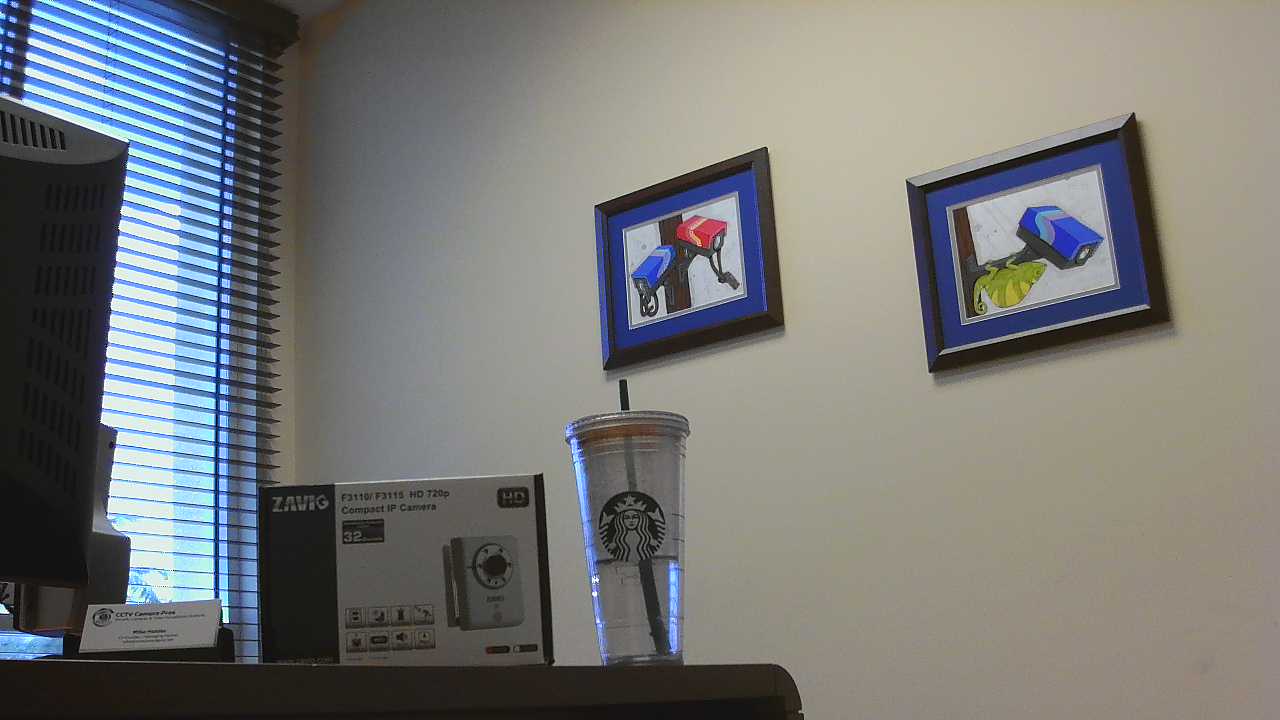
Please click for a full size view of the snapshot.
IP Camera Alarm In / Out Summary
In summary, when the panic button connected to the alarm input of the camera is pressed, an alarm is created which triggers two events. The first events causes the LED connected to the output the camera to light up for 5 seconds. The second event triggers the camera to take a 1280 x 720 snapshot and upload the image to a remote server (off-site).
A Zavio F3110 was used for this project, however the setup will be the same or very similar for the following Zavio cameras and network servers which also support digital IO. These cameras have the same firmware / software interface as the F3110 (screenshots in this article). A full line of bullet, box, dome, and cube style cameras are available with alarm in / out ports. Please visit this page to see all Zavio IP camera models with digital IO.

This is the first of many digital IO projects that I plan to do at CCTV Camera Pros. I will be adding more to this blog as I do them. If you have any questions related to this article or anything related to video surveillance, please contact me at mike@cctvcamerapros.net. You can also connect with me in various ways here.


