
How-to Stream Nintendo Switch on Twitch
Watch this video to learn how to stream Nintendo Switch on Twitch live streaming platform. Streaming video games on Twitch is simple and inexpensive to setup using an HDMI to USB video capture box and OBS studio software. I am using Nintendo Switch games for this demo, but the process is the same for other video game consoles.
Follow below to see the hardware and software setup that I used in the video.
Hardware Setup
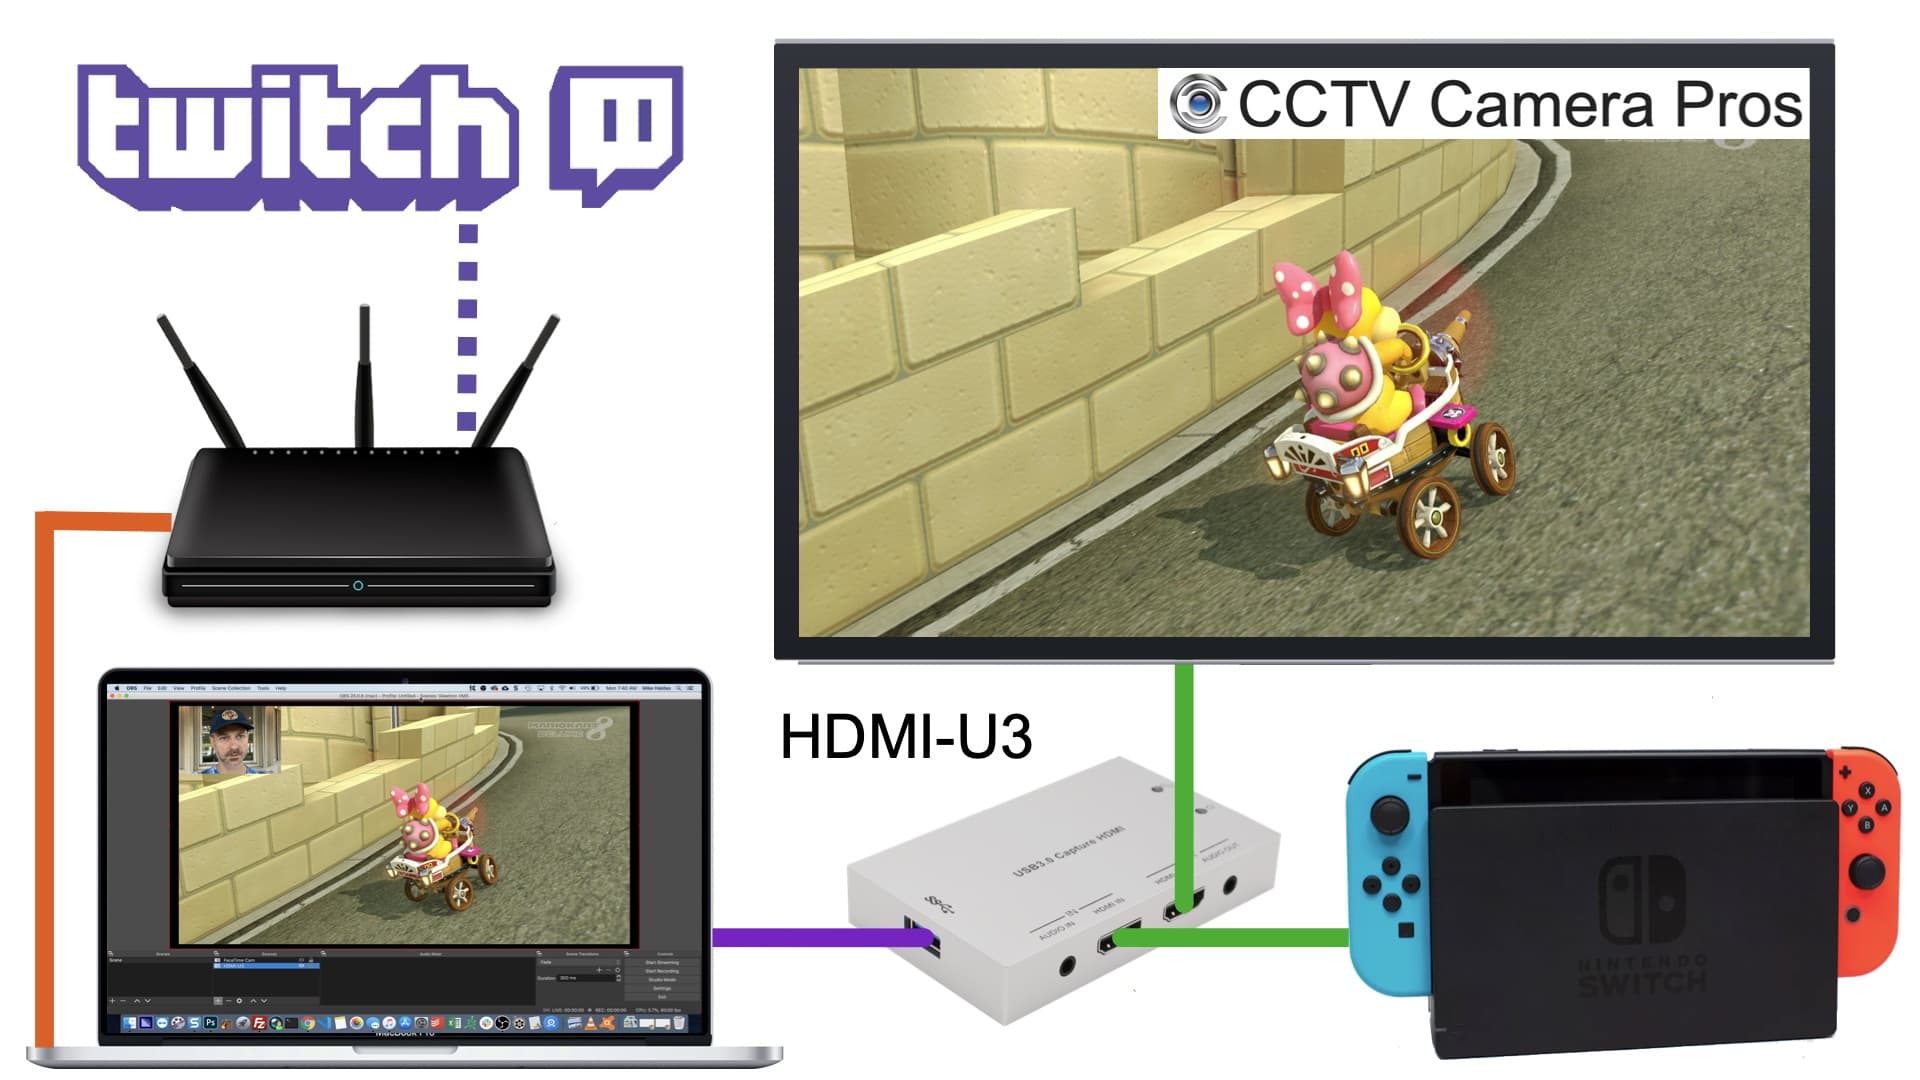
Here is a diagram that shows how all of the hardware is setup. This is how it works.
- This HDMI to USB converter / video capture device (model HDMI-U3) is used to capture the 1080p video output from the Nintendo Switch. The HDMI out port of the Switch’s dock station is connected to the HDMI input of the HDMI-U3.
- The HDMI-U3 also has an HDMI “loop output”. This is connected to a display monitor or TV. This enables video game display on a dedicated monitor while you stream, so you do not need to use the display on the computer that is doing the video capture. The HDMI output is a key feature for video game streamers.
- The USB-3 port of the capture device is connected to one of the HDMI ports on the laptop using the USB cable that is included with the HDMI-U3. Being that my Macbook Pro uses USB Thunderbolt ports, I need to convert the USB-3 to USB-C Thunderbolt on the end that connects to my Mac. Please note that the Thunderbolt converter is not needed if you are using a Windows or Mac PC that uses USB 3.0 ports.
- The Mac PC is running Open Broadcaster software (OBS). OBS can be downloaded here. It is available for Windows, Mac, and Linux for free. The OBS software is what connects to the Twitch streaming service.
- The Mac PC is hard wired to a network router. The router is connected to a high speed Internet connection. I highly recommend using a hard wired Internet connection when you live stream video games. It is much more reliable than WIFI.
Open Broadcaster Studio (OBS) Setup
This is how I configured the OBS Studio streaming software. Before you begin the OBS setup, make sure that the HDMI-U3 is connected to your computer, Nintendo Switch, and the display monitor output (if you are using the HDMI loop out to a monitor).
In the OBS software, we need to add all of the video and audio sources that will be used for streaming into the OBS “Scene”. If you are new to OBS Studio, a Scene is made up of one or more media “Sources”. In this case, we will be adding video and audio sources to capture the live video game play, face shot of the gamer, audio from the game, and audio from the microphone that the gamer is wearing.
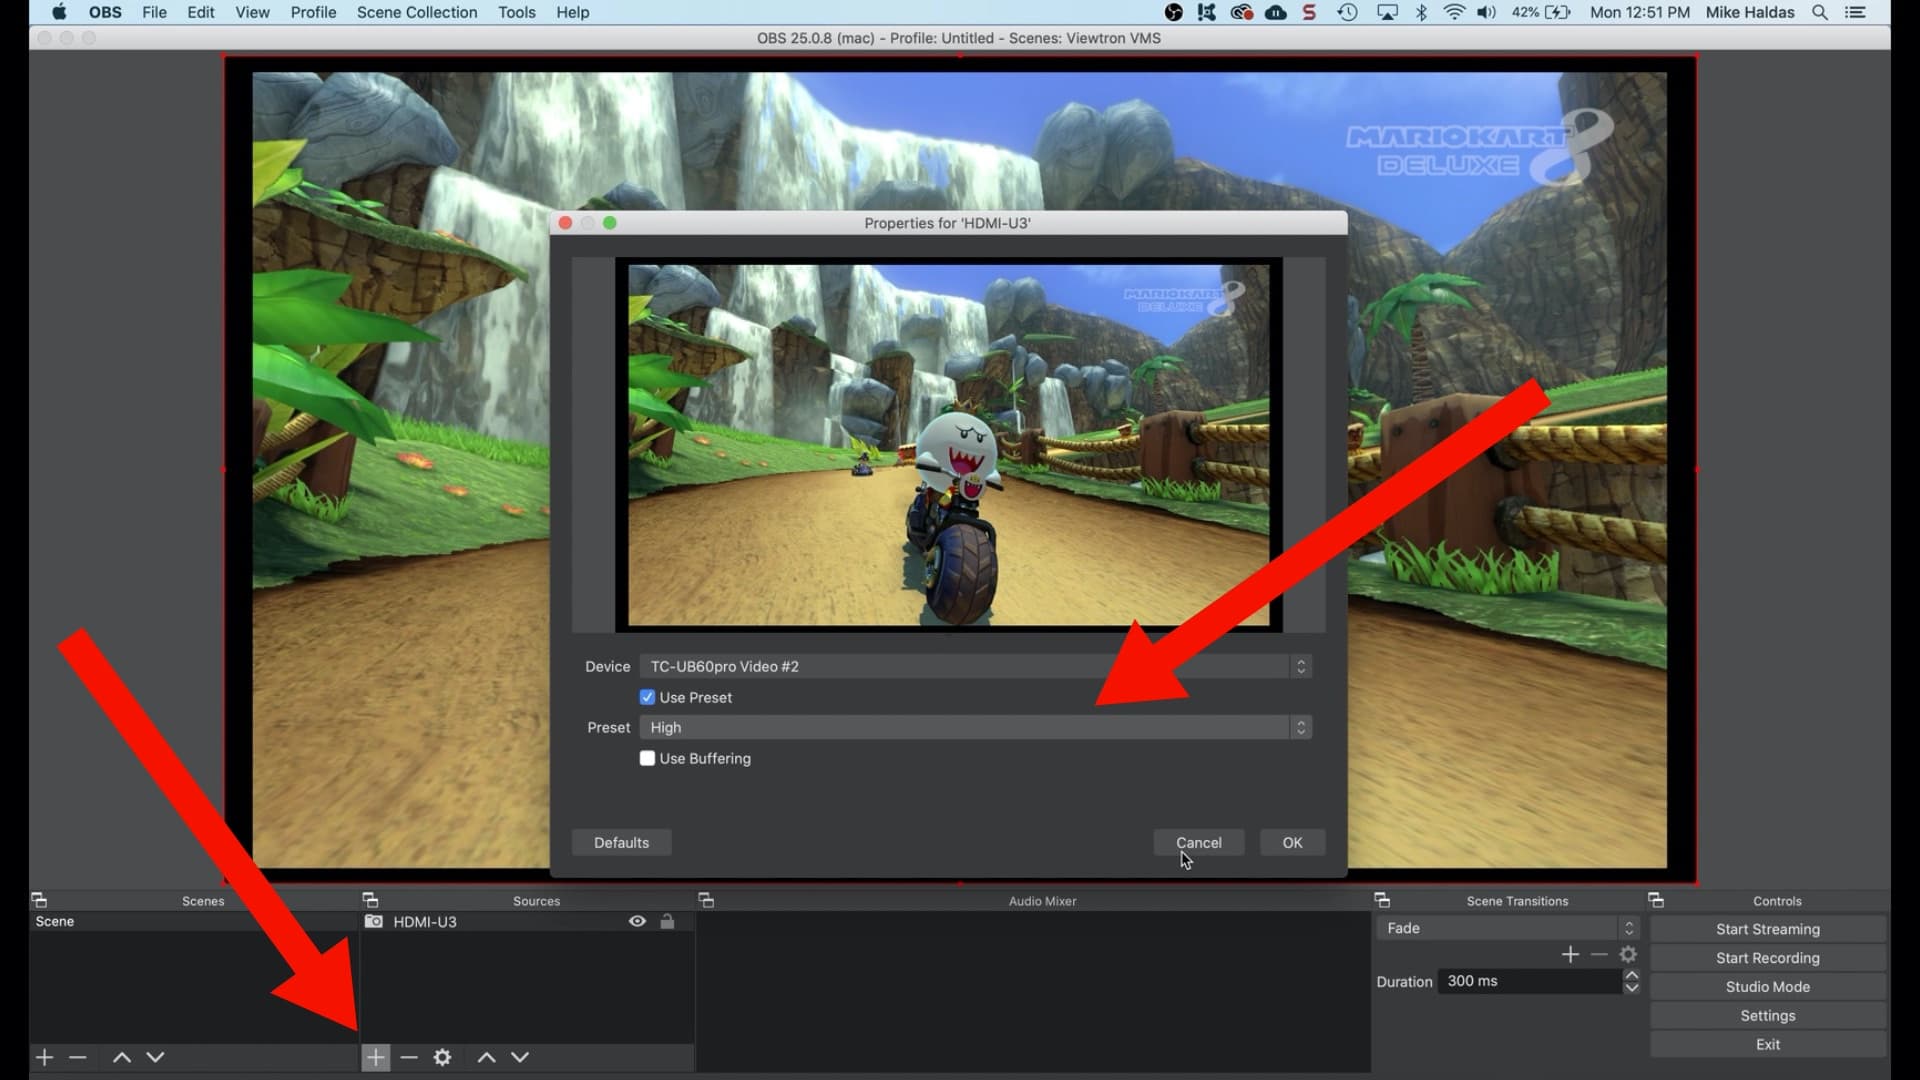
To add the HDMI video capture device to our Scene, click on the plus button in the Sources window (lower left), the select Video Capture Device. Leave the Create New radio box checked and give the source a name. I named mine HDMI-U3. When you press OK, you will see the properties window (small Window in the above screenshot). Select the HDMI-U3 for the device. Please note that our HDMI-U3 is sometimes detected as “TC-UB60pro Video”. Select “High” for the preset resolution. You should begin to see the live video display from your Nintendo Switch. Press OK.
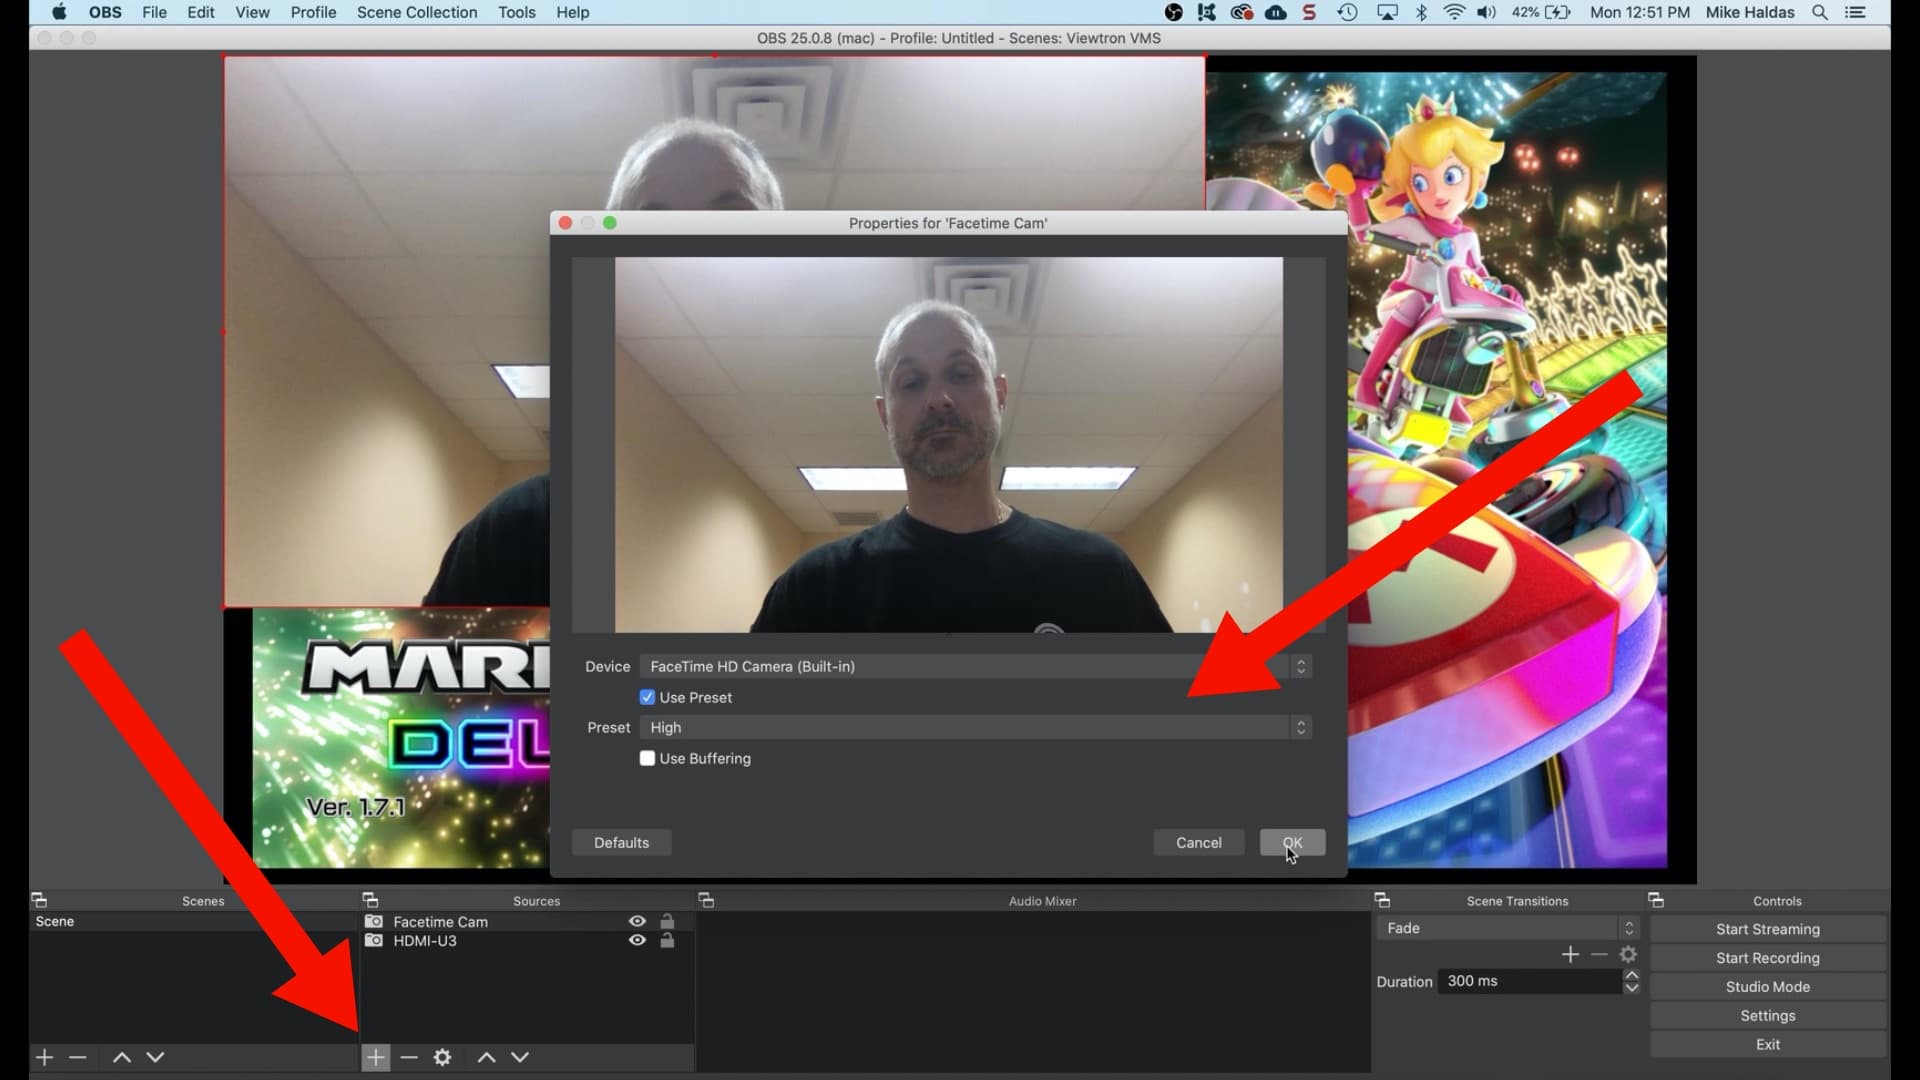
Next, I will follow the same steps to add the FaceTime camera on my Macbook. This is the camera that I will use for the webcam overlay of my face. If you are using a USB web camera, the process is the same to add it into the view.
Press the plus button again in the Sources window and select Video Capture Device again. Give the source a name, then click OK. On the properties screen, select FaceTime HD Camera or select the USB webcam that you are using. Choose the resolution, then press OK.
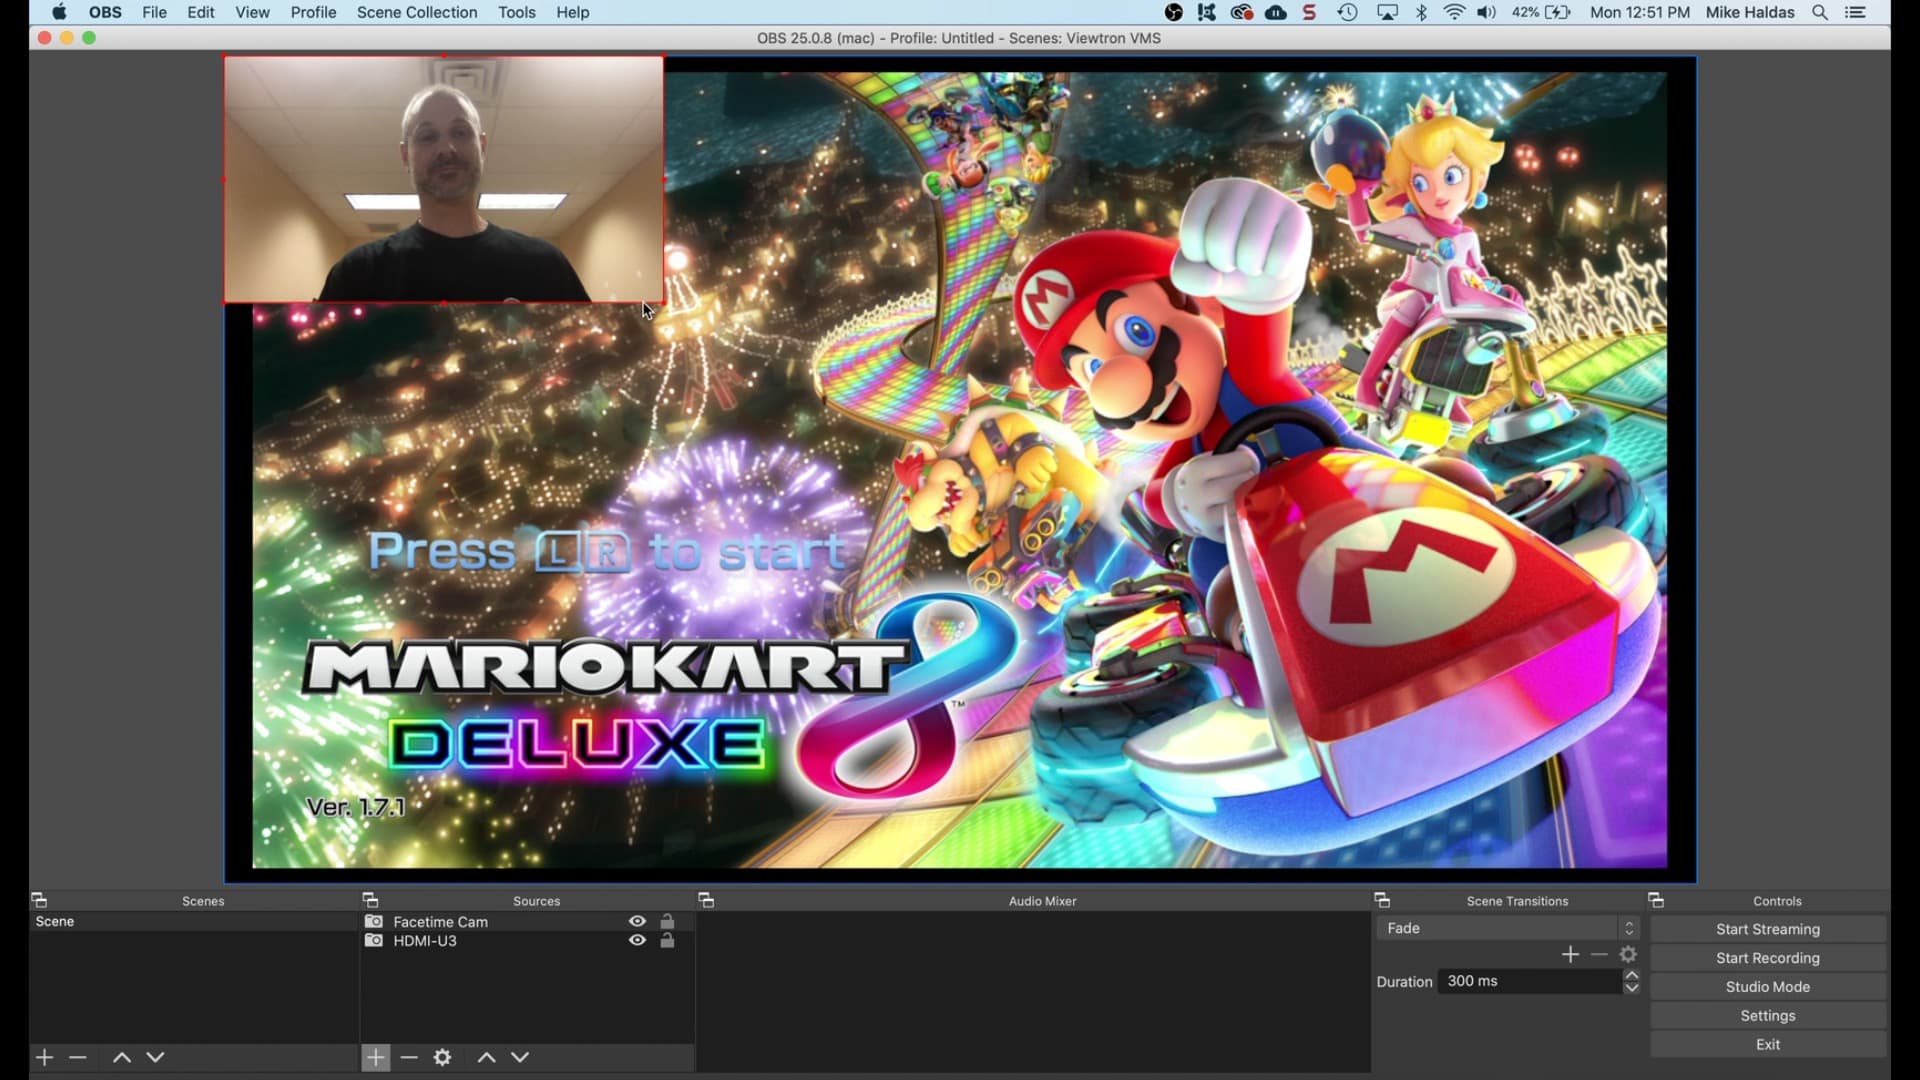
You will see the FaceTime / webcam video on top of your video game source. Drag the webcam overlay to the location where you want it and re-size it.
Setup Audio Input Sources
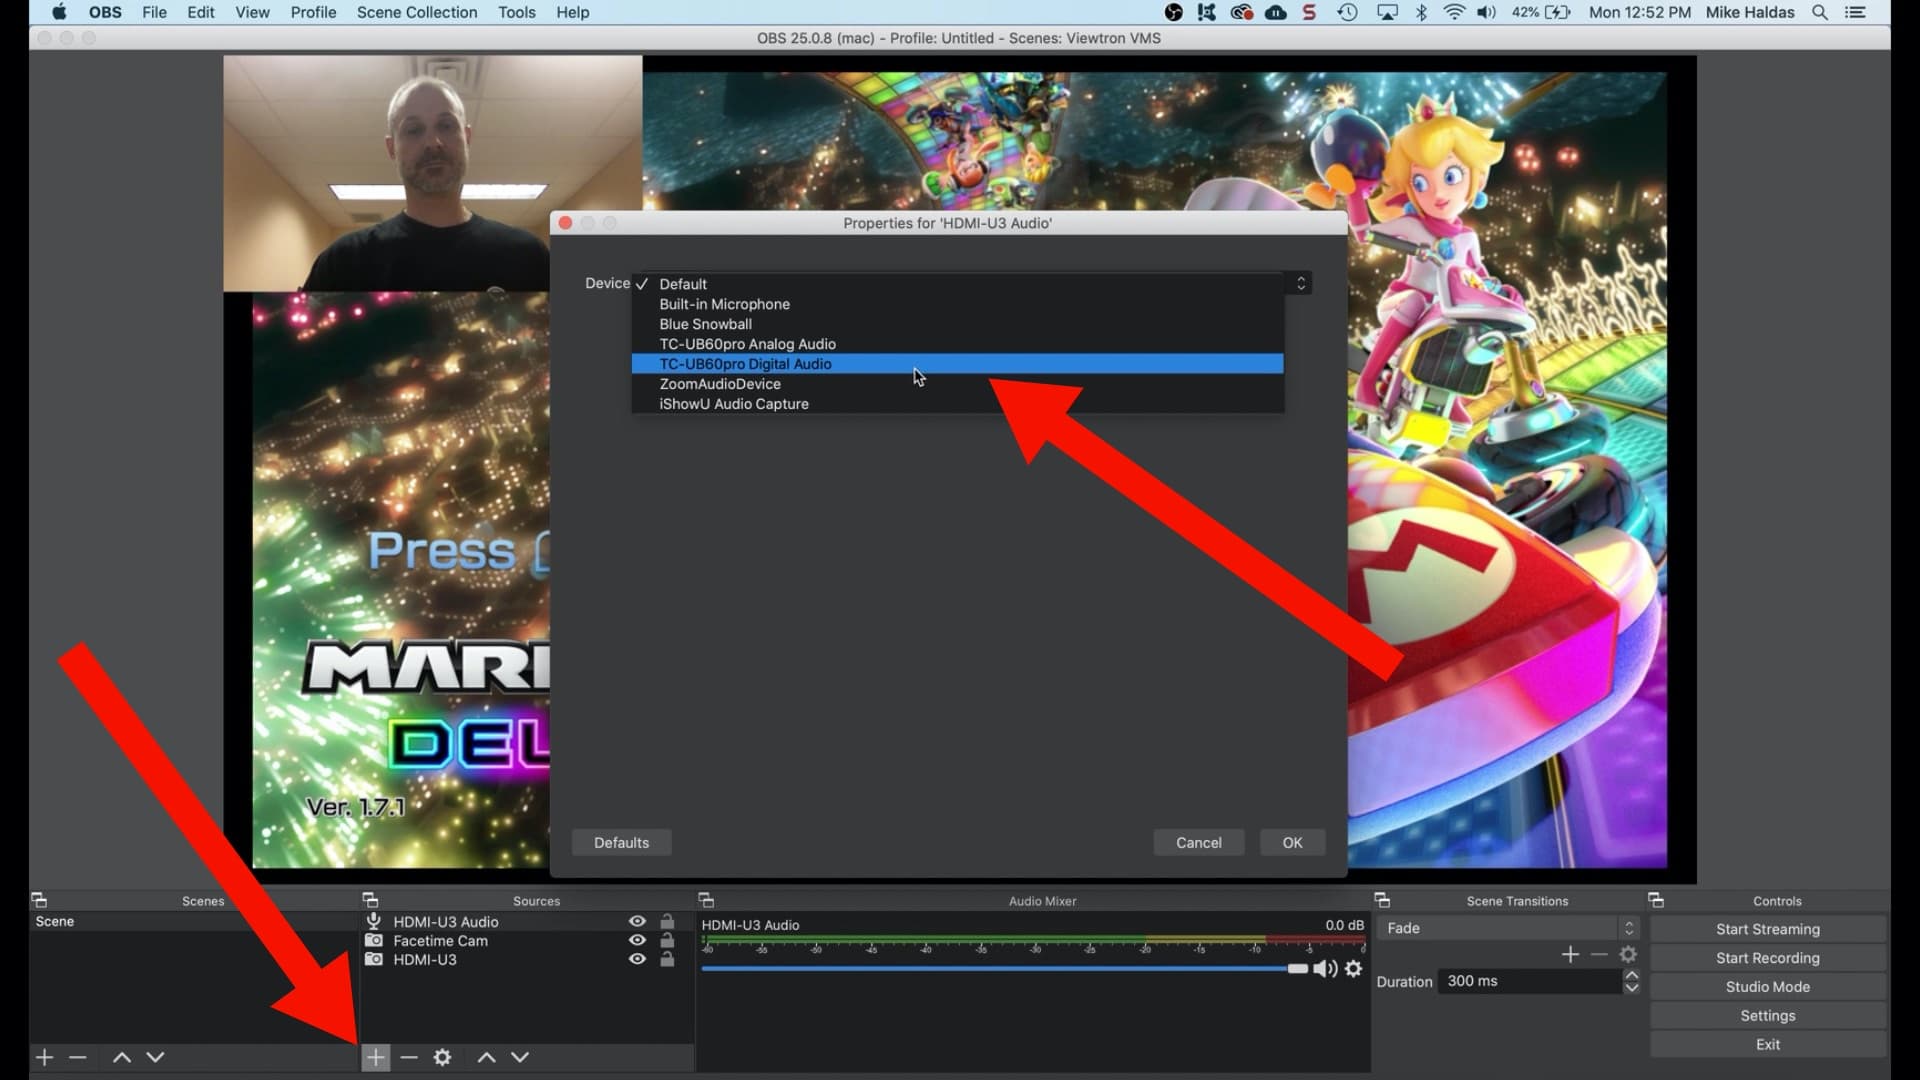
The process to add audio sources to the scene in OBS studio is the same as video. I add two audio sources for my stream. One from the HDMI-U3 to capture the HDMI audio from the video game and the other for the microphone that I wear for the voice over.
Click on the plus button in the Sources window (lower left), but this time select Audio Capture Device. Leave the Create New radio box checked and give the source a name. I named mine HDMI-U3 Audio. When you press OK, you will see the properties window (small window in the above screenshot). Select the HDMI-U3 for the device. Please note that our HDMI-U3 is sometimes detected as “TC-UB60pro Digital Audio”. Make sure you select the “digital audio” source and not analog. Press OK.
Repeat these steps to add whichever microphone that you will use to capture your voice.
Twitch Stream Key
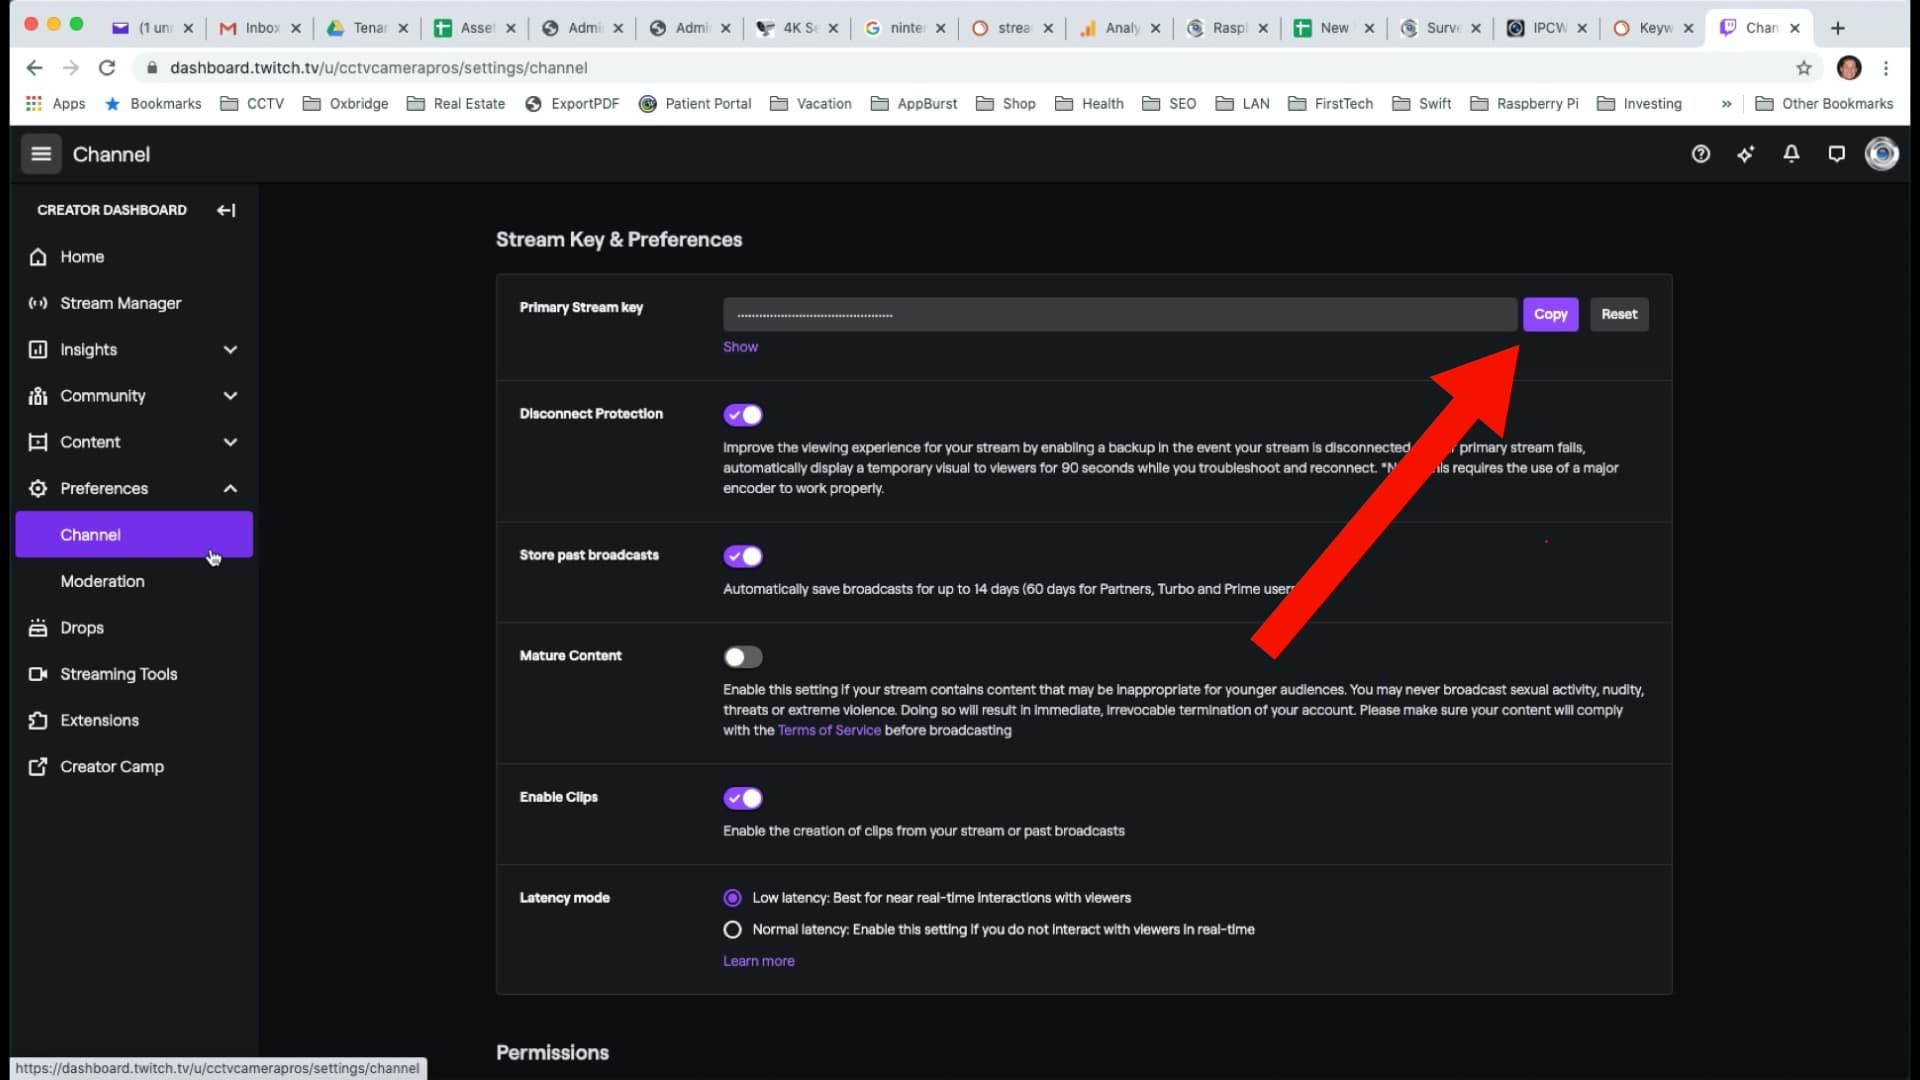
I assume that you already setup a Twitch account. Log in to your account. Select Creator Dashboard. Then select Preferences -> Channel. On the preferences screen, you will see your stream key. Copy it.

In OBS studio, click on the Settings button in the lower right. Then, select Stream. Select Twitch in the service dropdown. Leave the Server set to Auto. Paste your Twitch stream key. Press OK.

When you are ready to start streaming, press the Start Streaming button in the lower right. Your video should be streaming live on Twitch.
HDMI to USB Video Capture Device

The HDMI-U3 is the best value for game streamers. It supports 1080p streaming and the HDMI output is extremely useful for local monitor display while you stream. You can learn more about the HDMI-U3 video capture device that my company supplies here.
Questions / Comments
If you have any questions or comments about how to stream Nintendo Switch or any other video game console, please email me here. You can also use these instruction for streaming on Facebook Gaming and YouTube Live.


