
Send Security Camera Photos from Raspberry Pi via MMS Text Message
This project demonstrates how to setup Raspberry Pi as a security camera system that can take a photo snapshot send the image to mobile phones using MMS text messages. The action is triggered by an GPIO alarm input. I use a magnetic door sensor to trigger the alarm in the Python application that I wrote, but any type of sensor or event can be setup to trigger the Raspberry PI to take the snapshot and send the message. I use a service called Twilio to send the MMS text messages because they have a simple Python SDK for programmers and the service is free to use when in trial mode.
Setup Raspberry Security Camera System
Here are the things that need to be done to setup this project.
- Setup Twilio Account
- Install Apache Web Server
- Install Python Code
- Install Pi Camera & Wire Door Sensor
- Setup Static IP address
- Setup Port Forwarding
- Setup Dynamic DNS (optional)
- Run Code / Get MMS Message
- Run Alarm Code On Boot
Update 11/6/2014: Alternative use of imgur API instead of running a web server on Raspberry Pi
After launching this project, I received some great feedback on Reddit. /u/kurashu89 made a suggestion to use the imgur API instead of hosting the image on an Apache web server instance. Doing this has the following benefits.
- There is no need to setup a web server and use additional memory resources on RPi
- No need for the RPi to have a static LAN IP address
- No need for port forwarding
- No need to worry about DDNS
The one additional step that is required if you would like to use imgur for the snapshots is that you need to setup a imgur account and register a developer application. So, if you decide to use this method, you can skip steps 2, 5, 6, and 7 above and you need to install the alternative imgur source code provided here.
Setup Twilio Account
Twilio makes sending SMS / MMS messages simple by managing the connections with all of the different mobile providers for you. Software developers can use a simple Python API / SDK to request that a message be sent and the Twilio service takes care of the rest. To enable a trial account, Twilio requires two things. 1) You need to verify the phone number that you wish to send messages to and 2) the Twilio service prepends “Sent from a Twilio Trial account†to trial account messages. As far as I can tell, the service is free to use as long as you are sending 250 messages or less per month.
- Signup for a free Twilio account here.
- As part of the signup process, you need to verify a phone number. Use the cell phone number that you want to send messages to.
- After you verify your phone number, Twilio will assign you an account phone number to use that is in the same area code as the number you verified. This is the phone number that will be sending MMS messages on your behalf.
- Click get started, then Go to Your Account.
- When you login to your account, you will see an Account SID and Auth Token field at the top of the screen. Click on the lock icon in front of the Auth Token field to reveal the value. Make note of these two values. You will need them for the Python code shortly.

- Just below these fields you should also see your Twilio phone number. You will need this also when you configure the RPi camera application.
Install Apache Web Server
You are probably wondering why you need to install the Apache web server on your Raspberry Pi for this project. Here is the answer: in order for the Twilio service to send a photo with MMS messages, it needs to get the photo from a URL on the Internet. The Twilio SDK will retrieve the photo taken by your Raspberry Pi camera via a URL served by the Apache web server running on your RPi.
- If you do not already have Apache running on your Raspberry Pi, click here to follow these instructions on the RaspberryPi.org website.
- The default installation of Apache makes /var/www/ the DocumentRoot which means that is where the web server looks for files to serve. My Python application assumes that you are using the default “/var/www” DocumentRoot, but if you are not that is OK, you will just need to modify the APACHE_DOC_ROOT variable in the code.
Install Python Code
Before you install the Python script, you must install the Twilio SDK on your Raspberry Pi. Download the Twilio Python SDK here. There are several ways that you can install it that are documented on that page.
Apache Method
Here is the Apache based Python application that I wrote to create the security camera system. The comments in the code should explain what is going on pretty well. You will only need to modify the CONSTANT variables that are defined at the top part of the app.
You can download the source code here.
Imgur Method
This is the version of the system that uses Imgur instead of Apache (I know, I should merge the two into one code base). I will likely so that later.
You can download the Imgur based source code here.
- Install the pyimgur.py library by running the following command:
sudo pip install pyimgur - Download the source code to your Raspberry Pi. If your RPi is already connected to the Internet, use the following command to get the source code.
wget https://videos.cctvcamerapros.com/downloads/python/mms-alarm.py - Edit the mms-alarm.py application using the editor of your choice on your Raspberry Pi.
- Change these variable values in the code.
- SENSOR: you can leave this value set to 19 if you are going to use GPIO 19, otherwise change as needed.
- DELAY: this is set to zero, but if you want a delay time between the alarm sensor being triggered and the camera taking a picture, change this to the number of seconds of delay that you require.
- ACCOUNT_SID: put the value from your Twilio account here.
- AUTH_TOKEN: put the value from your Twilio account here.
- TO_PHONE: this must be set to the phone number that you want your Raspberry Pi to send the MMS message to. This must be the phone number that you already verified during the Twilio account setup.
- FROM_PHONE: this must be set to the phone number that Twilio assigned to you during the account setup process.
- TXT_MSG: this is the text message that you want to be sent along with the photo that your RPi will take.
- CLIENT_ID: (ONLY for imgur code) this is the imgur Client ID assigned to the app you registered.
- HOSTNAME (not used if using imgur): set this to the public IP address (or the DDNS hostname) of your Raspberry Pi and the port number that you will use for forwarding. This WILL NOT work using a LAN IP address because the Twilio service will be accessing your Raspberry Pi from remotely over the Internet. IP addresses begining with 192. or 10. WILL NOT work. This is explained further in the port forwarding and DDNS sections of this project.
- APACHE_DOC_ROOT (not used if using imgur): if you installed your Apache web server with the default DocumentRoot, you do not need to change this value.
- IMG_DIR (ONLY for imgur code): location where you want the snapshot saved on your RPi.
- IMG: this is the name of the photo that will be saved. There is no need to change this unless you do not want the image to be named snap.jpg. This image will be overwritten each time the alarm is triggered.
- IMG_WIDTH: I have the image size set to 800 x 600 by default. I do not have any need to send a high resolution image over text, but if you do, you can change it here.
- IMG_HEIGHT: see explanation above.
- Save the file after you have changed these values.
Install Camera & Door Sensor
I am not going to document how to install a Raspberry Pi camera in this project because there are plenty of articles and videos available online that can show you how to do that. Just search Google for “install raspberry pi camera” if you have not yet installed yours.
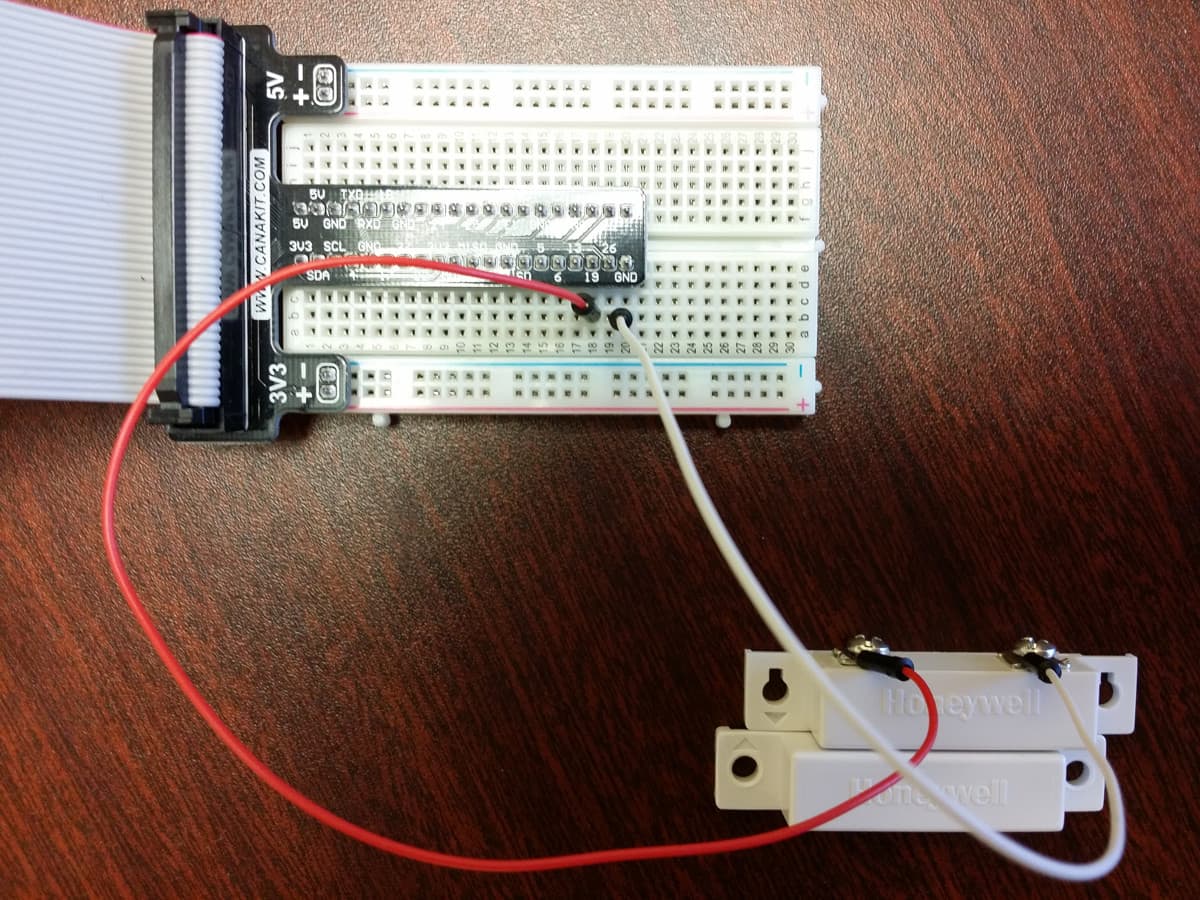
The door sensor wiring is very simple. You can use any magnetic door sensor. I am using a Honeywell. Wire one of the terminals of the sensor to GPIO pin 19 of your Raspberry Pi or any other GPIO of your choice. The mms-alarm.py code that I provide is setup for GPIO 19, so if you use a different pin, make sure you update the SENSOR variable. Wire the other sensor terminal to a ground (GND) port of your Pi. you can see my wiring below. I am using a breadboard which is totally overkill for such a simple project, but I still like using it.
Setup Static LAN IP Address (DHCP Reservation)
If you want to save a lot of time and frustration, you should set a static LAN IP address for your Raspberry Pi. I recommend doing this by reserving an IP address in your router. I find this method to be most reliable and most routers have an IP reservation function. The process to do this will depend on your specific router type. Here are instructions for a D-Link router. The concepts are the same for any make and model of router but the interface will be different. Do a search online for your specific model. Search for “LinkSys IP reservation” or “Linksys DHCP reservation”. Obviously replace Linksys with your manufacturer and model.
Setup Port Forwarding
When the Python application calls the Twilio MMS service, one of the parameters that is passed to Twilio is the URL on your Raspberry Pi where the image to send with the message is located. Because the Twilio service will be accessing this URL from remotely over the Internet, it is necessary to setup port forwarding to the Apache web server running on your RPi.
Just like the DHCP reservation setup above, the concept of port forwarding is the same but the setup process is different depending on your specific router.
By default, Apache web servers run on port 80. Please watch the below video if you want to understand port forwarding better. In concept, replace the IP camera used in the video with your Raspberry Pi and the computer on the left of the network diagram in the video with the Twilio service and you should understand how port forwarding will be working for this project.
You can find port forwarding instructions here for many popular manufacturers. Do a Google search for your specific make and model if you can not find yours there.
Dynamic DNS Setup (DDNS)
If the Internet connection where your Raspberry Pi is located does not have a static IP address, you should setup a Dynamic DNS account (DDNS). You can find an explanation of DDNS and setup instructions for some routers here. If you do end up setting up DDNS, then be sure to use your DDNS hostname in the HOSTNAME variable of the mms-alarm.py application. If your internet connection uses a static IP, then it is not necessary to setup DDNS and you can simply use the IP address of your Internet gateway in the HOSTNAME variable.
If you need to find your Internet IP address and if you would like to test to make sure that you have port forwarding setup correctly, please use this online port forward checker tool. The tool also displays your Internet IP address.
Run Alarm Code / Get MMS Message
You can test the project by starting the Python application manually. After you confirm that it works correctly, you may want to automatically startup the Python application when your Raspberry Pi boots up.
To start the app manually, change directory to where it is located and type the following command:
sudo python mms-alarm.py
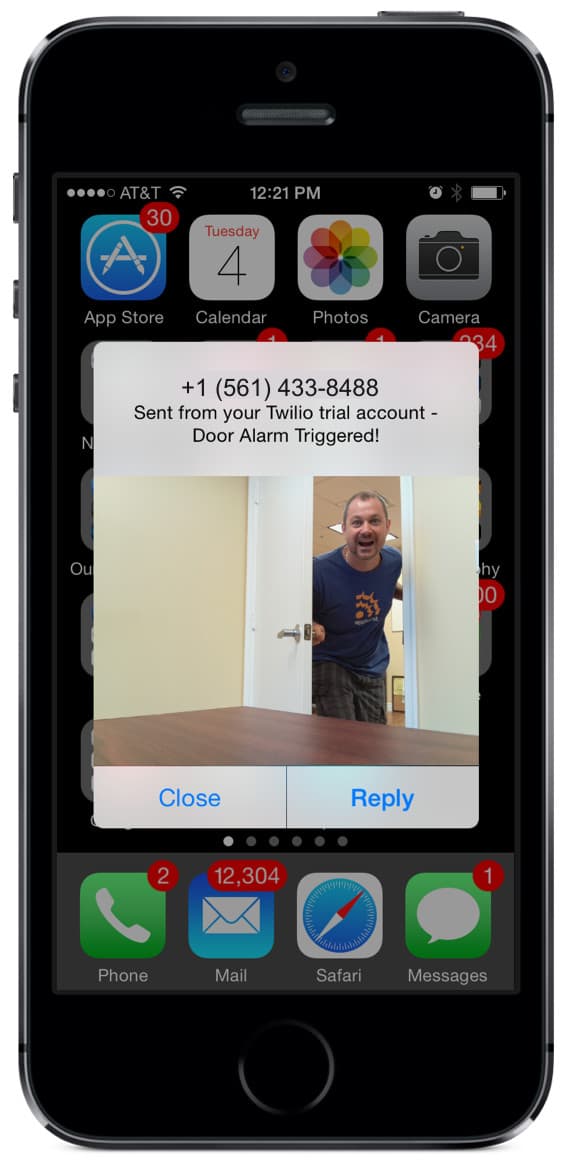
When your door is opened (alarm sensor separated), the following will be printed on the screen: Door Opened!
Within a few seconds, you will receive the MMS message with the photo attached that your Pi camera captured. Mine looks like this.
Startup Alarm Application on Boot
If you decide to use this project in real life, you will most likely want the alarm code to startup when your Raspberry Pi boots up. To start the program on boot, you can add a startup command to the rc.local file on you RPi. This file will either be located in /etc or /etc/rc.d
Change directory to /etc to see if your rc.local is located there. If it is not, change directory to /etc/rc.d.
Edit the rc.local file using the text editor of your choice and add the following line before the last line in that file which should read “exit 0”
python /home/pi/alarm.py &
Save the file, then reboot your Raspberry Pi and test the alarm application again by opening your door.
That is all. If you have any questions, you can email me at mike@cctvcamerapros.net.


