
Tesla API Security Alarm System with Raspberry Pi
Here is a Raspberry Pi project that uses the Tesla API and an outdoor motion sensor to create a security system alarm using my Tesla Model 3’s headlights and horn.
My Model 3 Tesla was delivered to me three weeks ago. Being a big software geek, one of the features that I have been obsessing over is the developer API / SDK (software development kit). After tinkering with some of the API commands to get familiar with how it worked, I decided to create a security alarm application.
TeslaPi is the name for my project. The project uses a Raspberry Pi to communicate with the Tesla API using the Python programming language. An outdoor motion detector is connected to one of the GPIO ports on the Raspberry Pi. When motion is detected by the motion sensor, the Raspberry Pi communicates with my car via the API to control the headlights and horn. Essentially, the Tesla’s headlights and horn become security alarm outputs.
Note: Tesla has not officially released a developer API. This is a very early proof of concept project. Eventually, I would like to integrate Tesla cameras, lights, and horn into Viewtron IP cameras systems and AI security cameras.
Video Demo

Watch this YouTube video demo to see the TeslaPi project in action.
Application Logic
The logical operation of the application is a bit more involved than just turning the horn and headlights on and off based on motion. I use the concept of an “alarm cycle” to escalate alarm levels based on how long the alarm has been active. Users can also setup a time range for monitoring using begin and end variables. For example, if you only want to enable monitoring from 12:00 midnight to 5:00 am.
Here is a detailed explanation of how it works.
- An “alarm cycle” is defined by a duration (in seconds) and five escalation levels. The number of levels can be changed.
- The duration is checked against a timer to keep track of how long motion has been continuously detected or if motion has been detected again within a time threshold.
- When motion is detected by the sensor, the “alarm cycle” is started.
- This does two things. The alarm cycle timer starts and the alarm actions defined by the first escalation level begin.
- Programmers can define their own alarm escalation rules. These are the default 5 levels.
- Escalation Level 1: Flash Tesla headlights 3 times.
- Escalation Level 2: Flash Tesla headlights 3 times.
- Escalation Level 3: Flash Tesla headlights 3 times. Honk horn 1 time.
- Escalation Level 4: Flash Tesla headlights 3 times. Honk horn 2 times.
- Escalation Level 5: Flash Tesla headlights 3 times. Honk horn 3 times.
- When Escalation Level 5 is reached or if more time has passed then what is defined in the alarm cycle timer, the Escalation Level is reset and starts over.
RaspBerry Pi Wiring
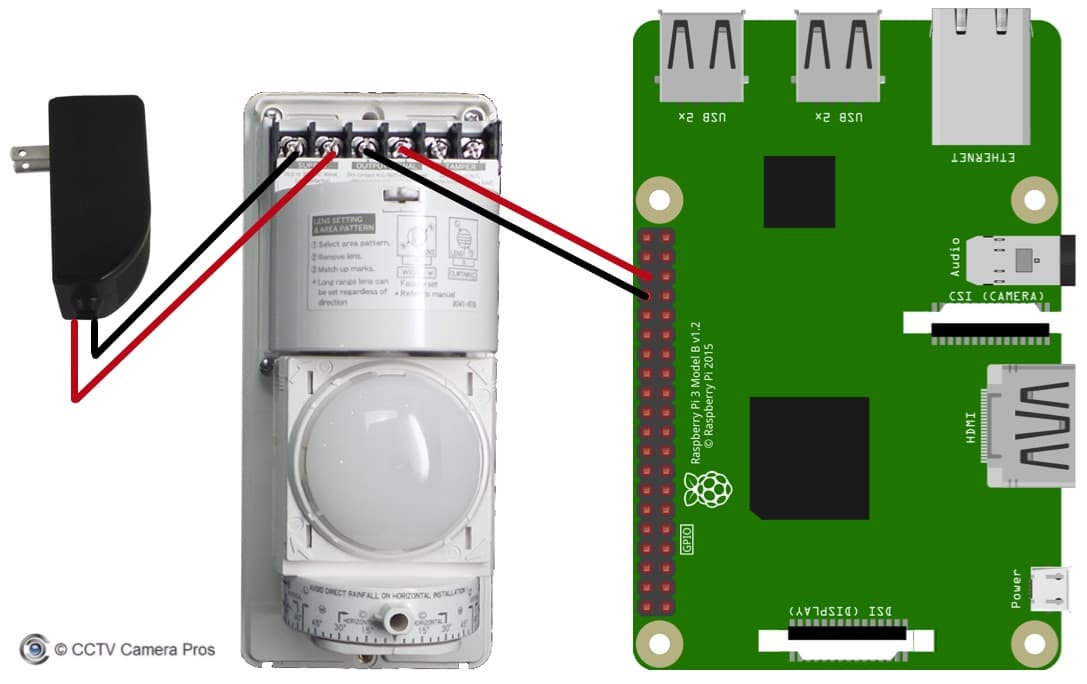
The Raspberry Pi wiring is simple. This is the outdoor motion sensor that we used. It comes with a 12V DC power supply. The output terminals are connected to GPOI pin 16 and the ground pin right next to it. You can use any GPIO pin that you want and just change the pin number in the TeslaPi.py application.
The Rapsberry Pi must also be connected to the Internet in order to communicate with the Tesla API.
Project Download
The Python source code for the TeslaPi project is hosted on Github. You can download it from that page and find detailed setup instruction on how it is installed.
Motion Sensor Installation
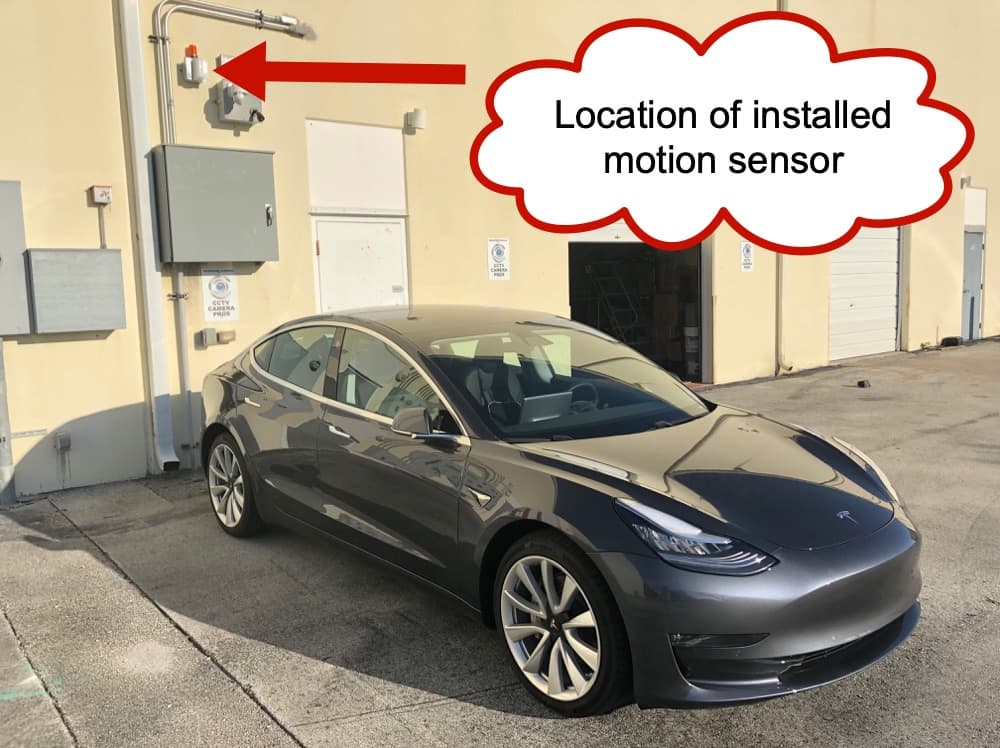
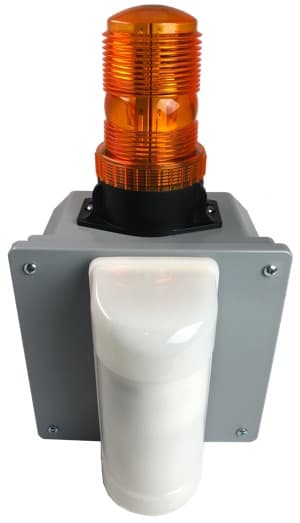
After I finished coding and testing this project, Carlos installed a motion sensor outside where I park so that we can test further in a real environment. Our trash dumpster is located near this location and we have a lot of illegal dumping at night. We plan on using the strobe light on top of the junction box as a deterrent.
When my car is parked out back, we can use the headlights and the strobe. When my car is not there, we can use only the strobe.
Future Development Ideas
Strobe Light
I already integrated with the strobe light that is on top of the junction box (in the above picture). I will document how to use connect a relay to the RaspBerry Pi and alarm devices soon.
Camera Recording
I hope that Tesla enables API access to start and stop the video recording on the dash camera, rear camera, and side cameras. It would be nice to be able to trigger video recording from external sensors using the API. It would be really nice for Tesla owners to be able to back their cars into their driveway so that integration with their security alarm system could trigger video surveillance recording any of their Tesla’s cameras. It also would be nice is Tesla would enable the ability to keep the headlights on continuously from the API instead of just flashing. If that was available, the Tesla headlights could act similar to security floodlights in the front of a house.
GPS
I would like to implement a GPS location check in TeslaPi. The idea is to only use my car as an alarm output if it is on-site at the location of the motion sensor. I have already started this, but am not 100% done. You can see the gps.py script on GitHub as part of the TeslaPi project.
Push Notifications
It will be easy for someone to implement a mobile push notifications. I completed this Raspberry Pi push notification project a few years back that can be used.
Use at your own risk
Please note that I created this Raspberry Pi / Tesla API project for fun. I wrote it very quickly and it is meant to be a proof of concept and a fun project to get familiar with the Tesla API. If you are going to use any of it in a production alarm system, you are doing so at your own risk and you should have a professional software developer thoroughly test it for your needs.
This software is provided as-is. This software is not supported by or endorsed by Tesla Inc. Tesla Inc. does not publicly support the underlying JSON API, so this software may stop working at any time. The author makes no guarantee to release an updated version to fix any incompatibilities.
Questions / Comments
The best place to make comments or ask questions about this project is on the YouTube video page.


