
How to Send Raspberry Pi Push Notifications Triggered by PIR Motion Detector
Here is a simple Raspberry Pi project that uses a PIR motion sensor from a burglar alarm to trigger a mobile push notifications to iOS or Android apps. Last year, I published a RPi project that used a magnetic door sensor and a push message service called Instapush. In this project, I use a PIR motion detector and a mobile push service called Pushover. I have been wanting to try Pushover and I ended up liking it better than Instapush because it is more reliable in my testing. I also like that it also has an email to push interface that is very handy for integrating network devices that have email sending capability.
You may also be interested in this article: How-to setup mobile push notifications to iPhone and Android apps using Zavio IP cameras.
Here are a few things I want to note upfront about this project.
- I am using a standard 12V DC alarm system motion sensor that is made for alarm systems, not a Raspberry Pi PIR sensor. The reason that I chose this one was because I am mounting the PIR sensor at my office and alarm system PIR sensors come in housings that are easy to mount. I also wanted to test with an outdoor motion sensor that came in a weatherproof housing.  As much as I want to justify buying a 3D printer to print my own electronics cases, I am not quite there yet. I also wanted to show that it is safe to use the dry contacts of a 12V DC device with Raspberry Pi because no electrical current is flows through dry contacts. The circuit is simply closed or grounded when there is no motion and the ground is broken or opened when motion is detected.
- The PIR sensor is powered by a separate 12V DC power supply. The RPi will NOT power it.
- Although the above picture of my Raspberry Pi includes a camera, I did not use the camera for this project. It is a pain to remove it from the enclosure and the picture looks nicer with it there rather than an empty Velcro pad. However, this project can easily be enhanced to use the camera. You can get some ideas to integrate camera functions into this project from this MMS project and this streaming video project.
Project Setup Steps
- Create a Pushover account and download iOS or Android Apps
- Register Pushover Application
- Install Python Source Code on your Raspberry Pi
- Wire the PIR Motion Detector and LED to Raspberry Pi Board
- Run and Test Code
- Get Push Notifications on iOS and Android
Setup Pushover API and Download Mobile Apps
In this project, I chose to use the Pushover service to send push notifications. Pushover has an easy to use REST API and very nice apps for iOS and Android that are free to download. The REST API makes it simple for developers to use httplib and urllib Python libraries to interface with it.
The push service is free to use for 7 days, then has a one time setup fee of $3.99 per platform. So, if you use both iOS and Android, it will cost you $3.99 x 2. If you have multiple iOS or Android devices, you only have to pay once per platform and can install on as many devices as you like.
- Sign up for a Pushover account here: https://pushover.net/
- Download the Pushover app for iOS and/or Android here.
Download iOS App
Download Android App - Launch the mobile app and login using the user ID and password you selected when you signed up.
- When your device asks for permission for Pushover to send you push notifications, say yes.
- Login to your account from a desktop computer. https://pushover.net/
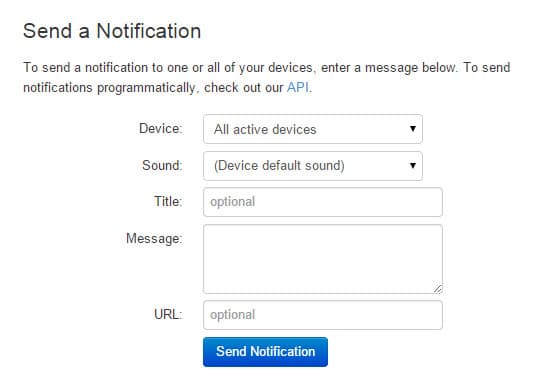
- From the Pushover control panel, send a test push message to make sure that the service and app are working. Below is a screenshot of the form that you can use to send the notification.
- In the Pushover control panel, you will see “Your User Key”. You will need this to use the Pushover API.
Register Pushover Application
Like most cloud based SDK / APIs, Pushover requires that you register your application. The process is simple.
- From the Pushover control panel, click on the Register an Application link.
- Create a name for your app. I named mine “RPi Push”.
- Choose “Application” from the type dropdown.
- Fill in a description.
- Check that you accept the terms and conditions, if you do, and press Create Application.
- After you successfully create your app, you will see a API Token/Key displayed. You will need this value, along with the Your User Key to use the API.
Install Program Code
Here is the Python source code for the project. The comments should explain clearly what is going on.
You can download the source code here.
From your Raspberry Pi, you can use the following command to retrieve the file:
wget https://videos.cctvcamerapros.com/downloads/python/pir.py
After you have installed the Python code on your Raspberry Pi, you need to edit following lines of the program.
# Pushover API setup

PUSH_TOKEN = "" # API Token/Key

PUSH_USER = "" # Your User Key

PUSH_MSG = "Motion detected!" # Push Message you want sent
Set the PUSH_TOKEN and PUSH_USER variables to the values assigned when you setup your Pushover account and application. If you want the push notifications to say something other than “Motion detected!”, you can change that value as well.
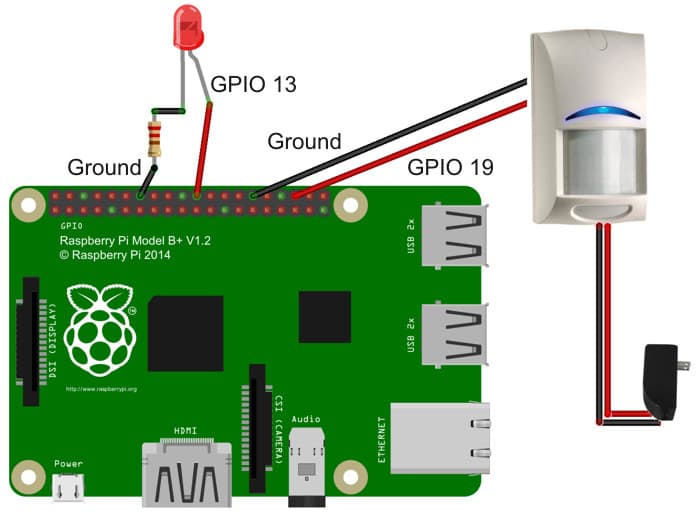
Wire PIR Sensor to Raspberry Pi
I used GPIO 19 for the PIR sensor and GPIO 13 for the status LED. If you choose to use different GPIO ports, be sure to update the pir.py application to reflect your GPIO ports. Please note that the below image does not accurately represent the locations on GPIO 13 and 19 on the Raspberry Pi. Please be sure to check the numbering of your Raspberry Pi or the breadboard that you are using to match up the GPIO ports that you use.
Also note that I used a 12V DC PIR sensor that is typically used in burglar alarms. I am powering the PIR sensor with it’s own 12V DC power supply. The Raspberry Pi is powered separately using a 5V power supply made for it.
In addition to the indoor PIR sensor pictured above, I also tested with this TAKEX MS-100E outdoor PIR sensor which worked great. If you are looking for a weatherproof / outdoor motion detector that works great with Raspberry Pi, I highly recommend the MS-100E.

Run and Test
With the Python code in place and the motion detector wired to your Raspberry Pi, you are ready to test.
- Make sure your Raspberry Pi and PIR sensor are both powered on.
- Start the program running the following command:
sudo python pir.py - Wave your hand in front of the motion detector so that it detects movement.
- You should see the value defined in the PUSH_MSG variable printed on the screen of your Raspberry Pi and shortly after you should receive a push notification.
iPhone Push Notification
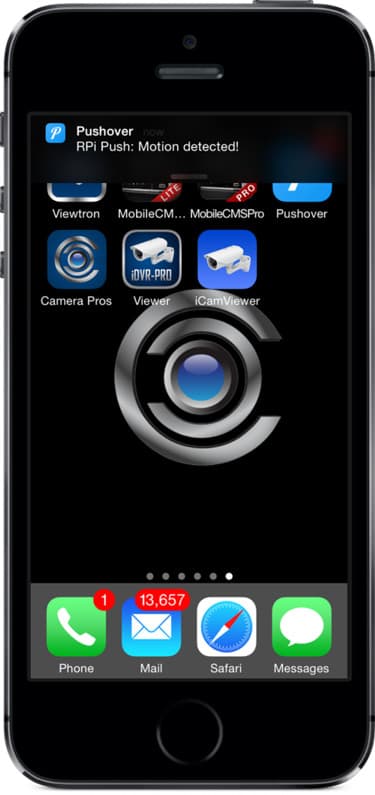
This is what the push notification looks like on my iPhone.
Android Push Notification
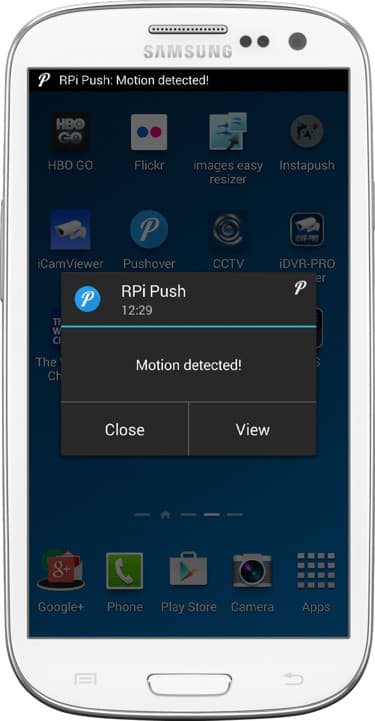
This is what the push notification looks on my Android Samsung Galaxy.
Summary & Enhancement Ideas
I hope that you found this project easy to setup and useful. I tried to keep it as simple as possible. It is meant to be a starting point that can be expanded to do much more. Some ideas on how this project can be enhanced.
- Integrate with a Raspberry Pi camera so that you can visually see what triggered the event.
- Make it so that you can setup a schedule for when the alarm is active.
- Enable output devices to take some type of action when motion is detected, like fire a Nerf gun or activate an alarm siren.
- I use the alarm based Raspberry Pi projects that I design in conjunction with video surveillance systems.


