
Use Siri to Trigger IP Camera Alarm w/ iOS Shortcuts App
This article explains how-to setup a Siri voice command using the iOS shortcut app that triggers the alarm output of an IP camera. I will document my ideas about this project and how-to setup the security camera and iOS shortcut workflow below. If you want to jump right to a demo, you can find the demo video here.
Recently, I was searching for a way to automate processes using voice commands on my iPhone. This is how I came across the shortcuts app for iOS. I have been obsessing over the app ever since. It is absolutely awesome how the app allows you to automate complex processes and program logical operations without writing any software code. It is also awesome that you can assign a Siri voice command to any shortcut to run the shortcut. These are the types of projects that get me excited to come to work.
Although my original intent for using voice command automation was not related to any video surveillance applications, I quickly shifter gears and started to think of ways to automate alarm sequences and emergency event plans. Wouldn’t it be useful to be able to say “Hey Siri… Activate Alarm”, and a sequence of tasks would kick-off such as sounds an alarm, start CCTV camera recording, text message the property manager, call the police. The possibilities are endless and the shortcuts app makes it pretty easy to setup.
As a proof of concept, I setup a shortcut that communicates with a Zavio IP camera to switch an alarm light on and off. Using a Siri voice command, I can activate and de-activate the alarm light from anywhere in the world. Please note that the alarm light could easily be replaced with another type of security alarm device that has an alarm input.
Please note that if you are going to setup your IP camera to do this, it should already be setup for remote Internet access. Port forwarding must already be configured for this project to work.
Here is how I setup this project.
IP Camera Alarm Output Wiring
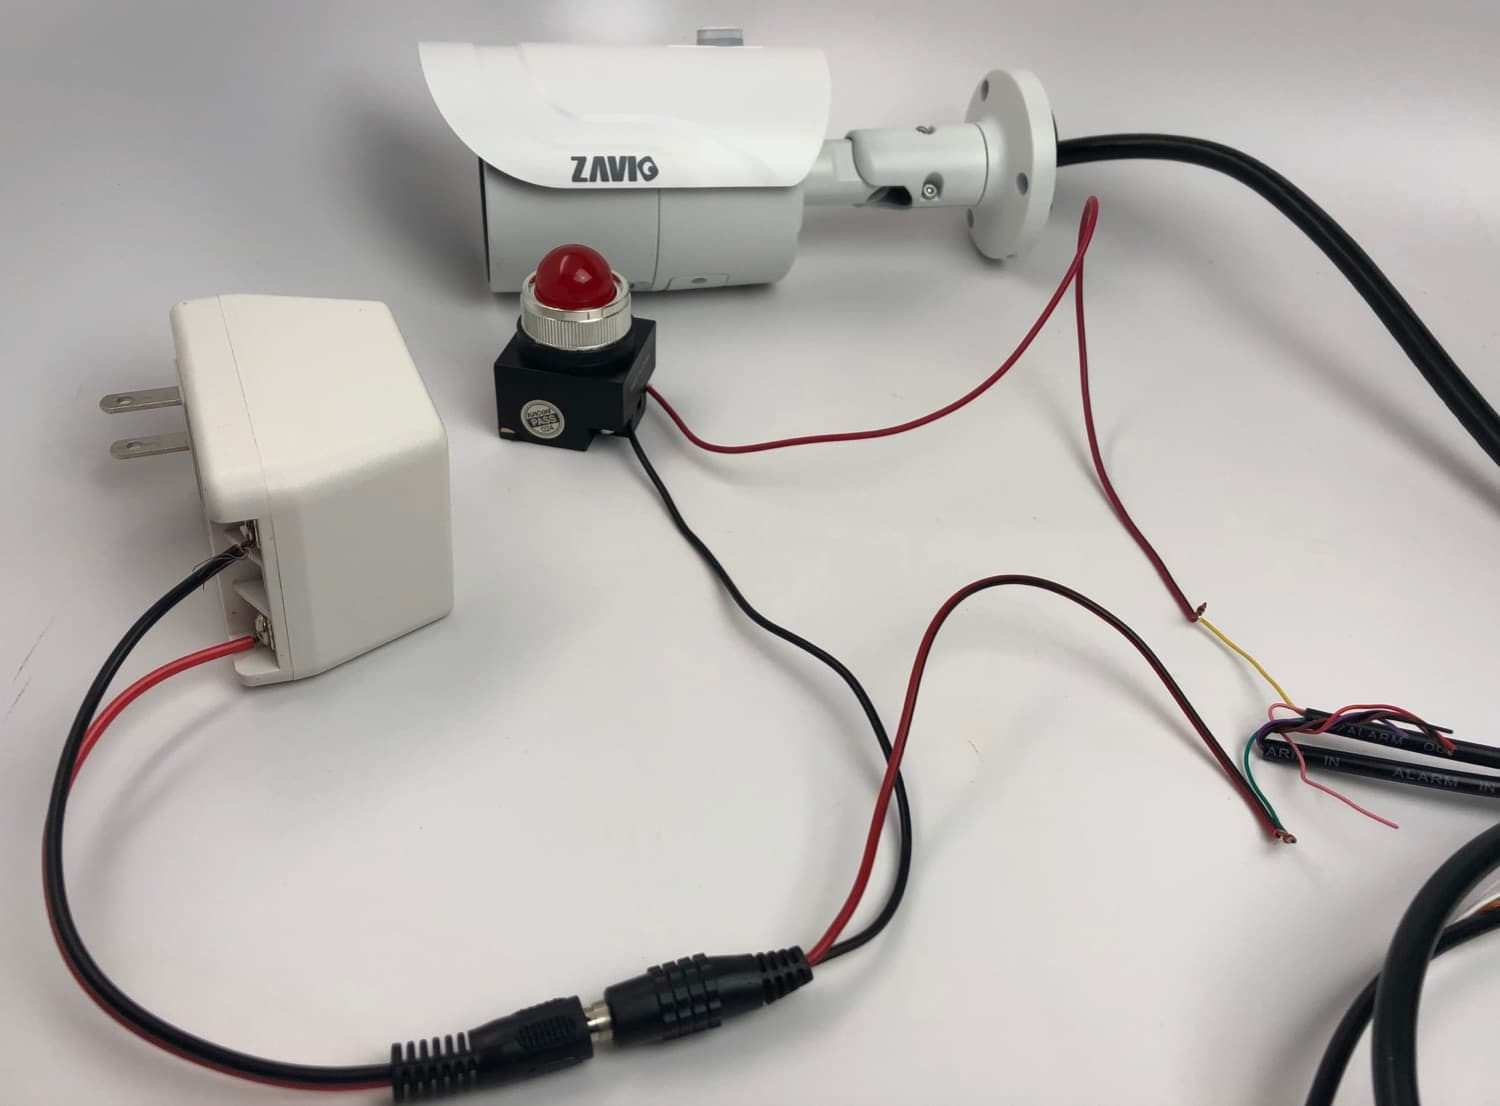
This is how the IP camera’s alarm relay output wires are connected to the alarm light and 24VAC power supply. Yes, I know that those wires are not securely attached. I set this project up quickly as a proof of concept. The purpose of this picture is to show installers how to connect the alarm light and power supply in line with the relay wires.
- The yellow/black and green wires are the ones used for the alarm relay output. It’s hard to see in the picture but that yellow cable has a black line on it.
- The small alarm light is powered by 24VAC.
- The yellow alarm wire is connected to the positive power connection on the alarm light.
- The green alarm wire is connected to the positive connection on the 24VAC power transformer.
- The negative connection from the power supply is connected to the negative connection on the alarm light.
- IMPORTANT! The max power supported by the relay built into Zavio IP cameras is: 0.3A at 12V AC or 1A at 30V DC. Connecting a power source higher than these will likely damage your camera’s circuit board.
In case you are not familiar with how alarm relay’s work, they are basically dry contact circuits that are set to be normally open or normally closed. If they are set to closed, electrical current freely travels through the circuit. If they are open, the electrical current is interrupted and can not flow. Relays are typically used to turn on / off external alarm devices such as sirens and lights. You can also use this project to trigger the alarm output on a CCTV DVR.
In my application, when the circuit is closed, the power supply will flow through to the alarm light and it will turn on. I also setup a second shortcut to open the circuit, which turns the light off.
IP Camera Alarm Input / Output Settings
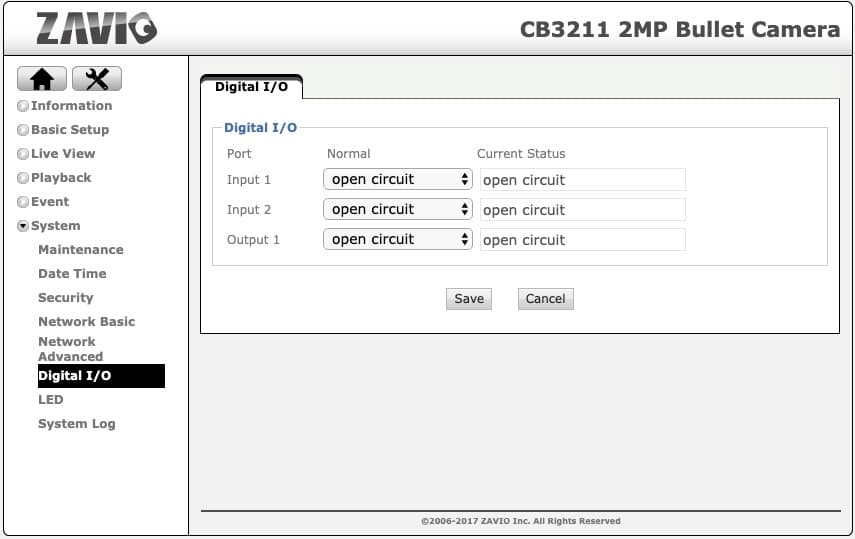
The above screenshot shows the alarm input / output settings screen for the Zavio CB3211 IP camera.The default state of the alarm output on the Zavio IP camera is normally open (open circuit). You can get to this screen by logging into your camera from a web browser, then clicking on the configuration button, then System -> Digital I/O. You can see that the Output 1 circuit is set to open circuit for it’s normal position. If your camera is not already setup for Output 1 as “open circuit”, change it and press save.
Zavio SDK Integration
To create the workflow with the iOS shortcuts app, we will use the Zavio IP camera API / SDK. If you are not a programmer, an API or SDK exposes functionality that allows software developers to integrate. In our case, we will use the output method of the Zavio API to send a command that closes the relay output circuit. This will turn our alarm light on. The API call is made using a URL that looks like this.
https://<servername>:<port>/cgi-bin/admin/output?action=1:/
The <servername> is replaced with the IP address or DDNS hostname that your IP camera is assigned. Port is replaced with the port that your camera is running on.
The same API call, except with a forward slash on the end turns the output off.
https://<servername>:<port>/cgi-bin/admin/output?action=1:\
I wanted to document the API method that I used for this integration, but actually you do not need to worry about this part because I have shared the two iOS shortcuts that I created so that anyone can download them.
iOS Shortcuts Setup
Another thing that I love about the new iOS shortcuts app is the ability to share shortcuts with others. Here are the two that I created. One for output on (close circuit), and one for output off (open circuit). The shortcuts are called Zavio Alarm On, and Zavio Alarm Off.
If you do not already have it installed, you can download the iOS Shortcuts App here. You should do that before downloading the shortcuts.
You can download the two shortcuts by clicking on the below links.


If you are on an iOS device and you click on the above links, iOS will ask if you want to add the shortcut to the app. This is assuming that you have the iOS shortcuts app already installed. If you do not, it will bring you to the iTunes download.
If you install these shortcuts, you will be asked the following questions the first time that you run them.
- What is the User ID for your camera?
The default User ID for Zavio IP cameras is admin. - What is your password?
The default password is admin. If you have not yet changed this on your IP camera, I highly recommend that you do right away. - What is the IP address or hostname used to remotely access your camera?
Again, this article assumes that you have already setup remote viewing access to your IP camera. If you have, what IP address or domain name do you use for remote access? - What is your camera’s HTTP port?
The default HTTP port for Zavio IP cameras is 80. If you changed this, please change this value.
Enable Siri Voice Command to Trigger Alarm
If you want to turn your alarm light on and off using voice commands, you need to record the command that you want to use using Siri.
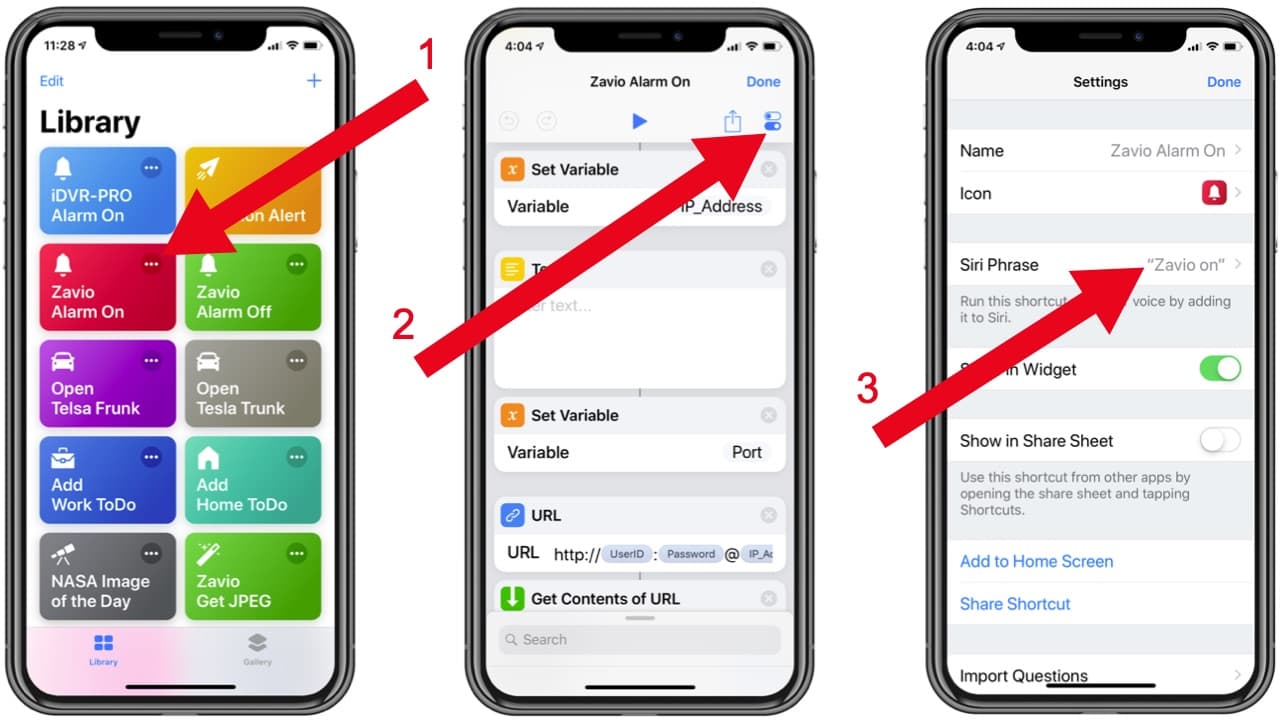
To setup the Siri voice command, follow these steps.
- Tap on the three dots in the upper right of the shortcut. This opens the shortcut to edit it.
- Tap on the configuration details icon in the upper right.
- Tap on the Siri Phrase field.
This will open the Siri voice command recorder.
Video Demo

Watch this video demo to see Siri voice commands communicate with the IP camera to turn the alarm output on and off.
IP Cameras with IO
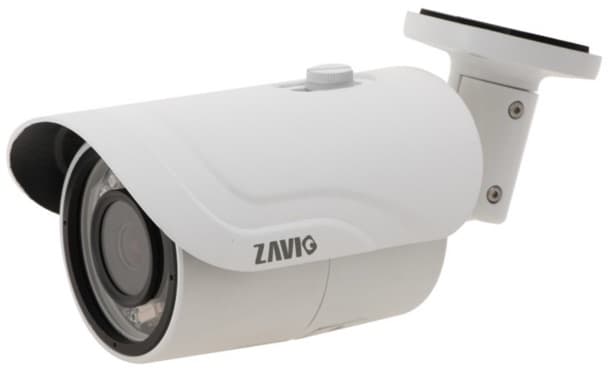
This is the bullet IP camera that I used for this project. Here are some other Zavio Zavio IP cameras that have alarm inputs and outputs. All of them will all work with the above setup and shortcuts that I made available to download.
If you have any questions, please email me at mike@cctvcamerapros.net.
Additional Raspberry Pi projects
You can find additional Raspberry Pi projects related to security camera system and alarm integration here.


