Port Forwarding and Remote Access Setup Guide for IP Cameras
Most users of IP cameras (network security cameras) want to access their camera remotely to see live video. Accessing cameras remotely from desktop software (Mac and Windows) and mobile apps (iPhone and Android) is extremely common for home owners and business owners.
The most common way to enable remote viewing to IP cameras is by manually setting up port forwarding on the network router that the camera is connected to. UPnP (universal plug-and-play) is a newer method that is supported by some routers and cameras but is not as reliable in my experience. This article explains ports forwarding and dynamic DNS – two concepts to understand if you want to access security cameras remotely. Setting up port forwarding for multiple IP cameras is also covered.
Please note that although this article focuses on IP cameras, the process and concepts are the same for network video recorders and security camera DVRs.

Here is and explanation of how it works using the above network diagram to explain.
Network Diagram / Wiring Installation Explanation
- All of the devices on the right of the red line are on the local network where the camera is located.
- The laptop on the left of the red firewall is at a different location than the IP camera and not connected to the same network. The laptop on the left can be located anywhere in the world as long as it is connected to the Internet.
- The red line in the middle represents the firewall that separates the local network from Internet.
- The IP camera in the upper right is hard wired to a network router using CAT5 Ethernet cable.
- The laptop on the right is also hard wired to the same router.
- The network router is hard wired to the Internet modem using CAT5 Ethernet cable. This modem can be a cable, DSL, direct fiber, or any other type of high speed Internet modem.
Connect to Camera on LAN
Before you setup port forwarding for remote access, you should first connect to your cameras on the LAN (local area network).
- Our IP camera is running on port 7000. Please note that different IP camera manufacturers use different default ports. Check your manual to confirm the port that your camera uses. Please note that you can change your camera’s port when you login to it.
- Typically, when you connect an IP camera to a router and power it on, the camera is assigned an IP address by the router. This is known as DHCP (Dynamic Host Configuration Protocol). Our IP camera was assigned IP address 192.168.0.101. Most IP camera manufacturers have their cameras setup to use DHCP by default, but some have a static IP address assigned to their cameras. You need to check your camera’s manual to confirm. If you are unsure, plug your camera into your router and power it on. Most IP cameras include PC software to search your network for IP cameras. If yours does, run this software to locate the IP address of your camera and make note of it.
- Using a computer on the same network as your IP camera, login to your IP camera. IN our example, we are using a laptop on the local network with IP address 192.168.0.2. Most IP cameras have an interface that can be accessed via web browser. In our example, would enter the following address into the web browser of the laptop on the right. https://192.168.0.101:7000. If the address and port is correct, you will most likely be prompt for a user ID and password by your camera.
- Enter the default ID and password and you should see a live view of your camera or a configuration screen. Congratulations, you just accessed your camera on the LAN.
IP Reservation
After confirming that you can access the IP camera on the LAN (local area network), you should reserve that IP address specifically for your IP camera. By reserving an IP for your camera, if your router looses power or needs to be re-booted, that same IP will always be assigned. This is important because your port forwarding rule that you will setup will not work if the IP address of the camera changes. Consult with your router’s manual on how to setup IP reservations for your specific model.
Port Forwarding Setup / Network Setup
Port forwarding is what enables you to access your camera remotely over the Internet. In the above diagram, the red line represents the firewall provided by the router. Basically, no outside traffic is allowed into your network. When you setup a port forwarding rule, you create a controlled hole in your firewall.
To set port forwarding, login to your router and navigate to the port forwarding section of the interface. This will vary by make and model. You should consult your manual or search online for instructions.
In our example, we forward incoming requests on port 7000 to IP address 192.168.0.101 on port 7000. This allows access to your network, through your network firewall, (only on port 7000) and forwards all of those requests to your IP camera.
Test Remote Access
To confirm that port forwarding is setup properly, you must try to connect from a device that is not on the same network as your camera. If you are on-site where the camera is located, you can turn off the WIFI connection of your phone so that you connect over the cellular phone network.
- 207.5.23.205 is the IP address of the Internet connection in the above example. You can find out what your Internet IP address is by using accessing this page from any computer or mobile device on the network where your camera is located: What is my IP Address?
- If you have trouble accessing your camera, us this open port forwarding test tool to see if the port is properly open.
DDNS Setup for Dynamic IP Addresses
Contact your Internet service provider and ask them if your Internet connection has a static or dynamic IP address. If you are fortunate enough to have a static IP address, you can always access your camera remotely using the IP address of the Internet connection (207.5.23.205 in our example) where your camera is installed. If your Internet IP address is dynamic, you should setup a DDNS service to manage changes in your IP address.
DDNS Account Setup
- Create an account with a DDNS service provider. DynDNS and No-IP are two of the biggest service providers out there. At the time of this writing, DynDNS cost $40 per year and No-IP has a free account that requires that you login through a web browser once a month to keep it active. Some IP camera manufacturers provide their own DDNS service for free.
- After you setup an account with the DDNS provider of your choice, a connection to the service must be made from your IP camera, a PC on the same network, or in your router. Where you do this depends on which of your devices support the DDNS update service.
- When you setup your account, you will choose a hostname to use. For example, my-ip-camera.ddns.org. After DDNS is setup, you will use this hostname instead of your IP address to access your IP camera remotely.
- Please note that not all IP cameras have this built-in. If yours does not, check to see if your router supports it or your last option is to install a DDNS client on a PC. Please note that if you choose the PC option, that PC must always be running.
How DDNS works
Here is how DDNS service works.
- There is a service running on your IP camera (or network router or PC if you chose those options) that monitors the IP address of your Internet connection.
- When the service detects a change, it contacts the DDNS provider and updates them with the new IP address.
- The DDNS provider updates the record for your hostname with the new IP address.
The result is that whenever you access your camera remotely using the DDNS hostname (my-ip-camera.ddns.org is my example), the request is always routed to the correct IP address.
Port Forwarding Multiple IP Cameras
Suppose you want to enable remote access for more than one IP camera. The IP cameras are the same brand, maybe even the same model – so they use the same port. This is how you can setup port forwarding for multiple IP cameras running on the same port.
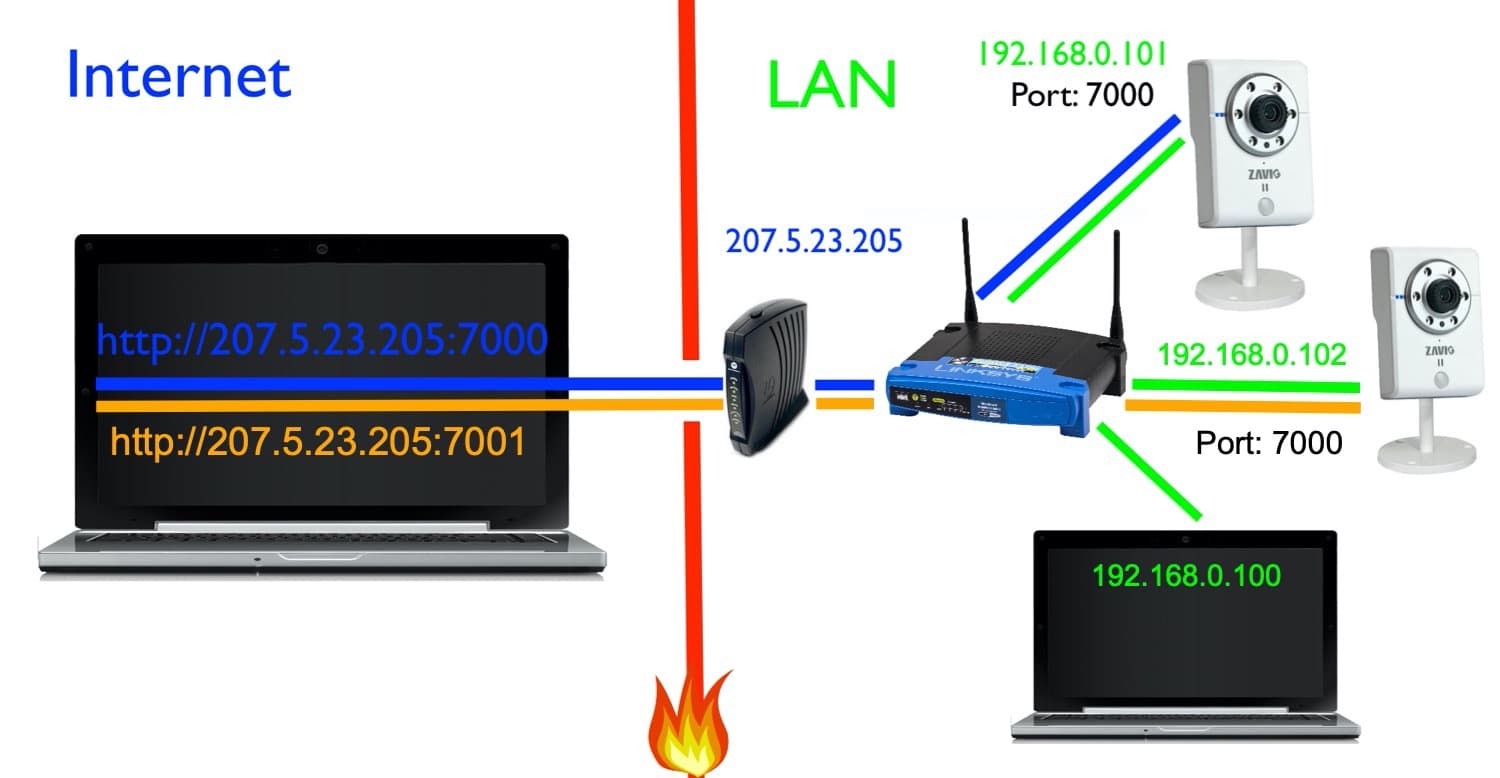
Here is the same diagram that was used in the first explanation except a second IP camera was added to the network. Everything is setup the same way with the following additions and notes.
- The second IP camera is assigned LAN IP address 192.168.0.102.
- The second IP camera uses the same port as the first one, 7000.
- The port forwarding on the router is configured to forward port 7001 to the second IP camera at address 192.168.0.102 on port 7000.
You see that the external Internet port does not need to match the internal LAN port that you setup forwarding to on your router.
Alternatively, you could change the port that the second IP camera uses in the IP camera’s settings. For example, you could switch the second IP camera to use port 7001 instead of 7000. I have personally found that it is easier to manage if you keep all of you IP cameras on their default ports and setup unique forwarding ports, as described in the above digram.
What is Port Forwarding?
If you would like further explanation of port forwarding, please watch the video at the top of this blog post.


