Magnetic Door Sensor / Alarm Input Recording on Viewtron DVRs
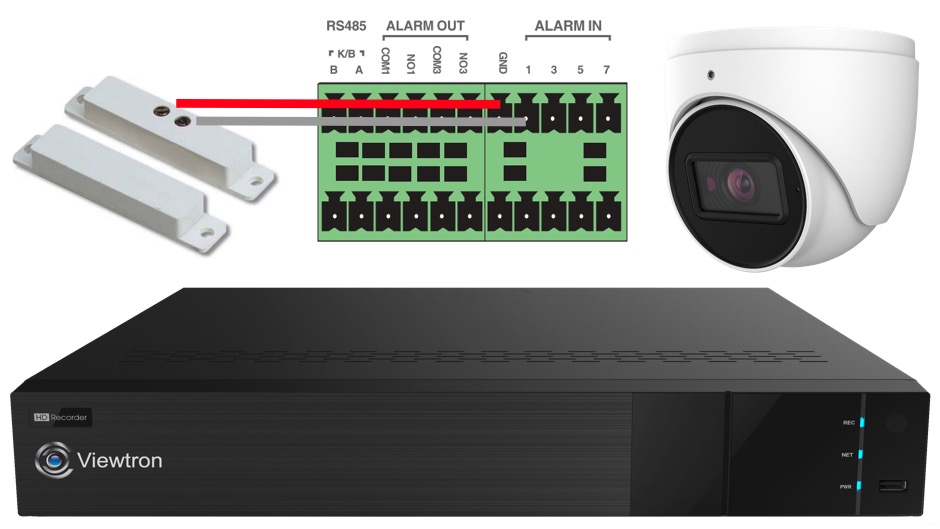
Watch this video to learn how to connect a magnetic door sensor to the alarm input of Viewtron security DVRs. You can also watch this video on how-to connect a motion sensor to a DVR alarm input.
DVR Alarm Input Setup
These setup instructions apply to Viewtron hybrid security camera DVRs and IP camera NVRs. The video also shows users how to configure the DVR software to start video surveillance recording, take a snapshot image, and pop-up live video of a camera on the DVR’s display. In addition, you can also setup mobile push notifications to the mobile app when the magnetic door sensor is opened.
Wire Magnetic Door Sensor to DVR Alarm Input
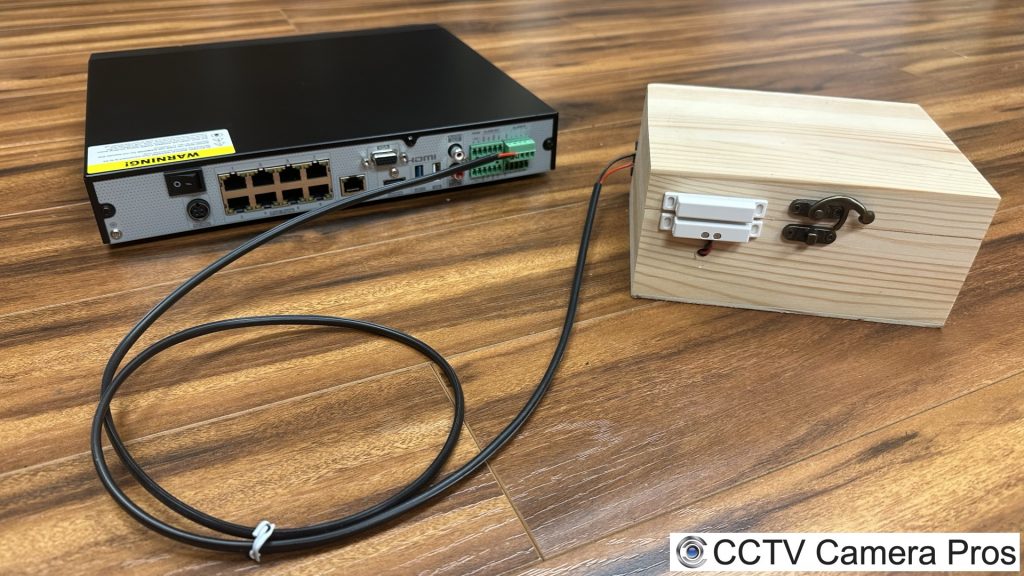
I installed one of our magnetic door sensors to this wooden box so that I can use it for testing at CCTV Camera Pros.
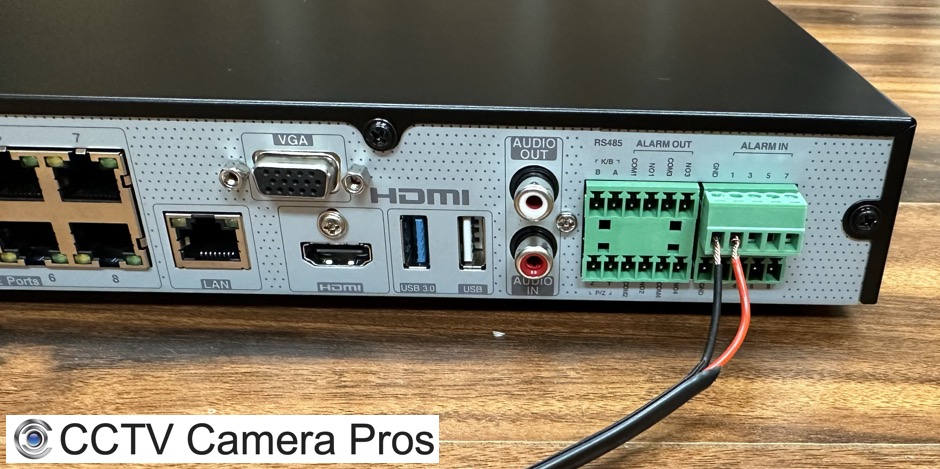
The terminal block that contains the DVR’s alarm input ports can easily be removed from the DVR by pulling it out. This makes installing the wires into it much easier. Use a small flat head screw driver to loosen the ports, then insert the raw cable ends into port 1 and ground. Tighten the screws when done.
Here is a close-up of the alarm input / alarm output ports on the back of a Viewtron IP camera NVR with the terminal block inserted. I am using 18 gauge power wire to connect the door contacts to the alarm input port 1 on the NVR. You can also use a single twisted pair from a CAT5E or CAT6 cable. Please note that the alarm terminal block is the same on Viewtron DVRs and NVRs.
DVR / NVR Setup
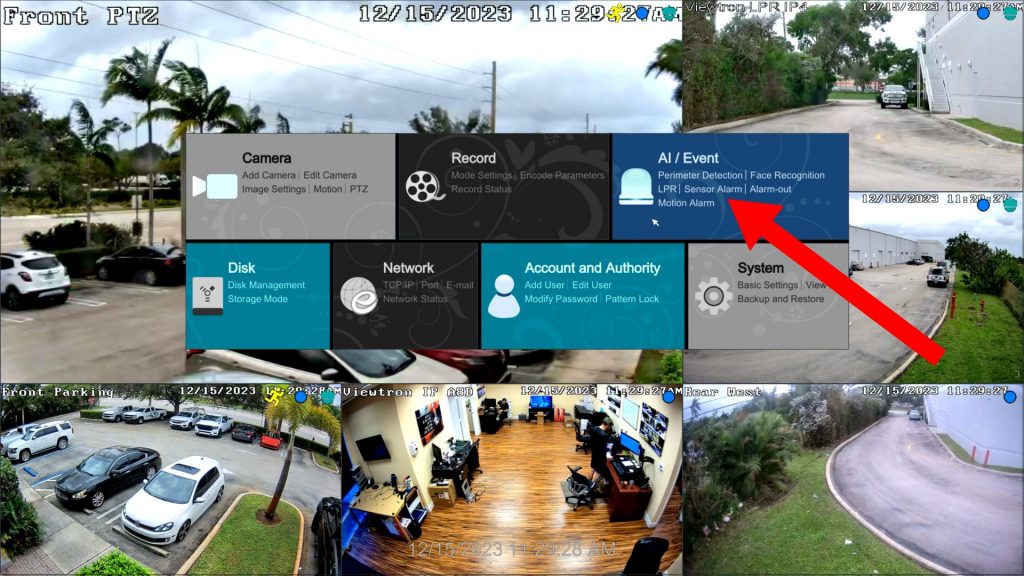
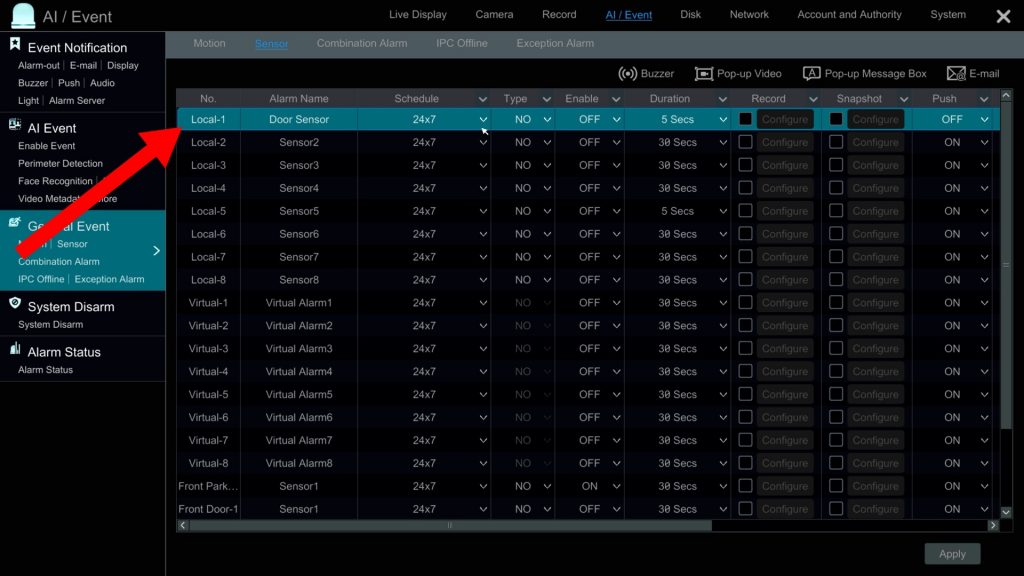
To setup the actions that the DVR will take when the magnetic door sensor opens, select Sensor Alarm from the DVR / NVR main menu.
On the Sensor Alarm screen, you will see rows of all the alarm sensor ports on your DVR. I am using alarm input port #1 which is the first entry on the screen. Setup the following fields.
- Alarm Name – You can name this anything that you want. I am naming mine “Door Sensor”.
- Schedule – You can select one of the pre-configured schedules, such as 24 x 7, or set a custom schedule.
- Type – For magnetic contact sensors, the this to “NC” which means “normally closed”.
- Enable – Set this to on to enable the sensor.
- Duration – Set this to the amount of time that you want the alarm triggered when the door opens.
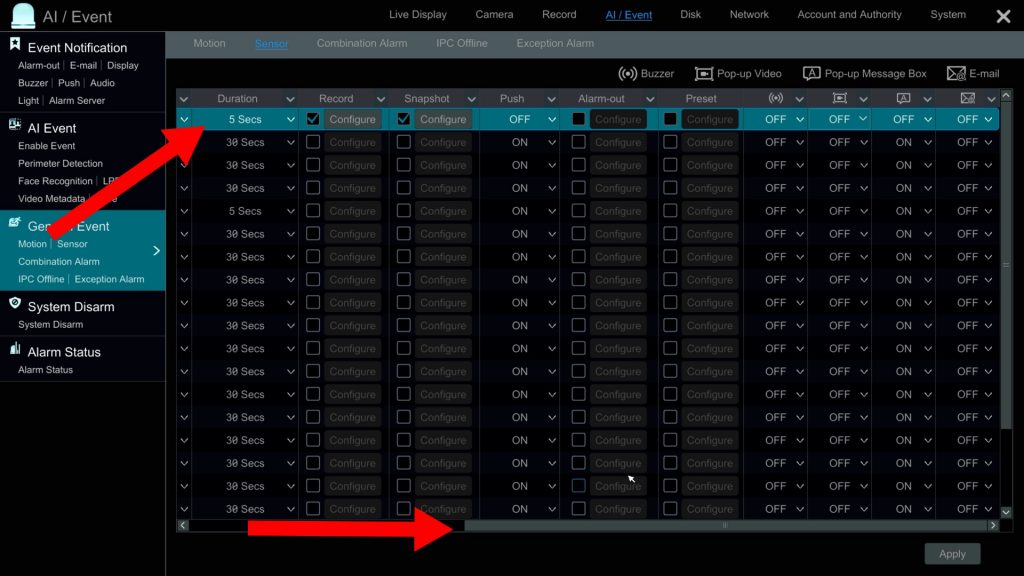
The alarm sensor configuration continues across the screen. You can use the slide bar along the bottom to move the row over. Then configure the following fields.
- Record – Check this box, then select the camera(s) that you want video recording triggered on when the door sensor opens.
- Snapshot – If you also want the DVR to take a snapshot image, check this box and select the camera(s) that you want snapshot images captured from.
- Push – Set this to enable if you want to DVR / NVR to send a push notification to the mobile app for iPhone and Android.
- Alarm Out – If you want to trigger one of the DVRs alarm output ports, check this box and specify which alarm output port(s).
- Preset – If you are using a PTZ camera on your system, you can have the PTZ camera go to a preset position when the door opens.
- Buzzer – Check this box of you want the DVR’s built-in alarm buzzer to sound.
- Pop-up Video – Set this to on and select the camera that you want displayed on the live view of the DVR.
- Pop-up Message Box – Set this to on if you want the DVR to display a message box when the door opens.
- Email – Although email alerts are supported, CCTV Camera Pros does not recommend using them. We recommend using the mobile push alerts instead.
Alarm Sensor Recording Setup
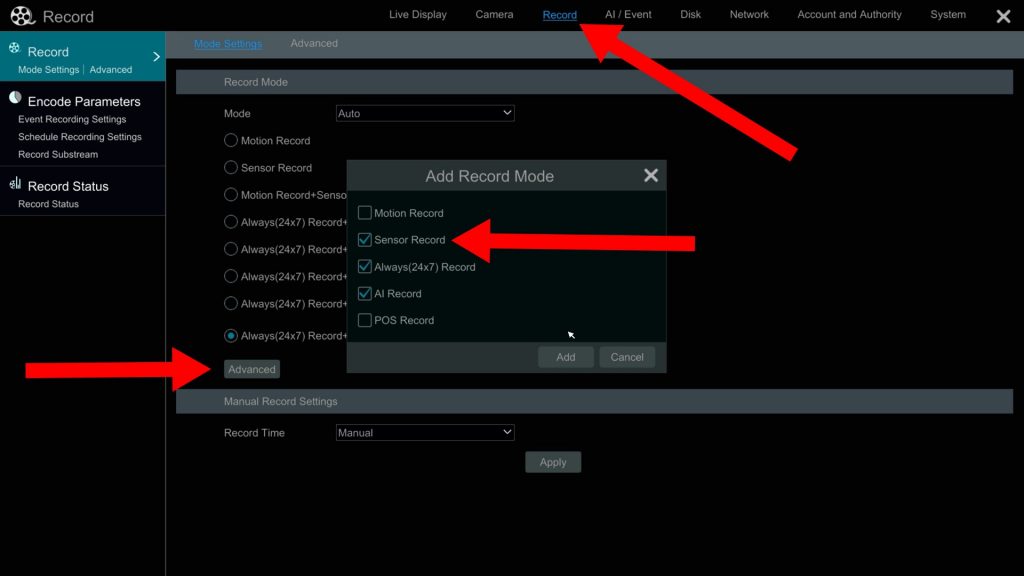
Next, setup the alarm sensor recording on the DVR by clicking on the Record link near the top. Then, click on the advanced button. The add Record Mode box will open. Check the Sensor Record checkbox, then click add. Click Apply.
The alarm sensor recording and alarm actions are now setup on your DVR / NVR.
Alarm Sensor / Magnetic Door Sensor Video Recordings
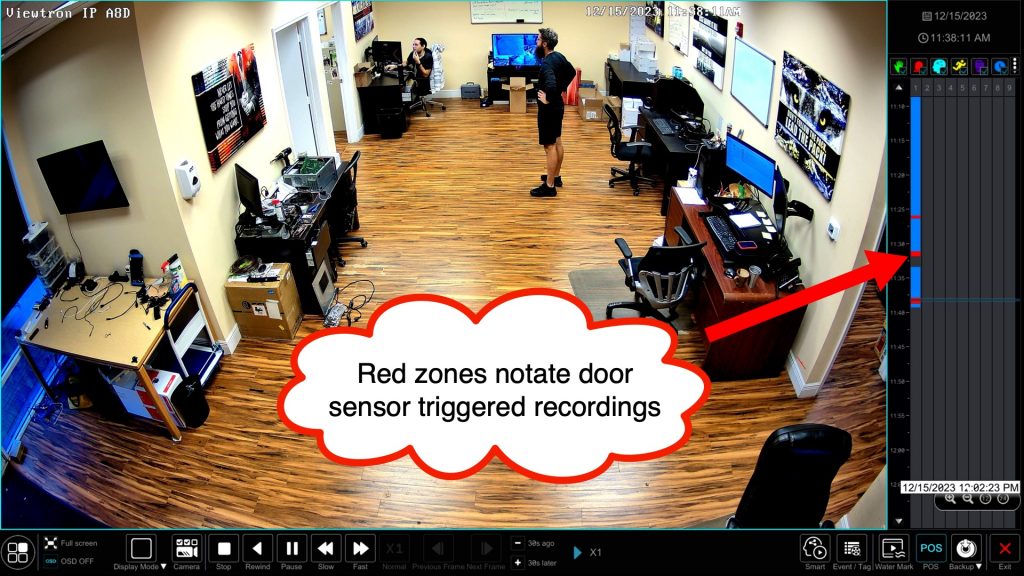
One of the benefits of using alarm sensor recordings on Viewtron DVRs and NVRs is that you can easily identify all of the door opening events on the DVR video playback time line.
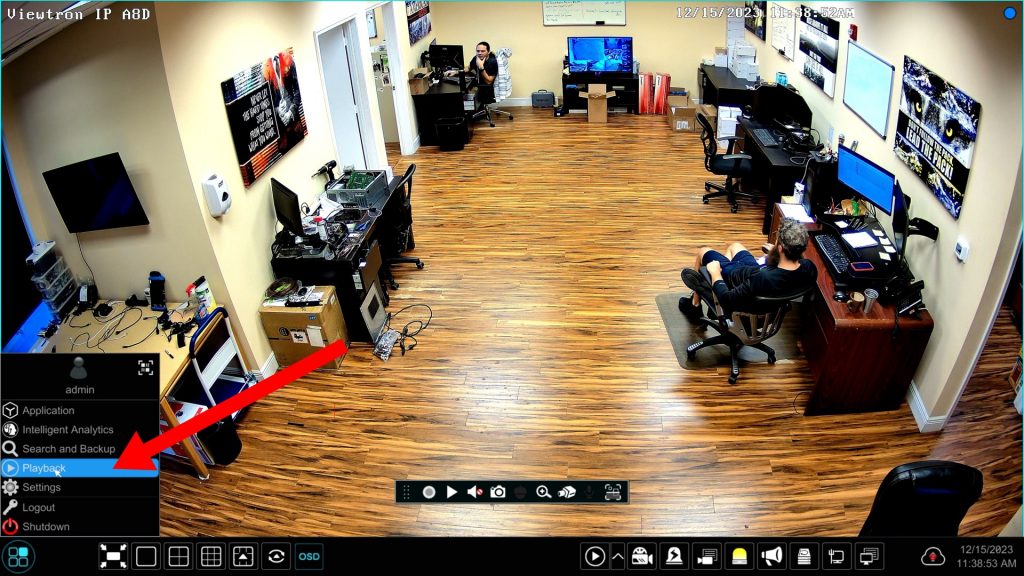
To playback video surveillance footage, select playback from the menu in the lower left.
When the video player opens, you will see a timeline on the right. The red zones on the time line notate the video recording events that were triggered by the magnetic door sensor opening.
Security Camera Alarm Sensor Recordings in Mobile App
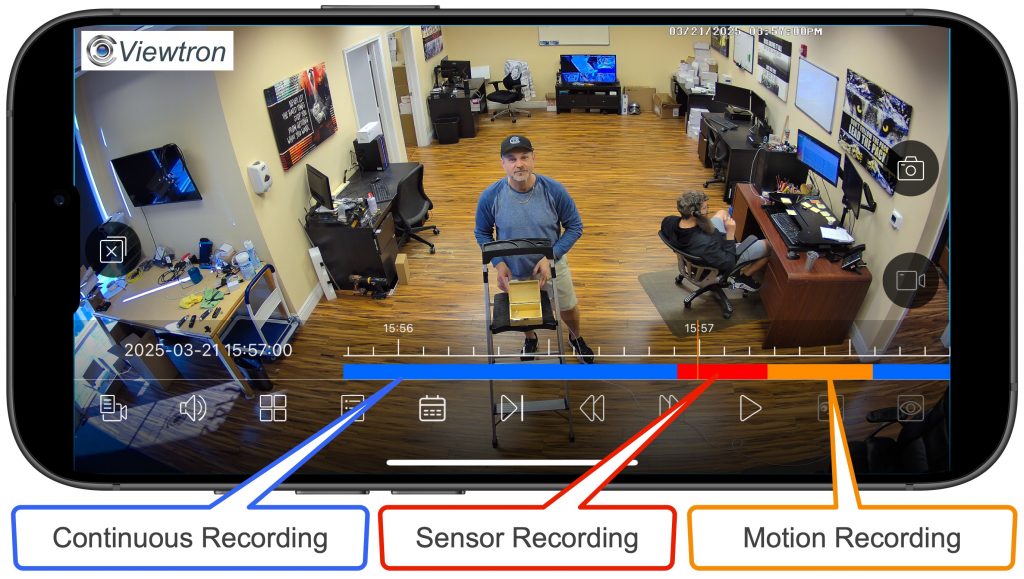
Video surveillance recordings triggered by alarm sensors are also very easy to find an playback in the mobile app for Viewtron DVRs / NVRs. You can see the video player in the above image. The time line annotates the different types of video recording in different colors. Sensor recording, such as video recording triggered by magnetic door sensors, are color coded in red.
Connect Motion Sensor to Security DVR
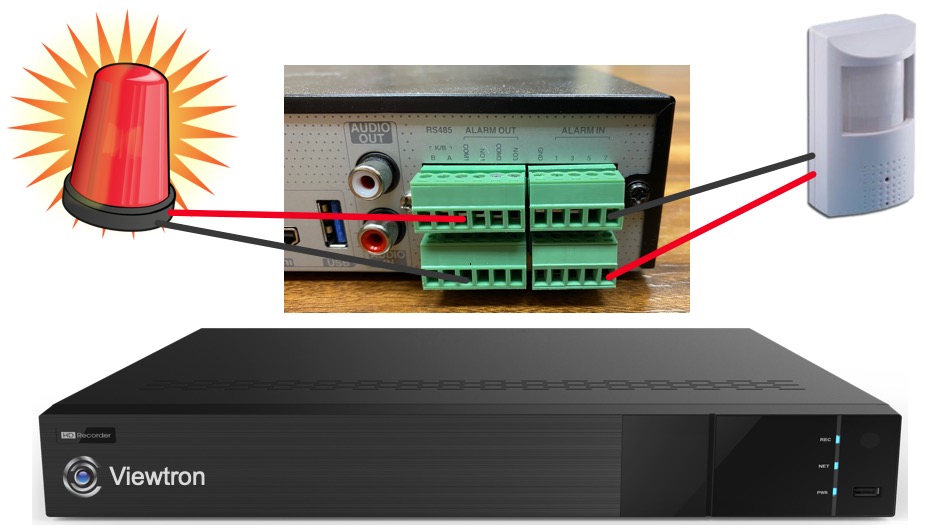
The alarm input ports on Viewtron DVRs / NVRs are not limited to magnetic door contacts. You can also connect external motion sensors to the alarm input ports. In addition, you can use alarm input devices to trigger other external alarm devices that may be connected to the DVR alarm relay output ports. Watch the above video to see a PIR motion sensor trigger a security light connected to the alarm output of the DVR.
Viewtron DVRs and NVRs

The setup instructions contained in the above videos applied to Viewtron IP camera NVRs and Viewtron hybrid CCTV DVRs.
Frequently Asked Questions
- Do I need to install a diode when connecting a magnetic door sensor to the alarm panel on my DVR? No. Door contacts are a dry contact. There is no current flowing through it, so it is not necessary to use a diode.
Video Transcript
Hey guys, Mike from CCTV Camera Pros here. In this video I’m going to show you how to connect a magnetic door sensor to the alarm input on one of our Viewtron security camera DVRs. When the window or door contact is open, that can trigger an alarm on our DVRs. And when you trigger an alarm, you can configure a number of events to happen. First off, obviously you could trigger a video surveillance recording, but in addition to that, you can also trigger a certain camera to pop up on the video display of the DVR. If you want to, you can alert someone that is monitoring your security camera system, like a security guard. You can also send a push notification to a mobile phone if you want. The mobile push alert works for iPhone and Android. So, first I’ll show you how we wire the magnetic door contact to the back of the DVR. It’s very simple, it’s just two wires. And then we’ll go in and we’ll configure the DVR software and run through a demo.
Wiring window and door alarm contacts to our Viewtron security camera DVRs is simple. I’m using 18 gauge power cable that we supply in spools. You can also use a single twisted pair from a Cat5 network cable. I have my door contact connected to the alarm input port number one on the alarm terminal block located on the back of the DVR. The cable is connected by inserting the stripped ends of the cable into port number one and the ground port, and tightening down the set screws. Next, we’re going to set up the Viewtron DVR. Actually, this is an IP camera NVR, but the setup is the same whether it’s a BNC, DVR or NVR. I select settings from the main menu and then select alarm sensor under the AI event area. So again, we’re using alarm input number one, which is labeled local one up here at the top of this menu. And I already named our alarm sensor, door sensor alarm input number one.
We’re going to go ahead and set this up, and you can set this up on a schedule. I’m going to set it to 24 hours a day around the clock, and the type is normally closed. Magnetic sensors are normally closed, and then when you open them, a door window is open and it triggers the alarm. Set a enable to on, and then you could set the duration for how long you want the alarm triggered. I’m going to leave mine at five seconds. So, now I’m going to configure it to start recording on the camera that covers our main sales floor. And I’m going to configure it to also trigger a snapshot image, so video recording and a snapshot. And if I wanted to, I could have it set a push notification to my phone, but we’re not going to test that in this video. But you could set this alarm to set off a push notification to the mobile app. And the last thing I’m going to do is I’m going to set to pop up the video full screen of that camera of our sales floor.
So, that’s the IP-A8D camera. And then I’m going to apply those settings. And then next, I want to make sure that recording is set up when the alarm is triggered. So, I’m going to go into the record settings, and you see right now I have continuous recording and AI recording set up. If I click on this advance button, I can add sensor record to that custom record mode. So, I’m going to check that box and click add and then apply those settings. And then when I’m done with that setup, I can exit out of the screen by clicking that X in the upper right, and then I’m back at the live view of the NVR. Now let’s run through a few tests. I’m going to overlay the video of the magnetic door sensor up here in the upper right, and you’ll see when I open up the door sensor, the view on the DVR is going to switch the full screen view of the camera I designated.
And you’ll notice that red dot in the upper right-hand corner of the screen that signifies that alarm sensor recording is currently activated. We set that for five seconds, so you’ll see that red light go off in a few seconds. And then I’m going to run through it one more time. I open up the door sensor, it goes full screen mode on that particular camera view, and the red dot signifies the alarm sensor recording. Guys, I hope this video has been helpful. I want to mention a couple things before we wrap up. The setup that I went through here is the exact same for our Viewtron hybrid security camera DVRs that work with BNC security cameras, as well as our Viewtron NVRs for IP cameras. The interface is exactly the same. In addition, we also have Viewtron IP cameras that have alarm input terminals blocks on them, so you can connect magnetic door sensors and window sensors directly to IP cameras as well.
It’s just as easy to connect like a PIR motion detector or any other alarm device that just has a normally open, normally closed type of circuit. You could use any type of alarm device as an input to these Viewtron, DVRs, NVRs and IP cameras. If you have any questions about any of this, feel free to reach out to me anytime. I could be reached directly at mike@cctvcamerapros.net. If you want to learn more about our Viewtron security camera systems and see additional video demos, please visit www.cctvcamerapros.com/viewtron. Thank you for watching.
