
Raspberry Pi IP Camera YouTube Live Video Streaming Server
Read this article to learn how-to use a network IP camera and Raspberry Pi as a YouTube livestream video server.
Project Background
Several customers at CCTV Camera Pros contacted me recently asking if it was possible to use a Zavio IP camera for YouTube live streaming. RTSP is the video streaming protocol built into most network IP cameras, including Zavio. After some quick research, I found that RTSP (Real Time Streaming Protocol) is not directly supported by YouTube. YouTube uses RTMP (RTMP Real-Time Messaging Protocol).
After some additional research, I found examples of how FFmpeg can be used to re-encode an RTSP stream to RTMP. FFmpeg is a free software project that produces libraries and programs for handling multimedia data. It is the base platform for most major video streaming applications. FFmpeg can be compiled and run on just about any operating system – including Mac, Windows, and Linux.
FFmpeg on Mac
I performed my initial testing by installing FFmpeg on a Macbook Air laptop. I used the Zavio F4215 HD IP camera that we have mounted to the ceiling of the sales room at CCTV Camera Pros office. The test worked very well but I did not want to use my Macbook long term. I wanted to create a live streaming application that could run for many consecutive days, weeks, and even months – without needing any maintenance or attention from me. So, I could not use the laptop that I take to and from work.
FFmpeg on Raspberry Pi
Next, I decided to test the application with a Raspberry Pi. I purchased the latest Raspberry Pi 3. Before my test, I wondered if it had enough processing power and memory to handle the intense video encoding / decoding that FFmpeg would be performing continuously. I also had concerns regarding the continuous network communication required to take the RTSP stream from my IP camera on the LAN and send a 1080p HD resolution RTMP output stream to YouTube over the Internet.
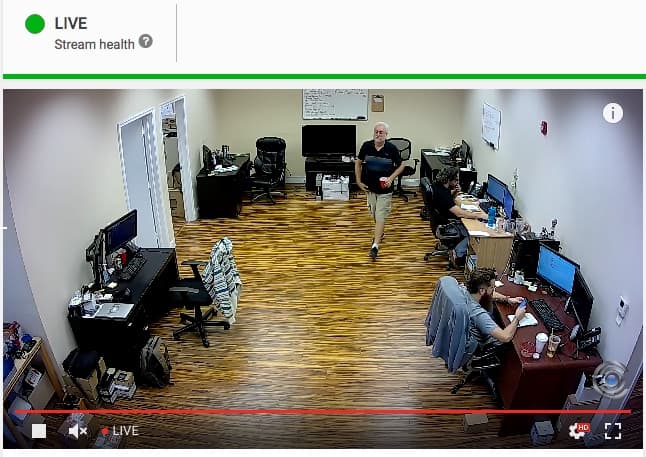
So far, the Raspberry Pi is working very well. It has been running for a a few weeks days continuously (at the time of this writing — 12/8/2016/2016). You can see an archive of the YouTube live stream embedded below. Click on the play button on the YouTube.
The stream was a live view of the sales room at CCTV Camera Pros. Sorry that it is not the most exciting view. I was just using this as a proof of concept for customers.I have since taken the stream offline now that this concept is proven.Customers contact CCTV Camera Pros for solutions for how to live stream wildlife, beaches, mountains, and other much more exciting views than this.
Project Setup
If you want to setup a Raspberry Pi and IP camera to be a livestream video server for YouTube, follow these setup instructions.
IP Camera
Before you begin configuring a Raspberry Pi, you should first make sure that you have an IP camera that makes available a URL to directly access an RTSP stream. All Zavio IP cameras provide this. If you are using another brand, please check your IPÂ camera’s technical documentation or ask the manufacturer to provide the RTSP stream and port that your camera model uses.
Here are the steps that I used to setup my IP camera.
- Make sure that you are connecting your IP camera to the same network as your Raspberry Pi. A hard wired connection will almost alwayts work better that wireless.
- You should configure a static LAN IP address for your IP camera. I normally do this on my router. If you do not know how to do this, search for your router model and IP reservation. Example google search: “Linksys router IP reservation”. That should point you in the right direction.
- Make note of the LAN IP address of your IP camera. It will be something like 192.168.0.100.
- Consult the manual for your IP camera to get the port number and URL that is used for its RTSP video stream. For Zavio IP cameras, you will use something like this.
rtsp://192.168.0.100:554/video.pro1
In this example, my IP camera’s IP address is 192.168.0.119. The RTSP port is 554 and the URL is /video.pro1.
Setup YouTube LiveStream
If you do not already have a YouTube channel / account, you need to register one first. Once you have a YouTube channel, follow the below instructions to configure your live stream.
- Login to YouTube dashboard by going here. https://www.youtube.com/dashboard?o=U
- Click on the Live Streaming > Stream now link on the left hand side menu.
- On the Stream Now page, scroll down towards the bottom of the page to find the Encoder Setup section. You need the Server URL and Stream name/key values to configure the BASH script that will be used to start and monitor the FFmpeg process on your Raspberry Pi. Your stream URL will look something like this: rtmp://a.rtmp.youtube.com/live2
Your stream key will look something like this: d5gz-5d1p-143w-qbha
Raspberry Pi Setup
-
- I started with a fresh Raspbian operating system installation using NOOBS. You can learn how to do this step-by-step here.
https://www.raspberrypi.org/documentation/installation/noobs.md - After installing Raspbian, boot the Raspberry Pi and open a terminal window. Note: before you turn your Raspberry Pi on, connect it to a network with Internet access using the wired Ethernet port. This should be the same network that your IP camera is on.
- The next few steps will run from the terminal window.
- Run this command to install some libraries that are needed for the installation.
sudo apt-get install git autoconf automake build-essential checkinstall libass-dev libgpac-dev libmp3lame-dev libopencore-amrnb-dev libopencore-amrwb-dev librtmp-dev libspeex-dev libtheora-dev libtool libvorbis-dev pkg-config texi2html zlib1g-dev yasm - X264 is a library needed by FFmpeg. Run this command to install the X264 libraries on Raspberry Pi.
cd /usr/src
sudo git clone git://git.videolan.org/x264
cd x264
sudo ./configure --host=arm-unknown-linux-gnueabi ––enable-static ––disable-opencl
sudo make
sudo make install FDK-AAC is another video library that FFmpeg needs to use. Just like the X264 libs, you should install FDK-AAC before compiling FFmpeg. Run these commands to install FDK-AAC on Raspberry Pi
cd /usr/src
sudo git clone --depth 1 git://github.com/mstorsjo/fdk-aac.git
cd fdk-aac
sudo autoreconf -fiv
sudo ./configure --disable-shared
sudo makesudo make install- Last, run these commands to compile and install FFmpeg on Raspbrery Pi. NOTE! This will take a long time (up to 3 or 4 hours) so be patient!
cd /usr/src
sudo git clone https://github.com/FFmpeg/FFmpeg.git
cd ffmpeg
sudo ./configure --enable-gpl --enable-libx264 --enable-gpl --enable-libass --enable-libfdk-aac --enable-libmp3lame --enable-libopencore-amrnb --enable-libopencore-amrwb --enable-libspeex --enable-librtmp --enable-libtheora --enable-libvorbis --enable-nonfree --enable-version3 --enable-nonfree
sudo make
sudo make install
- I started with a fresh Raspbian operating system installation using NOOBS. You can learn how to do this step-by-step here.
BASH Process Monitoring Script
In my testing, I found that the FFmpeg process would stop from time to time for unknown reasons. To compensate for this, I wrote a simple BASH script that checks to make sure FFmpeg is running, and if it is not, it will restart it. It is a very simple process monitoring script.
Here is the BASH script.
- You can download the source code for the BASH script here.
- Put the BASH script in the /home/pi directory on your Raspberry Pi. Name it start.sh
- Edit the script and replace the values for these variables.
RTSP_URL – replace this with the URL that your IP camera uses. If you are using a Zavio IP camera, this value does not need to change.
YOUTUBE_URL – most likely this does not need to change, but confirm it in your YouTube dashboard.
YOUTUBE_KEY – this is almost like a password so protect it wisely. You must change this value. The above key is not real. - After you edit the script, save it and set the permissions of it to be executable. You can use this command: chmod 755 start.sh
- You can test the script by running it with this command: sudo ./start.sh
- When you run this command, you should see live video on the stream now page in your YouTube dashboard.
This is what the video stream looks like in the YouTube dashboard.
Setup Cron Job
Cron is a time based job scheduler for Unix and Linux systems. I configured a cron job to run the start.sh script every minute. The script checks to make sure the FFmpeg process is running. and if it is not, it restarts it. If FFmpeg is already running, the script does not do anything.
To setup the cron job on your Raspberry Pi.
- Run this command.
crontab -e - This will open the cron configuration file for user “pi”. Add the following line to the file.
* * * * * sudo /home/pi/start3.sh - Then save the file and exit the editor you are using.
- Cron is now configured and the start.sh script will run every minute.
Even if your Raspberry Pi reboots, the cron will run and automatically start the FFmpeg video encoding process.
Live Video Stream Embed in Mobile Apps
After setting up my livestream, I also embedded the video in CCTV Camera Pros mobile apps for iPhone and Android. This is the great thing about using YouTube. It enables you to embed the live video on just about any platform and you don’t have to worry about usage. Here is a screen shot of what the video embed looks like in the iPhone app.
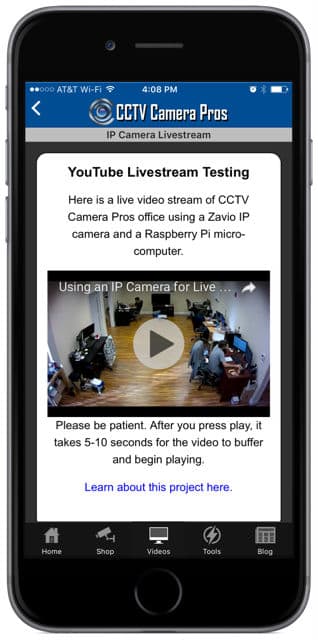
If you want to see the stream for yourself in the apps, you can download them here.
After you open the app, tap on the Videos section, then Live IP Camera Stream.
Live Video Stream with Multiple Cameras
You may also be interested in learning about how-to use multiple cameras to live stream video on YouTube and Facebook on this page. In that project, I use high definition security cameras (HD-over-Coax type) and a custom video streaming PC to broadcast various multi-camera displays. The display layout can be manually switched and also automated to rotate views.
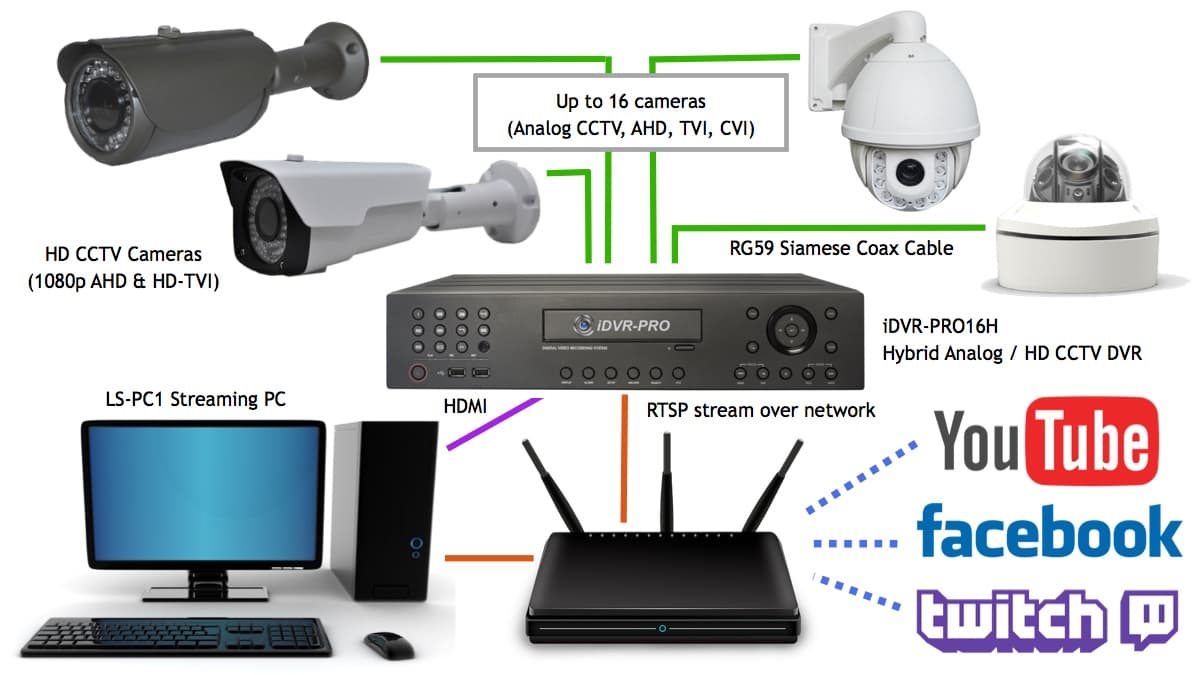
You can also learn more about the equipment used in these multi-camera live video streaming systems here.
If you find any errors or ways to improve this project, please email me at mike@cctvcamerapros.net.
Additional Raspberry Pi projects
You can find additional Raspberry Pi projects related to security camera system and alarm integration here.


