
CCTV Power Supply Box Installation Guide
This video will guide you through how to install a CCTV power supply box using pre-made Siamese security camera cables. Power supply boxes for CCTV are typically used in multi-camera installations instead of using single power adapters for each camera. The process is almost exactly the same if you prefer to use RG59 Siamese cable spools. This guide is applicable to analog CCTV cameras and HD BNC security cameras (AHD, HD-TVI HD-CVI, HD-SDI).
The cable installation is the same for 12V power supply boxes and 24V power supply boxes.
Power Distribution Box with PTC Fuses
The latest power distribution boxes use PTC auto reset fuses.
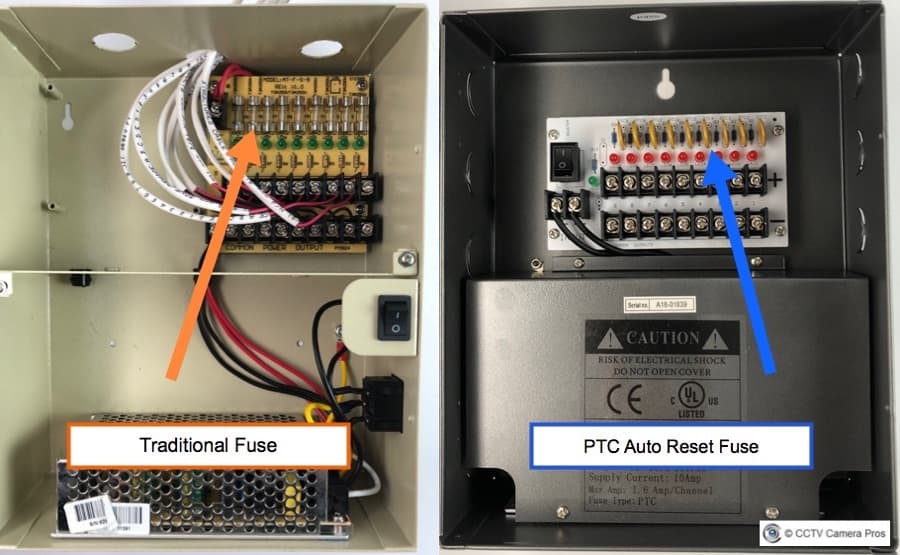
The above image shows the inside of a security camera power supply box with traditional fuses and one with PTC auto reset fuses. These are two different methods for surge protection. The advantage of PTC is that they do not burn out. The a circuit is overloaded, the PTC turns the circuit off. When the load is fixed, the PTC fuses automatically resets. There is no burnt out fuse to replace.
Video Transcript
In this video I’ll show you how to connect a CCTV camera to a power supply box using pre-made Siamese CCTV cables. On my bench, I have a 540L4 bullet security camera. It’s a standard DC powered security camera that has a BNC connector for the video output, and a 2.1mm power plug for the power input. Here is the pre-made Siamese cable.
Something to note: when you’re running this cable just be careful and make sure you run the right ends. You can see that they are different. The camera end is going to be the one that has the female power supply connector. Just be careful when you run cables that you do them correctly. I can’t tell you how many times we’ve done it wrong and then had to pull the cable out.
The BNC video connector pushes and twists on. The 2.1mm 12V DC power plug just pushes on real easy like that. Then, your power cable would be run back to where your power supply and your DVR are located. Then obviously the video would go to your CCTV DVR. I don’t have a DVR on the bench you can just pretend that’s connected to a DVR.
On the power end, you’ll notice the power supply box doesn’t have these 2.1mm plugs. It’s expecting a positive and a negative raw wire connection that screw onto these terminals. What we do is we use a PT3 power lead, plug that into the cable, and then run this through the access holes on the top of the power supply box. Now this is a 12 Volt DC power supply box, DC-powered camera.
With DC power, polarity is important, so you need to be sure to connect the positive connection, which is the solid red to the top terminal block, and then the ground or common to the bottom, which will be the red and black wire.
These are just standard screw terminals. You just insert the wire and then tighten it down. There’s the positive and then here’s the ground. Now those are secure there.
Typically this power supply box would be mounted on a wall right near your DVR. The box powered by a standard 110-120 volt AC power wall outlet with a 3-prong power cord.
There is a power switch for the whole power supply box. It turns on all the ports. This is an 18 port / 18 channel box, so it can power up to 18 cameras.
For more information on the equipment that was used in this video, please visit this webpage. Thank you for watching.
Related Articles and Pages
- RG59 Siamese Cable Wiring Guide for CCTV
- Pre-made Security Camera Cable Wiring Guide
- Voltage Drop Calculator
- What is HD-TVI?
- How to Connect a CCTV Camera to a TV
Related Surveillance System Equipment
- BNC Monitors
- BNC to HDMI Converter
- Infrared Security Cameras
- Box CCTV Cameras
- Hybrid AHD / CCTV Surveillance DVRs


