
Face Recognition Camera, IP Camera NVR Face Detection Software Setup
Watch this video demo to learn how-to setup a Viewtron face recognition camera and the face detection software on the IP camera NVR that it is connected to. Please note that there are very specific installation requirements for face recognition.
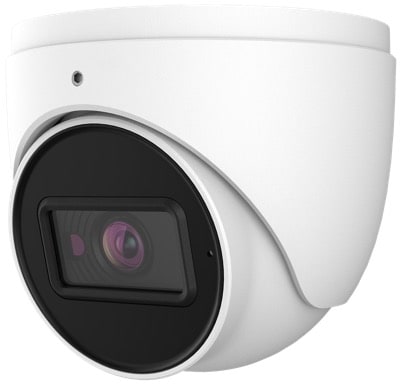
In the above video, we are using one of our 4K AI security cameras and a Viewtron NVR. Face detection and facial recognition are two of the available AI software functions available on Viewtron AI cameras. This is the 4K dome IP camera that was used in the video. Please note that all Viewtron AI cameras are network IP cameras. You can see all of our Viewtron AI security cameras here.
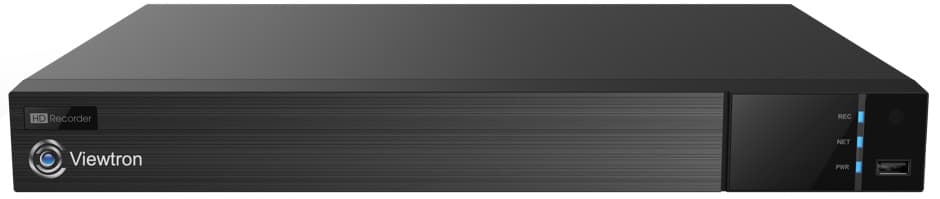
This is the Viewtron IP camera NVR that the camera is recording to and where all of the setup in the video takes place. Please note that in order to perform facial recognition, you must use one of these Viewtron NVRs with a Viewtron AI camera. This is because the face match database is located on the NVR, so that is where the face detection software does it’s processing.
Face Recognition Security Camera Installation Guide
Some important points to consider when installing a facial detection / face recognition camera.
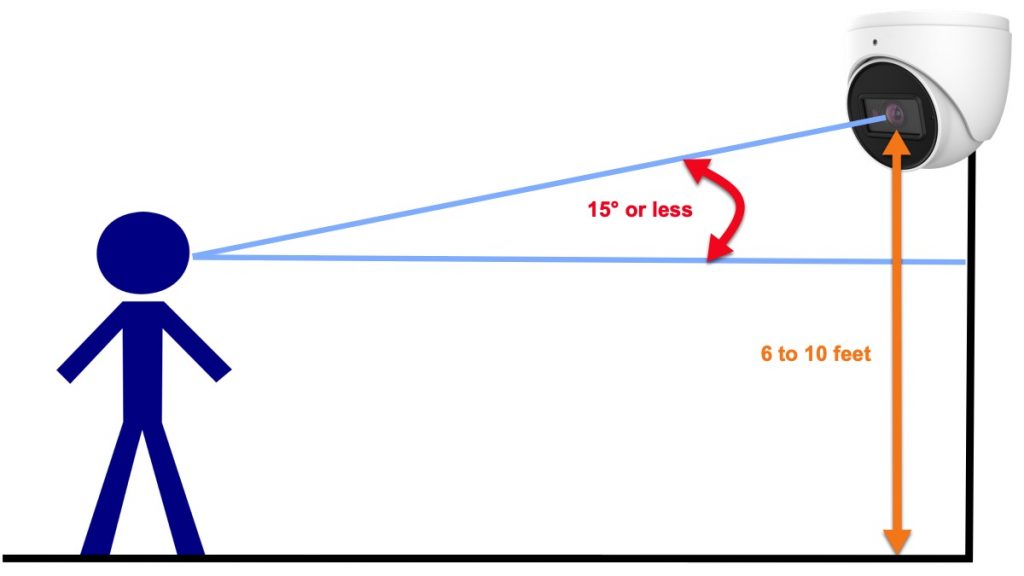
- The camera should be mounted as close to level where faces are entering the detection zone.
- Camera should be installed no greater than 15 feet from the facial recognition target area.
- The downward angle of the camera should be 15 degrees or less.
- Face detection cameras should be mounted between 6 and 8 feet from the ground level of the facial detection zone.
- The left or right angle of view should be less than 30 degrees. The more straight on the angle, the better.
- Face detection cameras do not work well in large crowded areas.
- They do work well when installed at building entrances where people are entering the detection zone one or a few at a time.
Viewtron Security Camera Systems
You can learn more about our Viewtron products on these pages.
- AI Security Cameras
- IP Camera NVRs with AI Software
- Hybrid Security Camera DVRs
- HD BNC Security Cameras
- Network IP Cameras
- License Plate Recognition Systems
- 4K IP Camera Systems
Video Transcription
Hey, guys. Mike, from CCTV Camera Pros here. In this video, I’m going to show you how to set the face detection and facial recognition AI software features using our Viewtron security camera system and I’m using one of our new 4K AI cameras. It’s that domed camera that you see there behind me. First I’m going to set up the AI software on the NVR and then I’m going to run through some tests to show you actually the facial detection and facial recognition. And then stay with me after the video because there’s some important points to talk about in regards to how to mount these cameras for face detection. It’s kind of similar to license plate recognition, where there’s some kind of strict requirements to how high you mount them. We’ll go over that after the demo.
Here’s the live security camera view on our Viewtron NVR and this is the 4K AI camera that we’re going to use to set up the face detection software. To do that, I’m going to select settings from the menu down here and then select AI/Event. On the AI event screen, I’m going to select face recognition, then select the camera that we’re going to use up here on this dropdown menu. Next, I’m going to enable detection by IP camera for face detection and then I’m going to draw a face detection zone on the screen. You generally want this to be pretty close to the camera. It can’t be too distant. And I’m going to make mine pretty big. You can also enable this display range to give you a guide for how big and small, a minimum, a maximum to set up the face sizes that are going to be coming through that zone. Judging by James in the background, I’m going to set this to 10% max and 4% minimum.
On the trigger mode screen, you could do things like enable snapshots, push notification, alarm buzzers and video popup. Bookmarking the event on the video recording happens automatically. You don’t need to do anything for that. Then I click apply and close and I go back to the live view of the camera.
Next, I’m going to enable the real time object detection display by clicking on that icon. That opens up that little window there on the right. Now when faces are detected and recognized in that zone, you’ll see that event pop up on that screen on the right. I’m going to walk through the face detection zone here and you’ll see the IP camera started tracking my face with that red box. It detected my face, it just detected James and then it’s going to detect Greg right here last. You can play back the video recordings from any of those events by hovering over these thumbnails and clicking on the play button. That’ll open up the video player and you can use these controls to control the video. You could also use this timeline to jump to other events.
All of the face detection events are highlighted in the light blue so if I click on them on that timeline, it’ll jump right to that section of the video recording. And you could adjust the timeline up by using that up arrow. And I’m just going to jump to a couple other events here. And then when I’m done, I can close that screen out by clicking on this exit button in the lower right.
There’s another way to pull up the face detection events that I’m going to show you. I’m going to close the screen out and go to the menu again and then select intelligent analytics. On the intelligent analytic screen, I’m going to select face and then today and then search. That’ll pull up all the face detection events that occurred today. It shows you the thumbnail image of those events and there’s a bunch of them. And if I want to play back any of those events, I can click on any of these thumbnails and it’ll start playing back in that playback screen in the lower left. If you want to see the full size view, you could hit that checkbox and then hit playback and that opens up the full size player. And when I’m done, again, I can click this exit in the lower right. That’ll bring me back to the intelligent analytics search. I close that out and I’m back at the live view of the IP camera.
Next I’m going to set up facial recognition and check faces against an authorized group in the face database. I go back into the AI event section and then select face recognition again. This time I’m going to choose face database. And we have three people added, myself, Zachary and Greg and we created a group called authorized and that these three faces are added to the authorized group. We added these faces using the Viewtron mobile app. It’s very easy to snap a picture in the Viewtron app and upload the snapshot to the NVR. Actually, I’m going to open up the app real quick and show you how that’s done.
From this menu, I select add person. That’ll open up the add new person camera and then I’m going to reverse the screen so it points back at me to take a selfie. And then after I take the picture, I can add my name and other information here. I’m just going to add my name for now, usually authorized group and click save and there it was added successfully. When I’m done, I’m going to go back and go back into the AI section again and then go into face recognition after I select our 4K AI camera. In the recognition, I’m going to check off stranger and then I’m going to check against all groups, which I only have one on this system, it’s the authorized group. You could see that here. Basically the system’s going to check to see when a face is detected if the user is in that database and if not, they’re considered a stranger and you could set up all the same alarm commands as the face detection. When I’m done, I click apply and click on this X.
Back at the live view of the camera, I’m going to enable the real time object display again here on the right. And in a minute, I’m going to have Greg walk through the face detection zone and remember Greg is in the authorized user list so when it detects Greg’s face in a second, you’re going to see that it compared them to the database and verified that Greg is an authorized face. Now, I’m going to have James walk through. He’s not in the authorized face group and you’ll see when James is detected, the system identifies him as a stranger and you can have the Viewtron system take a specific alarm action when that happens. And again, if I want to view the video, I can click on the play buttons here to go back and review that recorded video footage.
I hope this video’s been helpful. Let’s go over some things now. As you saw face detection is just when any face will be recognized and that’s bookmarked on the NVR so you can easily go back and see that. Facial recognition is actually comparing the faces that the camera captures to faces that are in a group database on the NVR and detecting if it’s a strange face or if it’s authorized face, you can do it either way. Some important points to consider, if you’re going to be using one of our Viewtron AI cameras for facial detection or face recognition.
You can’t mount these cameras too high, as close to level where faces come through as possible, the better. Between six and 10 feet at the most. As a rule of thumb, the camera angle downward can’t be more than 15 degrees, otherwise the face detection doesn’t work well. Also, it should be as much of a straight on view as possible. It shouldn’t be angled left or right towards the faces more than about 30 degrees. Kind of like license plate recognition, you have to follow those requirements for the install of these for face detection in order for the software to work well.
If you have any questions about any of this, you can reach out to me anytime via email, I could be reached at mike@cctvcamerapros.net. If you want to learn more about these Viewtron AI security cameras, please visit www.cctvcamerapros.com/AI.
Thank you for watching.


