
Setup Unique Recording Modes for Cameras on Viewtron DVRs
A common question that we get at CCTV Camera Pros is “can I setup motion recording on some of my security cameras and continuous recording on others?” You can do this and a whole lot more.
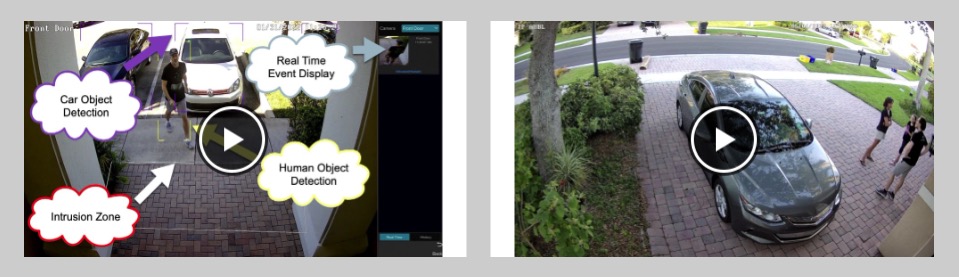
Watch this video to learn how to setup unique video surveillance recording modes and time schedules for each camera connected to a Viewtron hybrid BNC camera DVR or IP camera NVR.
Here are some examples of ways that you may configure video recording on your DVR / NVR.
- Camera 1 records continuously 24 hours a day, 7 days a week.
- Camera 2 records on motion detection only 24 hours a day, 7 days a week.
- Camera 3 records on motion detection only from 10pm to 6am, then from 6am to 10pm it records continuously.
- Camera 4 records on motion detection and continuous recording 24 hours a day.
- Camera 5 records on human intrusion detection 24 hours a day. Please note that this camera must me an AI security camera connected to an IP camera NVR.
- Camera 6 records when a car is detected entering a driveway from midnight to 5am.
- Camera 7 records when a magnetic door sensor opens.
As you can see, you can setup each camera to even use multiple recording modes at the same time.
*Please note that for new surveillance system installations or if you already have CAT5 cable installed, we highly recommend our AI security camera systems over BNC camera systems because the AI object detection software is so much more reliable when compared to video motion detection. However, if it is important to leverage existing coax cable that you already have installed, our Viewtron BNC systems are excellent too. The only feature that is missing is the AI software capability.
More Video Demos
You can watch additional video demos of Viewtron security camera systems here. You can see AI security camera video demos here.
Video Transcript
Hi everyone, Mike from CCTV Camera Pros here. In this video, I’m going to show you how to set up the video surveillance recording schedule on Viewtron security camera DVRs. This is applicable to both the Viewtron NVRs for IP cameras as well as the Viewtron hybrid DVRs for BNC security cameras. Afterwards, I’m going to talk about some of the slight differences between the NVRs and DVRs. The interface is the same but there are some small differences that I want to point out.
Okay, so here’s the live security camera display on the Viewtron NVR at our office and to access the recording settings, I’m going to click on the Start button in the lower left and then select Settings and then on this main setting screen I’m going to click record. By default when you get these out of the box, all of the recording is going to be on, the 24 by 7 record, motion recording, sensor recording, and in the case of NVRs, AI recording. The AI recording is only applicable to the Viewtron NVRs, and you could see the different recording modes here, motion, sensor, motion record plus sensor, 24 by 7 record plus motion record, so on and so forth. And when you change those modes, that’s applicable to all of the cameras on the system. This is if you want all cameras to be on the same recording mode.
Now if you want to set up different modes for different cameras, then you hit this mode dropdown box and select Customization. What that does now is that breaks up each camera so that you can set up different schedules for each camera. So for example, our license plate recognition camera, I might want that only to record on AI detection. So when a license plate is detected, but timed recording to be off. But this dome camera that we have in our office, I want that different. I want that set up to be on a time schedule 24 by 7 for example and AI maybe. And so you could see there’s three default recording schedules, 24 by 7, 24 hours a day during the weekdays and 24 hours a day on weekends. That’s what those three are and you could come under here to the schedule management and set up custom time schedules, so you can add one and name it whatever you want. I’m not going to through that, basically you name it and then you can pick and choose all the different times for every day of the week, all custom.
Okay, so back to the record mode. I’m going to switch that back to Auto and I just wanted to mention what I use at the office on our Viewtron NVR is I use Always On 24 by 7 plus AI. All of the cameras that we have here in the office are AI security cameras, so I do 24 by 7 recording plus AI and you’ll notice when you switch the modes, it’s going to pull up this screen so you can choose the resolution, the frame rate, the quality, and the bit rate, and whether audio is on or off if that’s applicable to the cameras you have, and then you can have different settings for the 24 by 7 schedule so for example if I want to save some hard drive space and have the quality lower on the 24 by 7 recording but then when there is an AI event, I want that bumped up to the highest. That’s an option that you could do. You could also for example on this schedule recording have audio off on one or more cameras but then when AI is triggered, audio on, and you could change each one of these for both the schedule record and the AI record. I just leave everything on the highest rate because we have plenty of hard drive space on these.
So now I’m going to go back out and show you what playback looks like real quick. so we’re back at the live view, and if I want to play back video, recorded video surveillance footage on this system, I can select this Start button again and then select Playback. So that puts the NVR in playback mode, it will look the same on a BNC DVR, and you’ll notice it opened up this time scrubber over here so I could jump to different points in time and it’s displaying the AI events in light blue. So you can uncheck these different types of recordings, none of these are applicable because again I’m just doing 24 by 7 recording plus AI recording so the light blue and the dark blue, and if I want to jump back to one of these AI events to see what happened, I can just select on the time scrubber that point in time. So we’ll go back and see what happened here, and it was a car, this car here going through … I have a detection zone set up here when vehicles pass through, so that’s what happened there.
And then we’ll jump to another event, so we’ll see what happened up here maybe, right here, and … It must have been sooner than that. Oh, that big truck went through the same area. So another motion event or AI object detection event in that overview camera. When you’re done playing back video, you click on this X in the lower right, and that will bring you back to the live security camera display.
Next, I want to show you the slight difference on the user interface on the Viewtron DVRs. So on the DVRs, when you select the manual mode, the manual settings don’t appear on that same screen, you have to click on this record schedule link on the left and then you can individually set the schedules on a per camera basis.
I hope this video has been helpful in showing just how easy it is to set up the video’s recording schedule on Viewtron security camera DVRs. The UI on these is extremely easy to use, and if you ever need help, our tech support staff is the best in the industry. If you want to learn more about these Viewtron recorders, the NVRs and the DVRs, we also have a line of BNC cameras and IP cameras, you can visit www.cctvcamerapros.com/viewtron and as always, if you have questions about anything you saw here or anything related to security camera systems, feel free to email me any time. I can be reached directly at mike@cctvcamerapros.net. Thank you for watching.


