How-to Trigger Video Surveillance Recording with Burglar Alarm Sensors
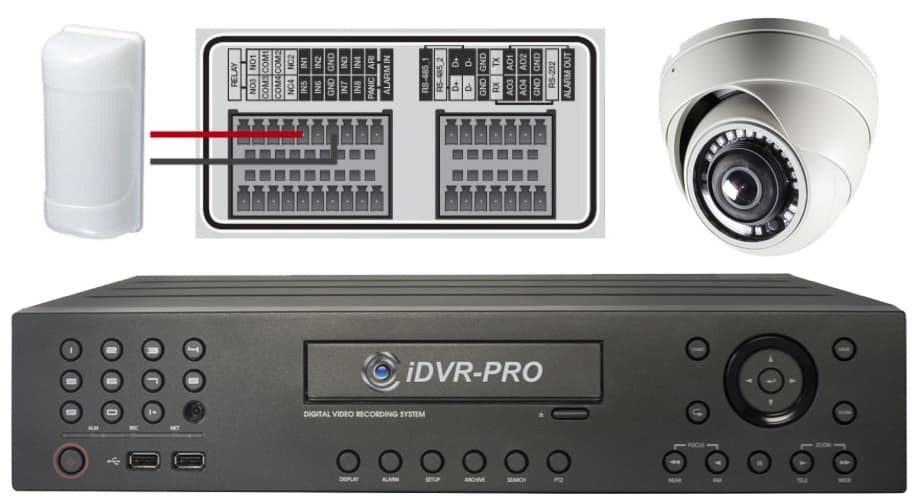
Burglar alarm sensors can be used to trigger recording on some video surveillance DVRs. This article will document how alarm recording can be setup using motion detectors and magnetic door sensors connected to an iDVR-PRO HD security camera DVR. I hope that this article explains the process simply, so that both DIY and professional installers can follow it. The installation and setup process will be similar on other type of DVRs (as long as they support alarm sensor input recording).
Viewtron DVRs and NVRs
Please note that CCTV Camera Pros now recommends Viewtron security camera DVRs and IP camera NVRs. Both have alarm input / alarm output ports and can be integrated in the same way as described in this article.
You can watch a video demo here.
The setup for iDVR-PRO DVRs consists of the following steps.
- Wire the Alarm Sensors to DVR
- Link Alarm Sensors to Security Cameras
- Setup the Alarm Recording Schedule
Click here if you prefer to watch a video demo of the entire setup process and view actual recorded video footage.
Wiring Alarm Sensors to a DVR
18 gauge / 2 conductor power wire is very typically used by professional installers to install alarm sensors. One of the cable pairs from a CAT-5 cable can also be used. Either type or cable can be used to wire burglar alarm motion detectors or magnetic door sensors for example.
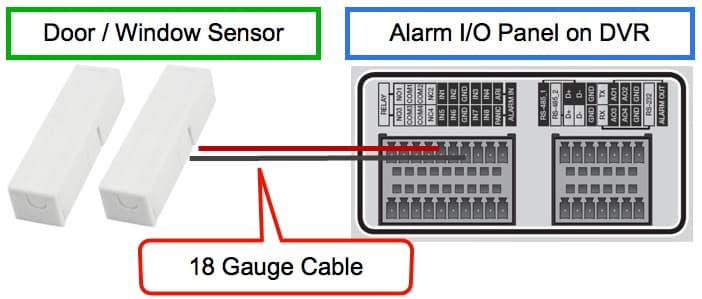
The above image shows how-to wire a magnetic door / window alarm sensor to a DVR. You can use a standard window sensor that is typically used with burglar alarms. The alarm input / output panel pictured is the one on the back of an iDVR-PRO16H DVR. The panel should look similar on other models.
The alarm terminal block on the DVR will have one or more alarm input terminals and one or more ground terminals. Sometimes there are less ground terminals because they can be shared by multiple inputs. The 18/2 cable is used to connect the terminals from the sensor to the input and ground on the DVR.
Motion Detector Wiring to Security Camera DVR
Wiring a motion detector to a security camera DVR works the same way as a door contact sensor, except that PIR motion sensors also require power.
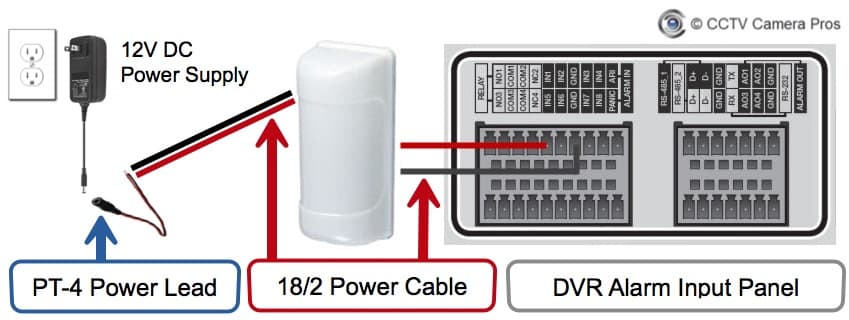
In the above wiring diagram, the motion detector is wired to the DVR using the same 18/2 power cable as used with the window / door contact installation. The motion detector connects to one of the alarm input ports on the back of the DVR.
18/2 power cable is also used to connect the motion detector to an individual 12V DC power supply. Because the power supply has a 3.1mm plug, a PT-4 power lead is used to transform the 2 raw power wires to a 3.1mm male connector.
Installation with Power Supply Box
A multi-channel 12V DC power supply box can be used to power the motion detector instead of an individual power supply.
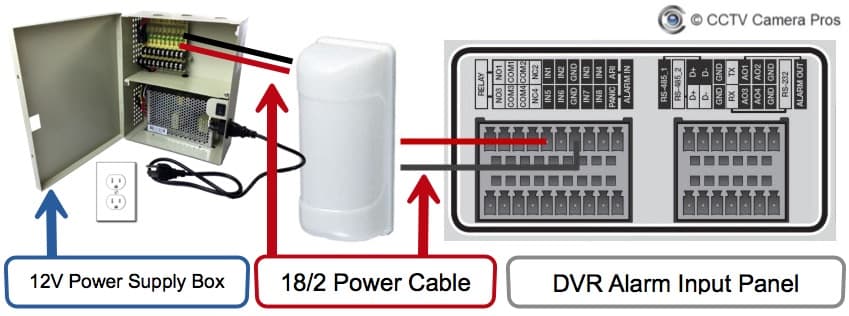
This installation works the same way, except for the use of a 12V DC power supply box instead of an individual transformer. Because most power supply boxes use screw terminals to connect raw power cable, there is no need to use the PT-4 power lead (as with the individual power supply installation).
Link Alarm Sensors to Security Cameras
The DVR needs to be configured to know which camera(s) each alarm sensor should be linked / mapped to. iDVR-PRO DVRs support the ability to map each alarm sensor to multiple cameras. For example, you may want to trigger video recording when motion is detected by an outdoor PIR sensor. Maybe you want recording on the camera nearest to the sensor and also one or more of the cameras in the surrounding areas. Alternatively, you may want to trigger recording on just one or all of your security cameras.
This is how to map your alarm sensors to one or more security cameras using an iDVR-PRO.
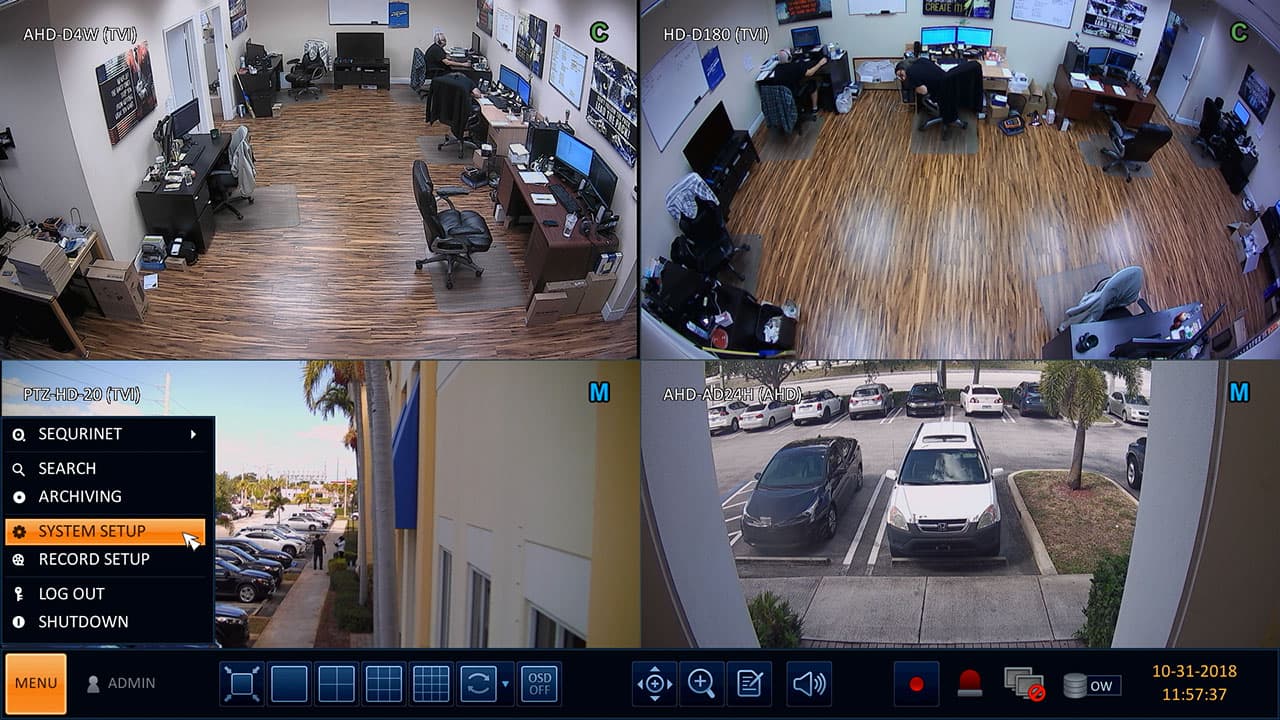
Select System Setup from the main Menu.
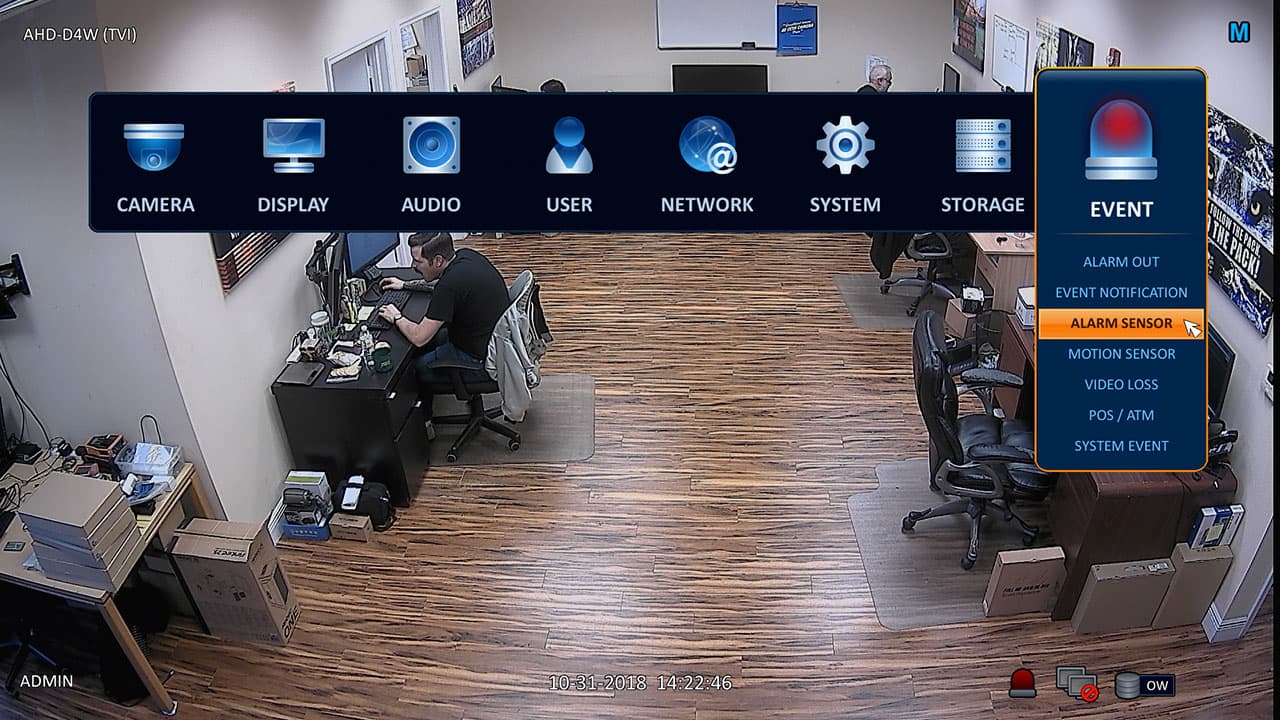
Next, select Alarm Sensor from the Event menu.
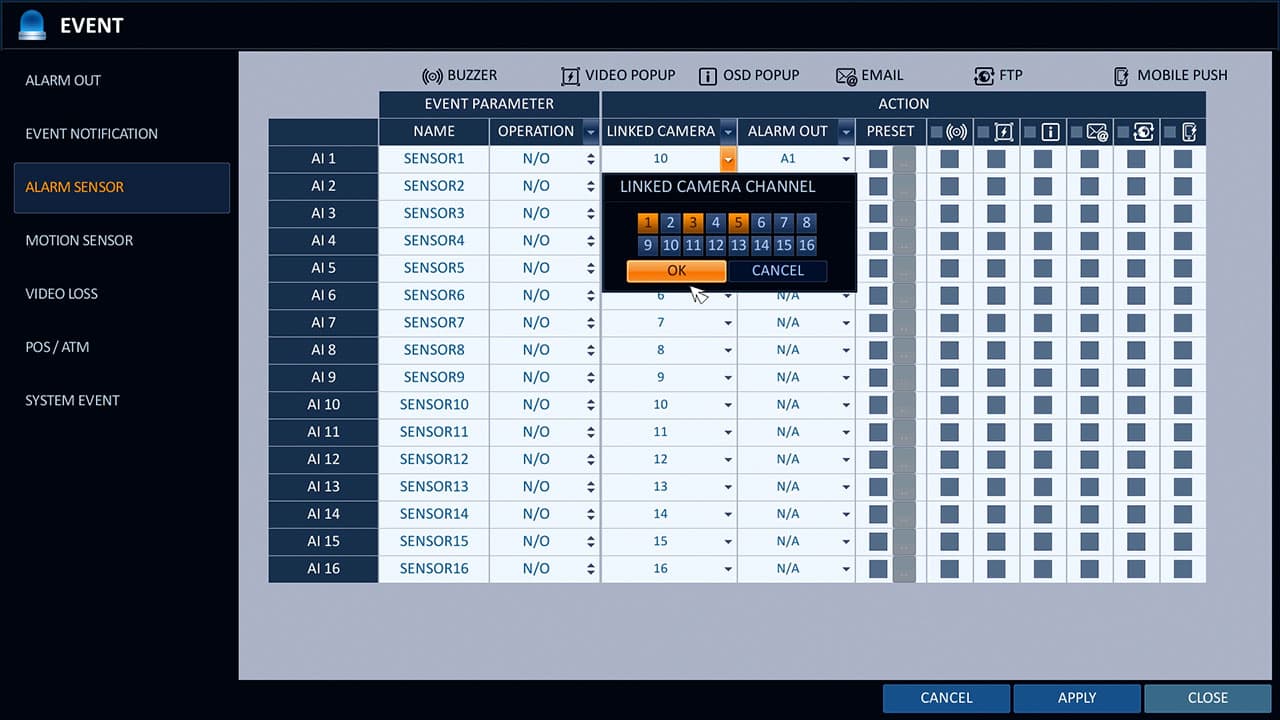
On the Alarm Sensor screen, you will see a list of the alarm sensor input ports supported by the DVR. In the above example, I am linking the alarm sensor connected to port one (AI1) to cameras one, three, and five. Please note that there are other actions that can be triggered besides video recording. I am not going to go into detail about each on in this article, but you can see above that email alerts, mobile app push notifications (iPhone and Android), FTP file upload, buzzer, alarm output, and video popups can also be setup.
After I map all of the cameras, I click on Apply and Close.
Setup Alarm Recording Schedule
You may not want your alarm sensors to always trigger video recording. iDVR-PRO DVRs support the ability to setup a recording schedule for each camera.
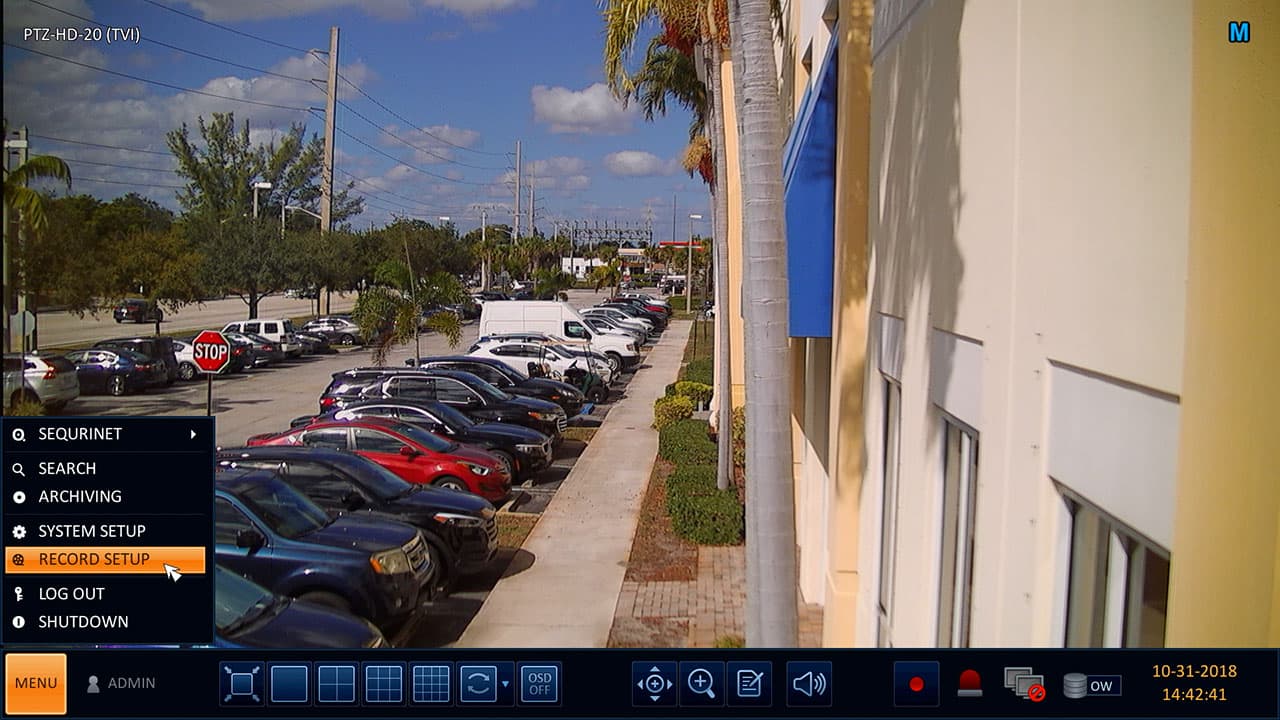
To setup a recording schedule, select Record Setup from the main Menu.
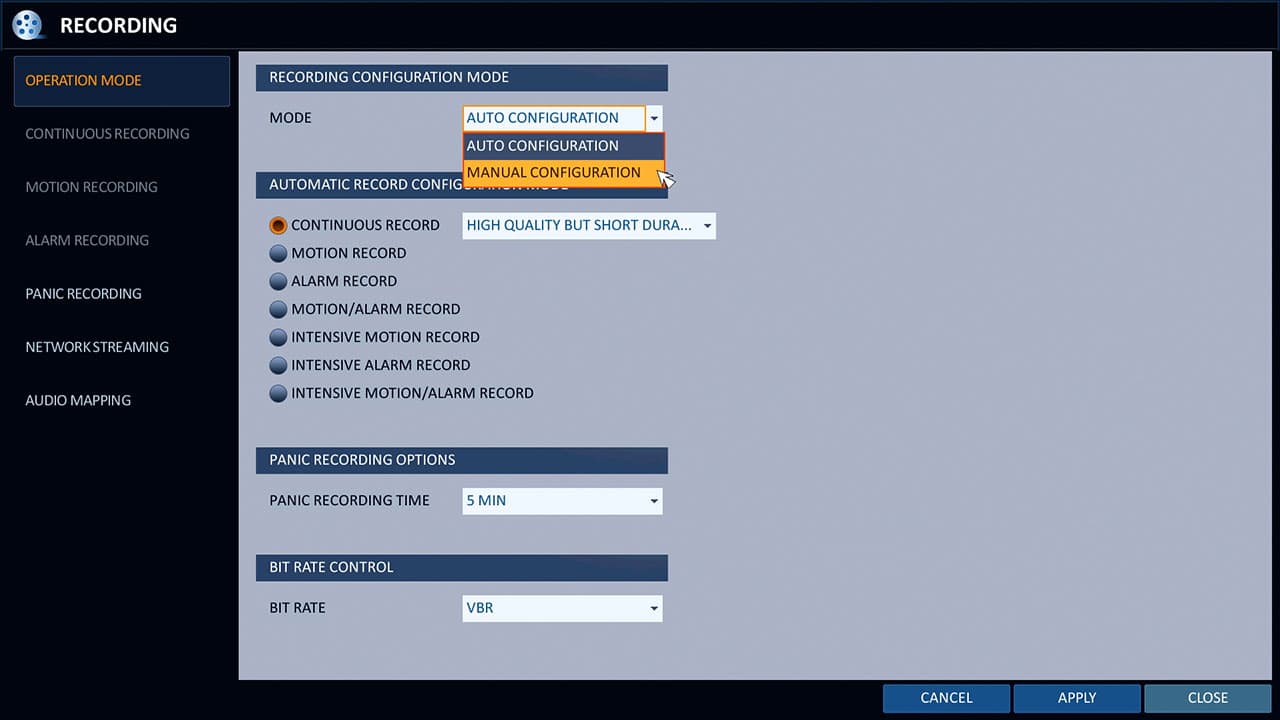
On the Recording screen, select Manual Configuration from the Mode dropdown, then click Apply. The manual configuration enables you to setup very specific recoding schedules.
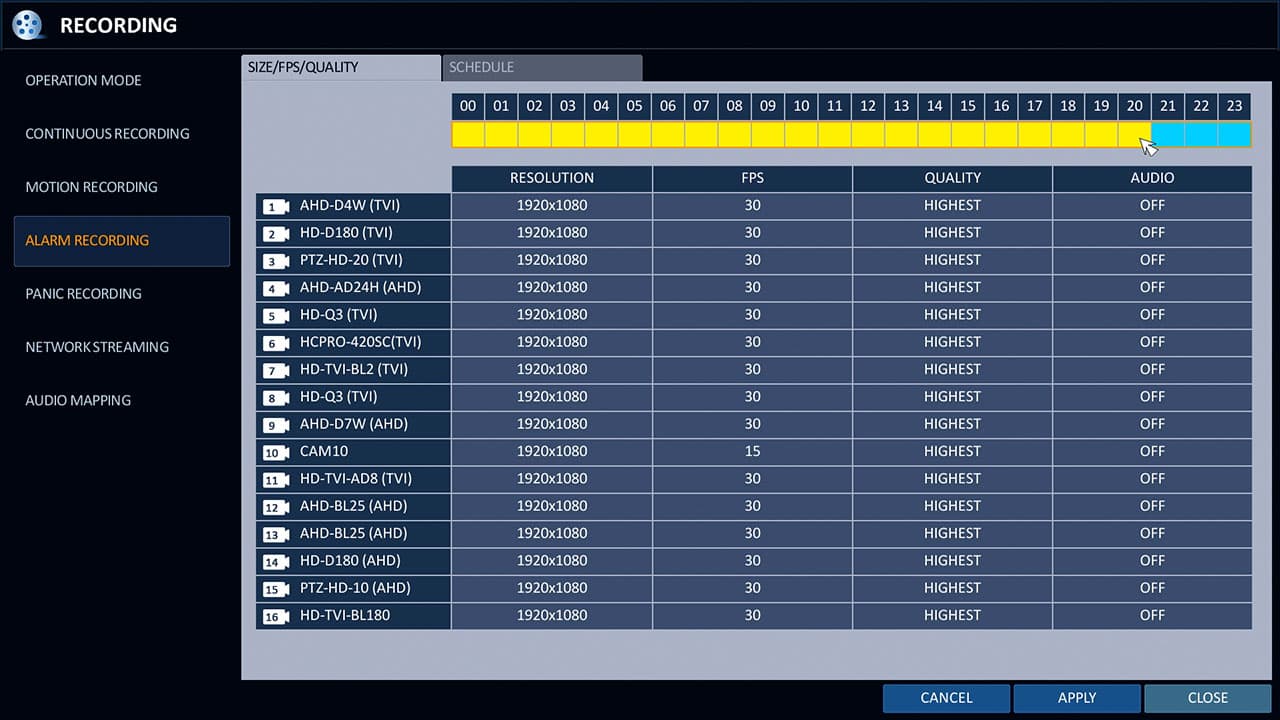
On the Alarm Recording screen, you may configure each camera’s recording resolution, frame rate (FPS), video compression quality, and audio on/off. There is a timeline (by military hours) on the top of this screen. To adjust the quality settings, first select the hours in which you want the settings to apply. In most cases, you will select all hours. You can then adjust the quality settings. Click apply when done.
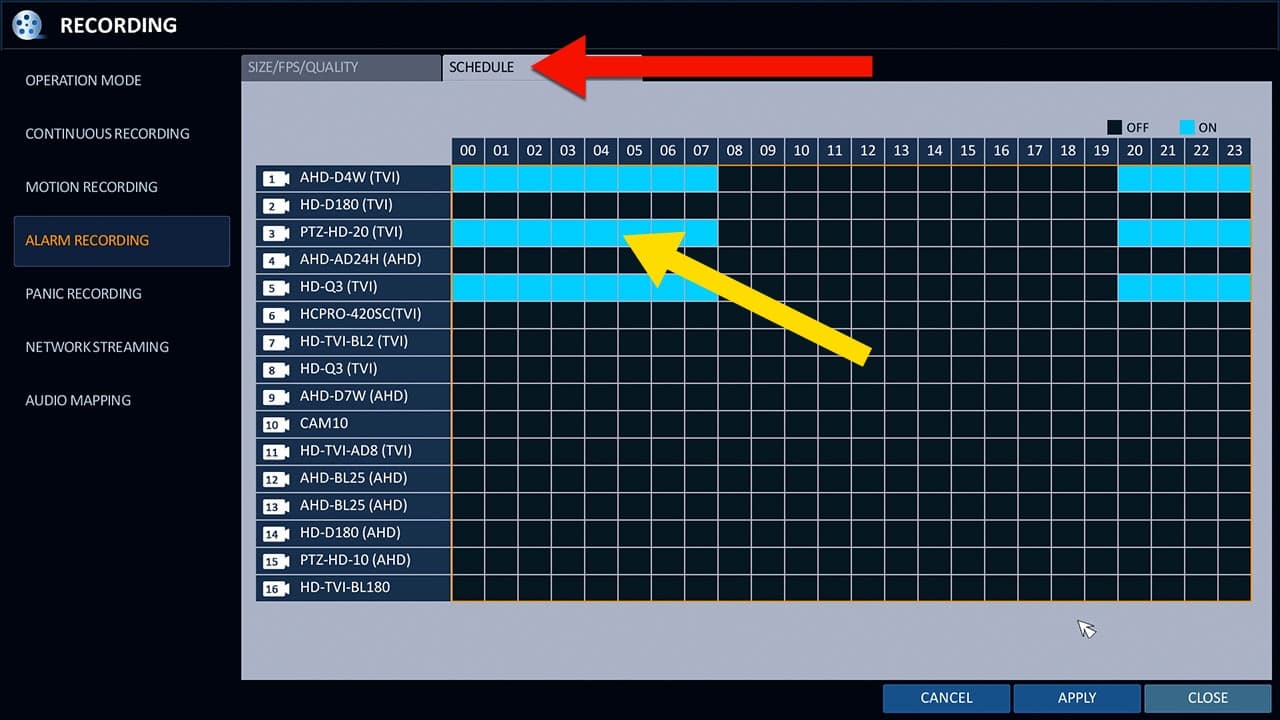
Next, click on the Schedule tab on the top of the screen. On the schedule screen, you can setup alarm schedule for each CCTV camera. In the above example, I setup cameras one, three, and five to have active alarm recording from 10:00pm (20:00 military time) through 8:00am (0800 military time). Click Apply, then Close when done.
Please note that when iDVR-PRO DVRs are setup in “Manual Configuration” mode, as seen in these instructions, video recording schedules for continuous recording and motion detection recording can also be configured. All three of these recording modes can be used simultaneously.
Video Demo
Watch this video to see how-to configure a PIR motion detector to trigger video surveillance recording on an iDVR-PRO analog CCTV / HD-over-Coax security camera DVR.
The video also shows how to access the DVRs timeline search to identify an playback recorded video that was triggered by the alarm input. You can watch additional DVR setup videos here.
Surveillance Equipment
Want to learn more about the video surveillance system used in this article. Please refer to the following links.
- iDVR-PRO surveillance DVRs – these DVRs support analog CCTV and HD-over-Coax type cameras.
- HD security cameras – all of the cameras that appear in the above screenshots and demo video are 1080p resolution HD-over-Coax (HD CCTV) type security cameras.
- 18/2 gauge power cable – in addition to being used for power supplies, 18/2 is commonly used to wire burglar alarm sensors.
- PIR motion detectors – outdoor and indoor sensors can be used. These models have been tested and work great with iDVR-PRO DVRs.
- Magnetic Contact Switch for Doors and Windows – These window / door sensors have been tested and work great with iDVR-PRO DVRs.
Help and Questions
If you have any questions about this article or anything else related to security camera systems, please contact me by email here.


