
Viewtron Security Camera Alarm API for Systems Integration
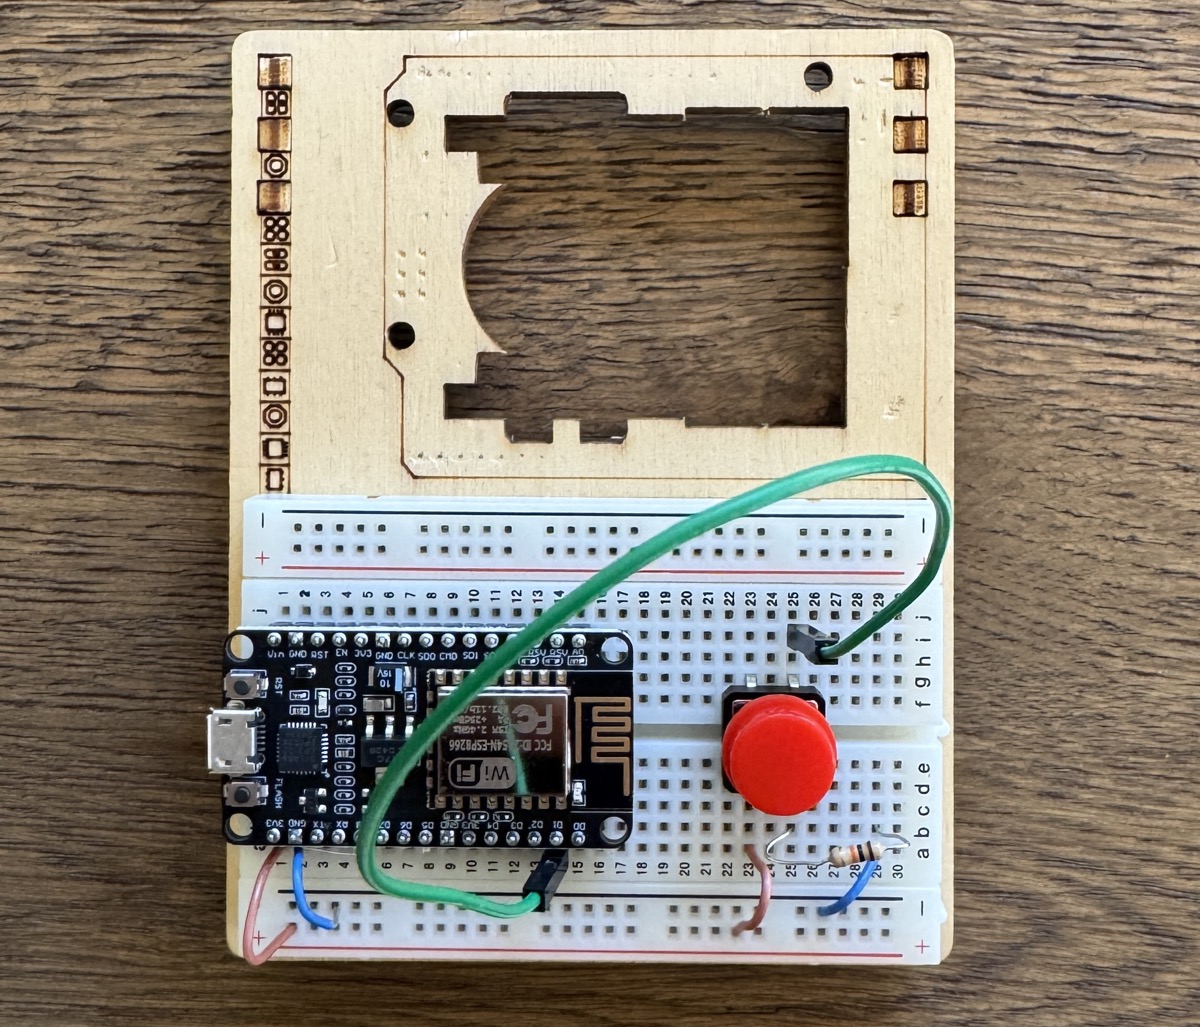
The virtual alarm and webhook API integration capability of Viewtron IP camera NVRs provide a simple and powerful way to integrate IoT (Internet of things) with your security camera system. The Viewtron API uses HTTP Posts to communicate with the NVR. Watch the above video to see a how I created wireless alarm button using an Arduino board to demonstrate this.
This is how it works.
Viewtron NVR Virtual Alarm Function
Viewtron NVRs now support a feature called “virtual alarm”. It’s functionality is similar to the physical alarm inputs on the back of Viewtron NVRs, except virtual alarms can be triggered from IoT devices over an IP network. The devices that trigger virtual alarms are not hard wired to the alarm panel on the back in the NVR. They send an HTTP Post to a webhook endpoint on the Viewtron NVR. A webhook endpoint is simple a URL that gets sent some data to let the NVR know the alarm was virtually triggered.
This is how it is setup on the NVR.
Enable API Server on NVR
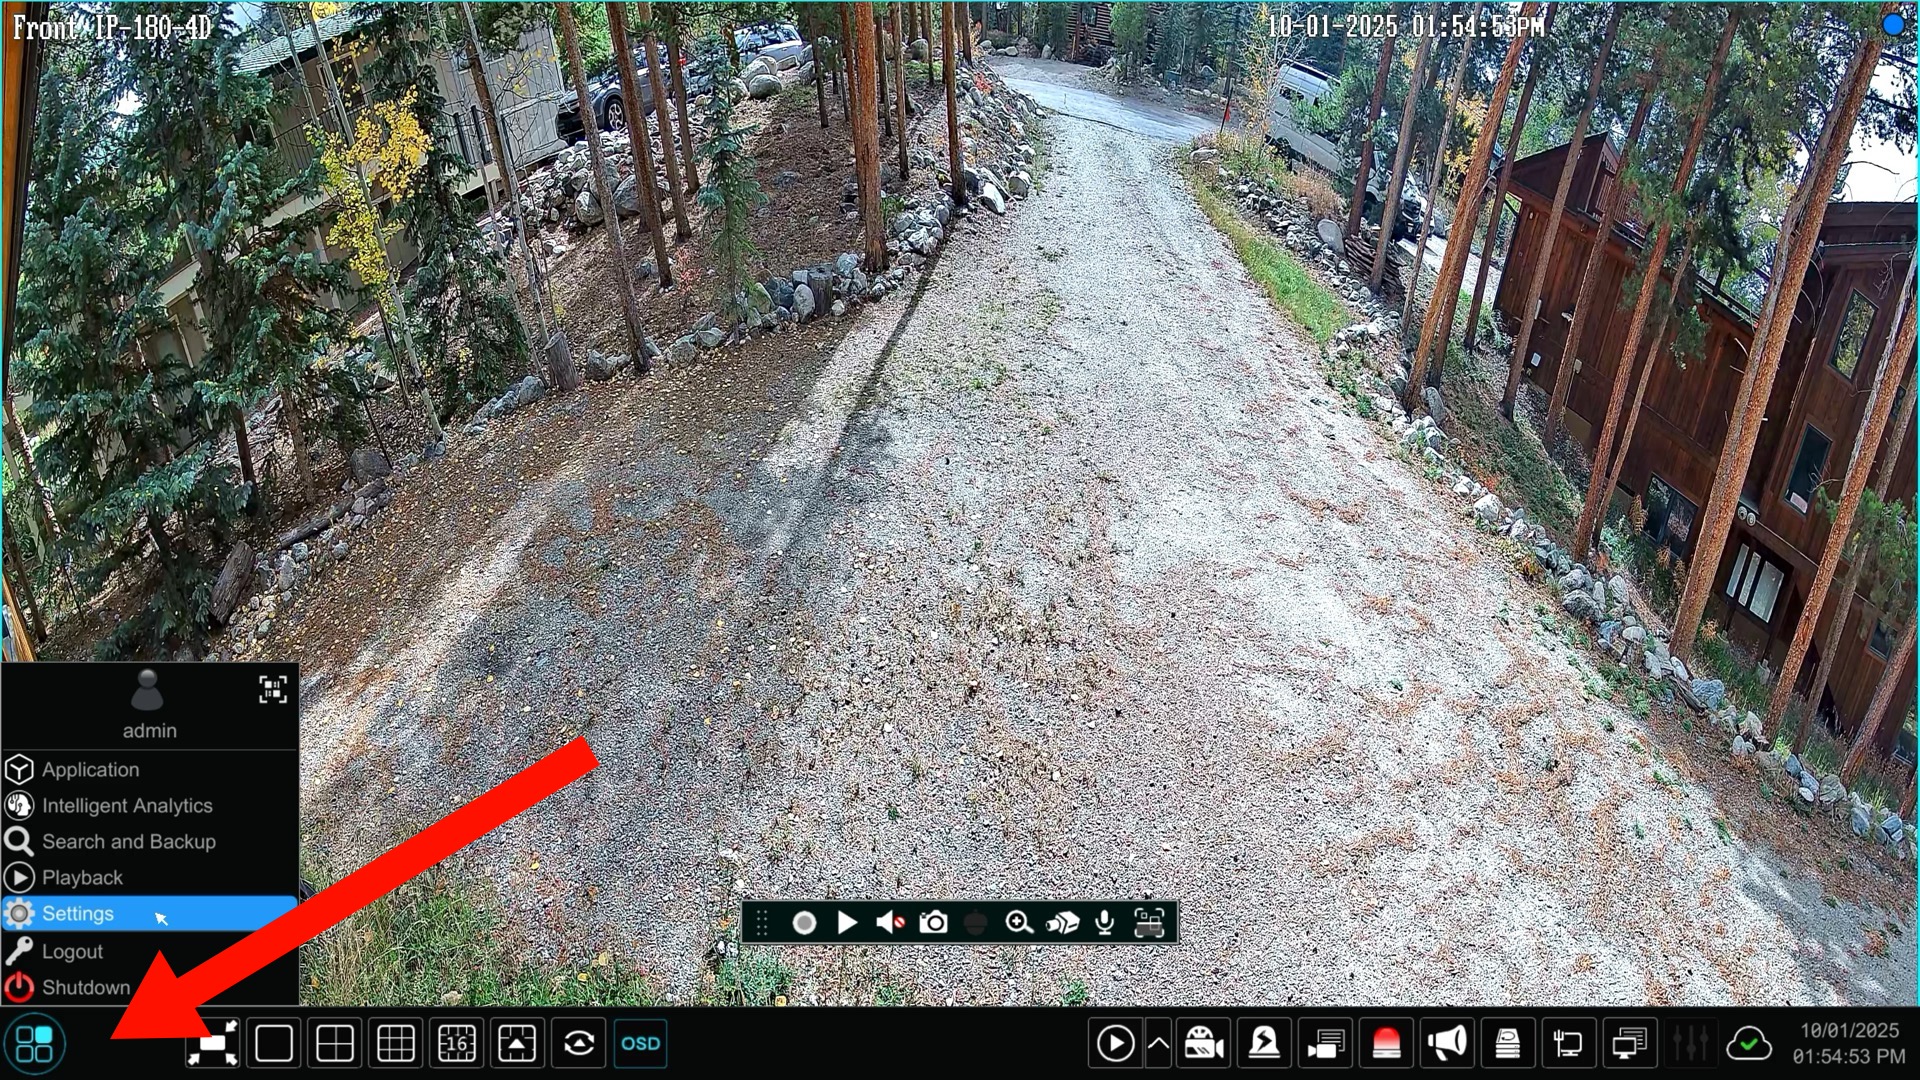
Click on the Start button in the lower left, then click on Settings.
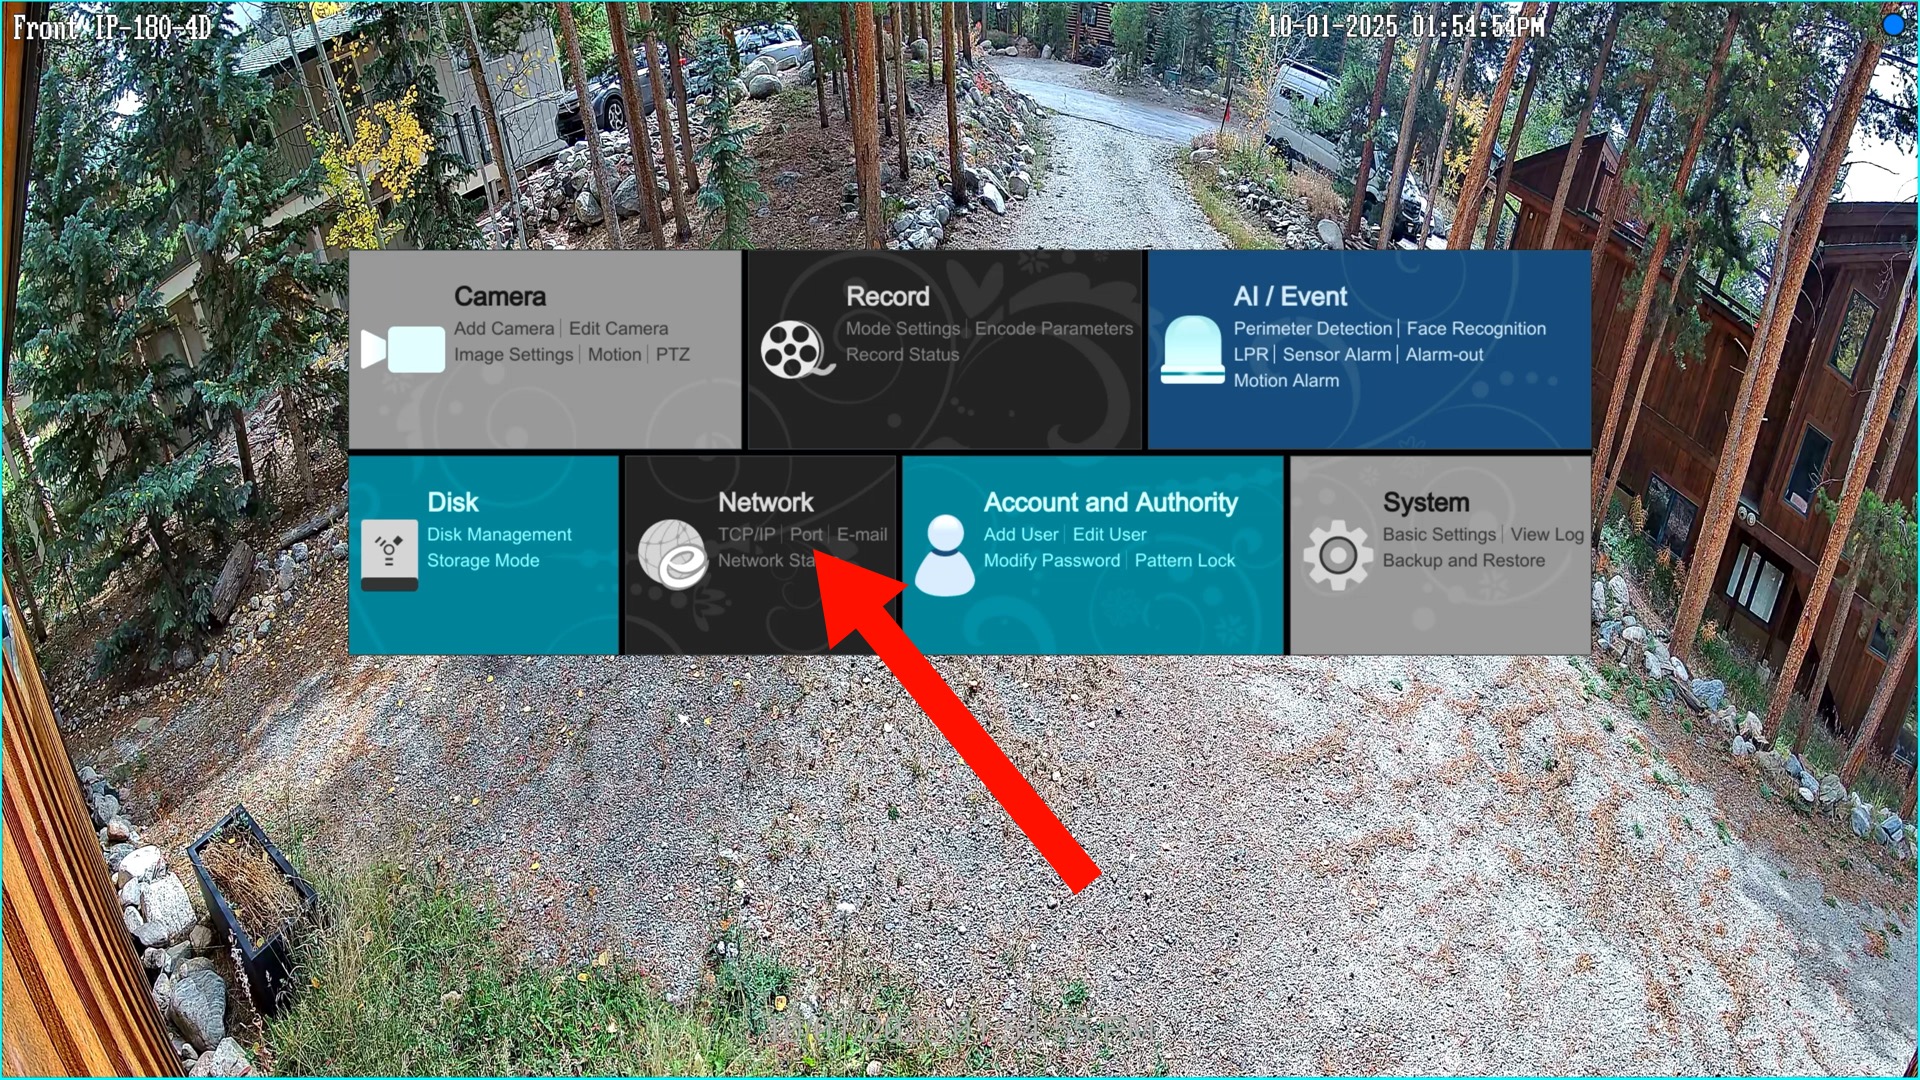
Click on the Port link in the Network settings section of the main settings menu.
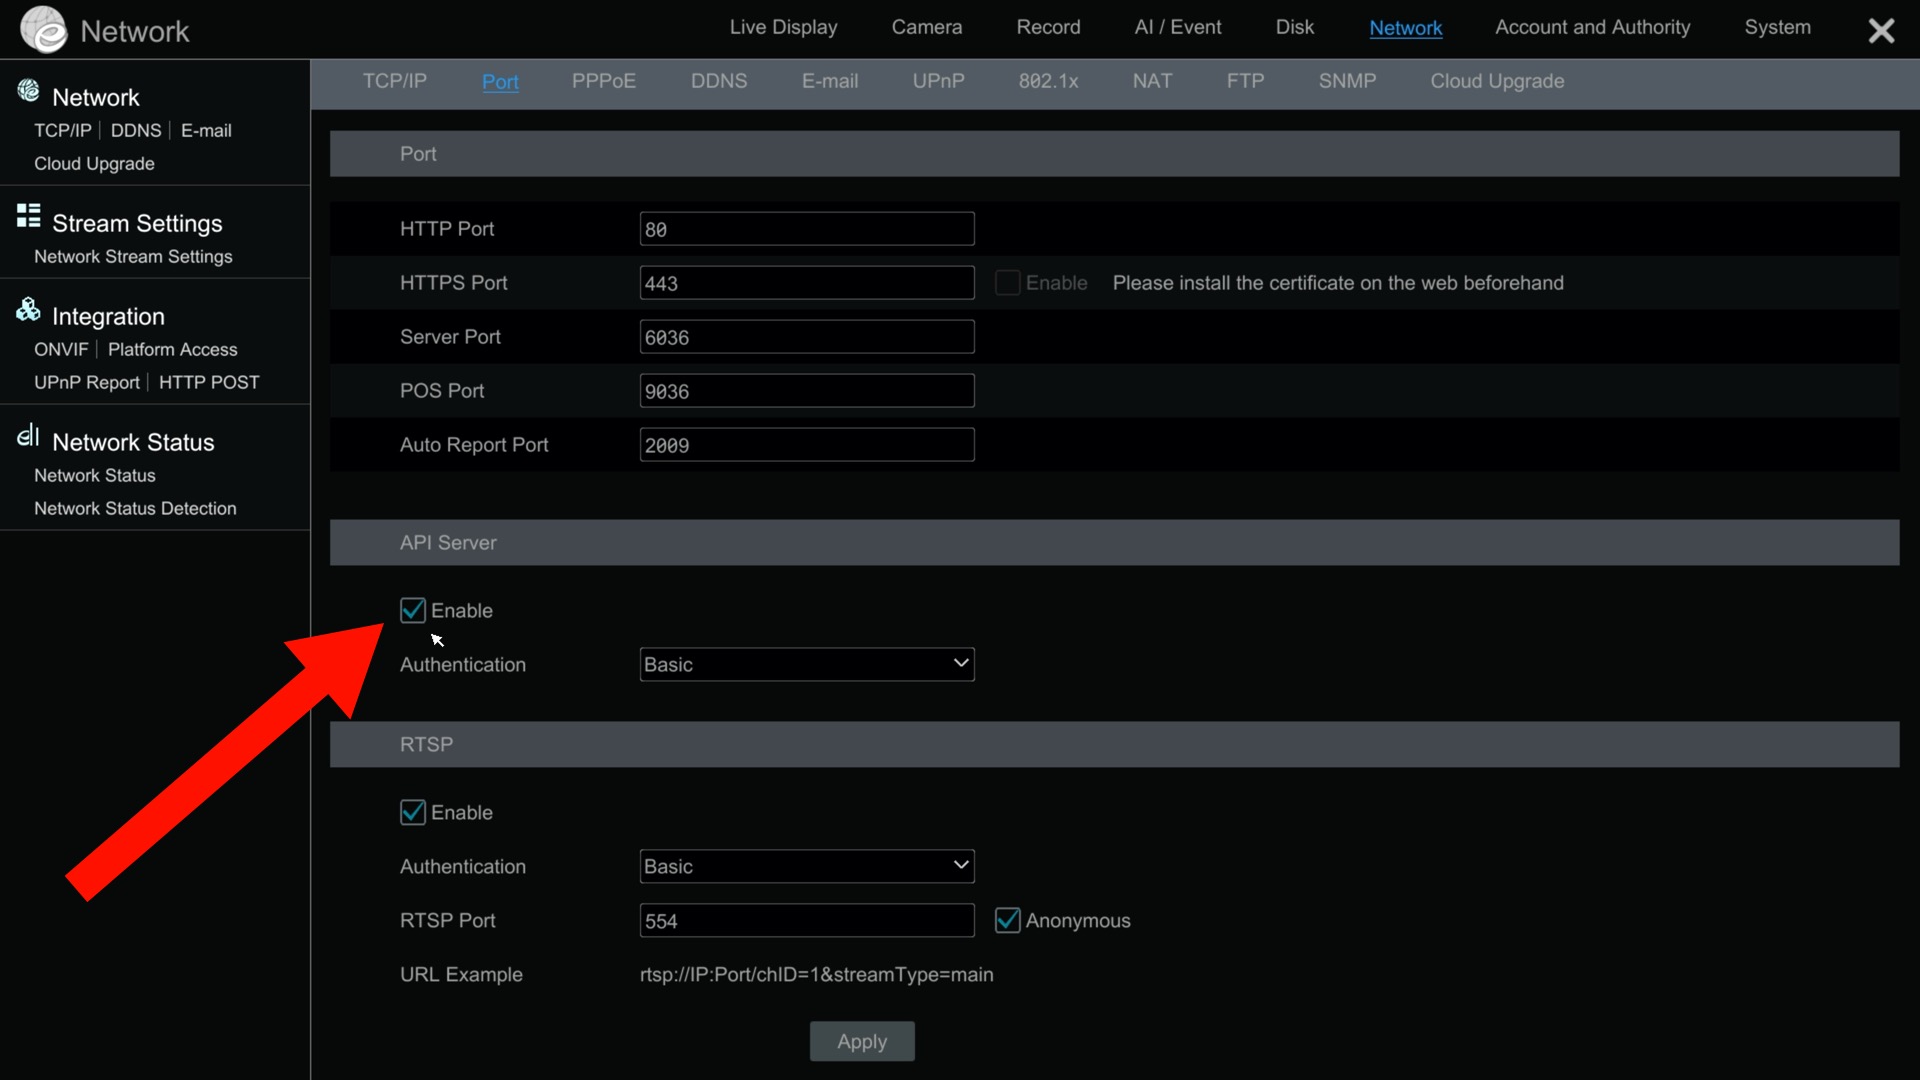
On the Network Port settings screen, check the Enable checkbox in the API Server section. You can leave the Authentication type as Basic. Click Apply on the bottom of the screen.

Configure Virtual Alarm on NVR
To configure the Virtual Alarm on the Viewtron NVR, do the following.
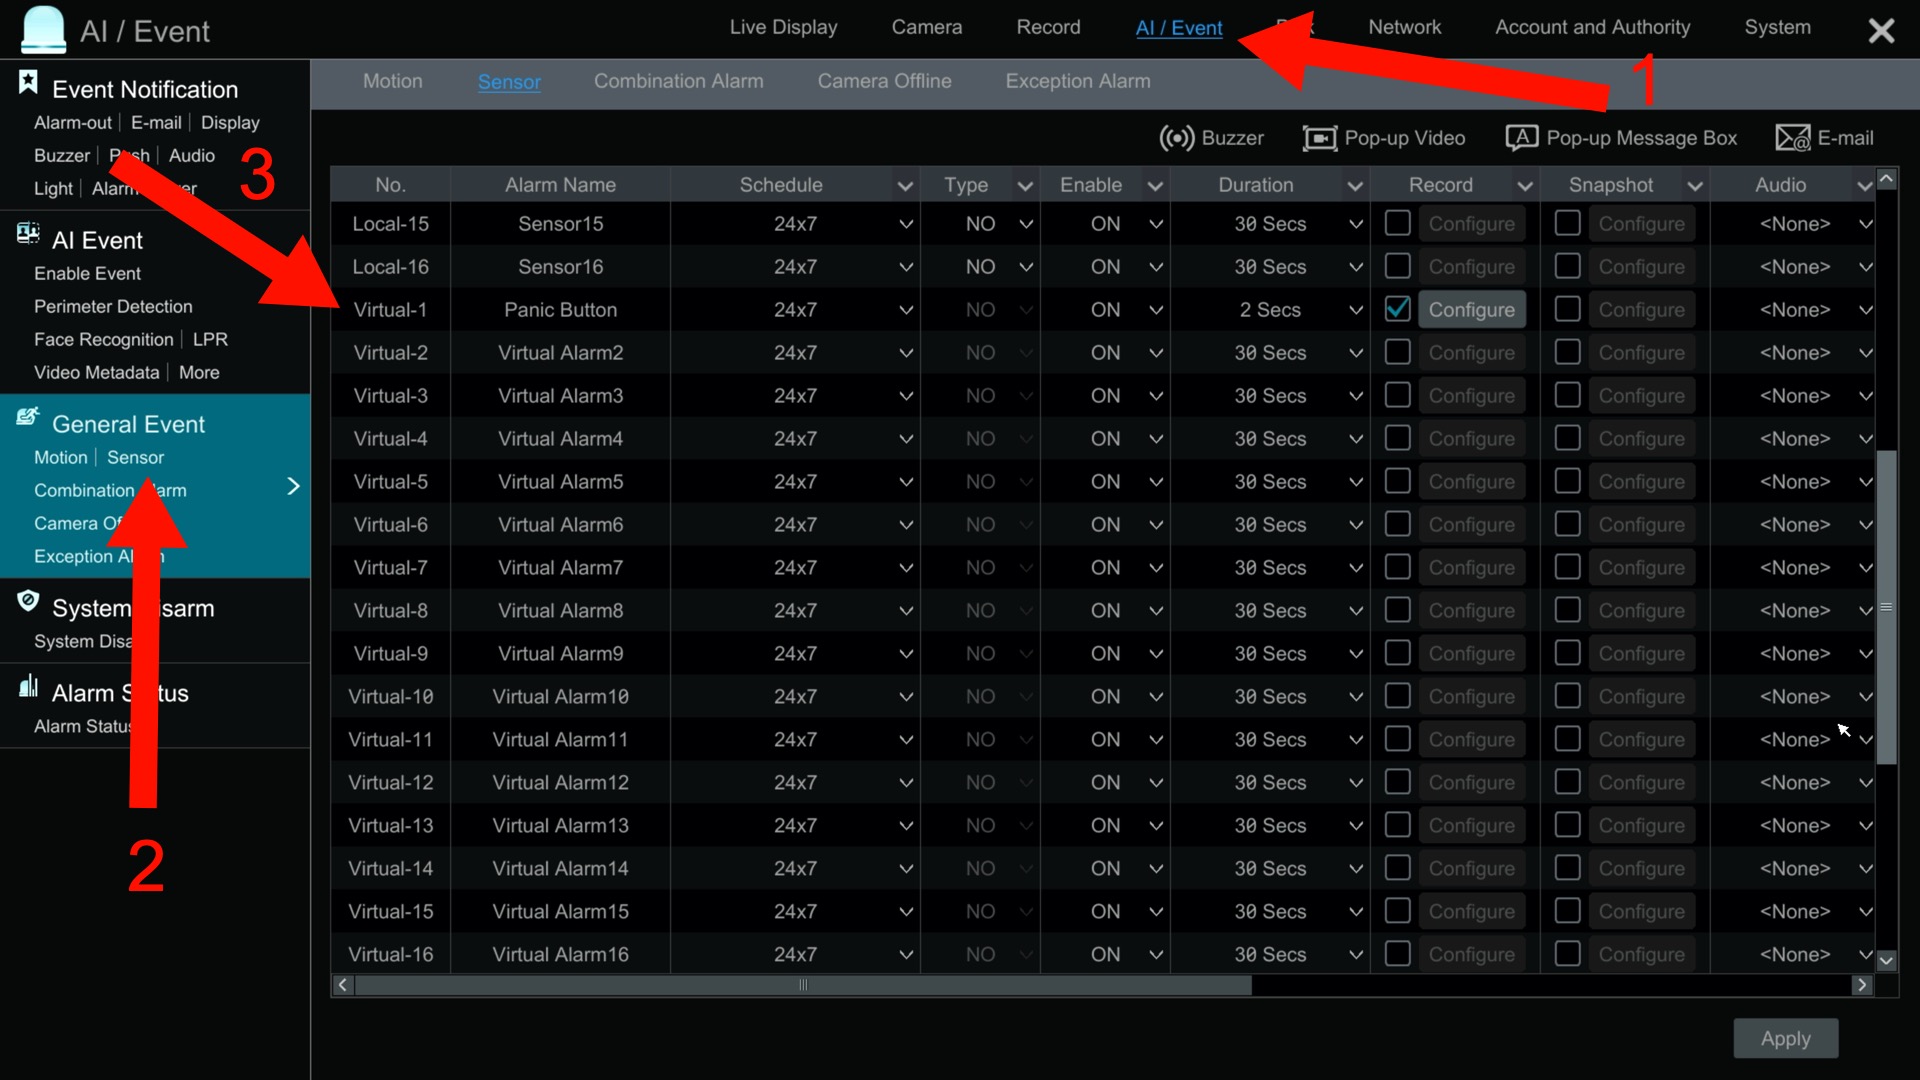
- Click on the AI / Event link on the top menu.
- Click on the Sensor link on the side menu.
- Locate the virtual alarm that you want to configure. The virtual alarms are below the local physical alarms on this screen. If this is the first virtual alarm that you are configuring, use Virtual-1.
You can configure the following fields and alarm actions.
- Alarm Name: The NVR will use this name to report alarm activations to you. For example, when you receive a mobile push notification. I names my virtual alarm “Panic Button” for my Arduino project.
- Schedule: You can select a time schedule that you want the virtual alarm to be active.
- Type: This field is not applicable. Virtual alarms are always NO (normally open).
- Enable: Set to On.
- Duration: The length of time that you want the alarm to be active when it is triggered.
- Record: You can select one or more security cameras to begin recording when the virtual alarm is triggered. All of the events will be bookmarked even if you also record video surveillance footage continuously.
- Snapshot: You can configure one or more security cameras to capture a snapshot image and save it to it’s local SD card (if you have one installed).
- Audio: This is for future use with IP speakers.
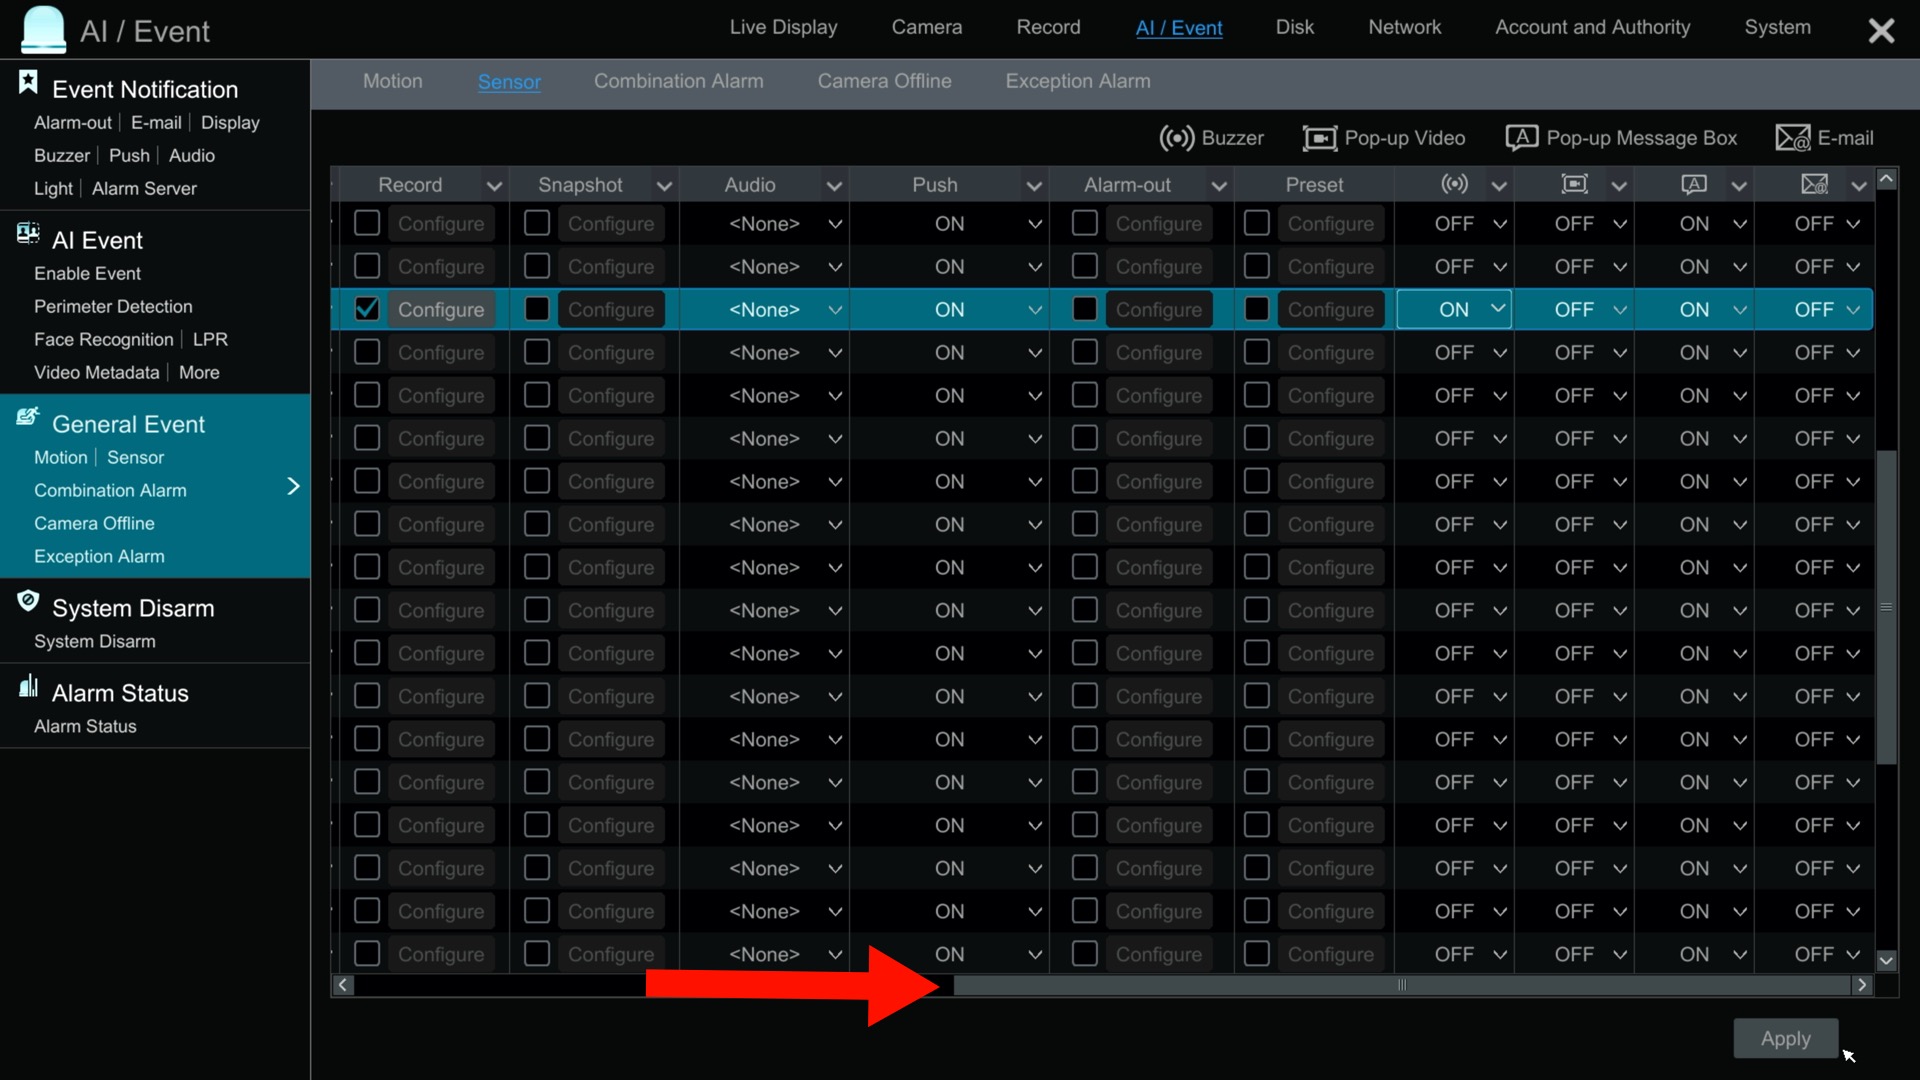
To see the rest of the virtual alarm settings can be accessed by sliding the screen using the bottom scroll bar.
- Push: Sets mobile app push notifications On / Off.
- Alarm-Out: Trigger one or more physical alarm devices that are connected to the alarm relay output ports on the Viewtron NVR. You can also trigger an alarm output on any other IP camera that is connected to the NVR (if it has an alarm relay output port).
- Preset: If you are using any PTZ cameras on your system, can may configure the PTZ camera to pan tilt zoom to a preset location when the virtual alarm is activated.
- Buzzer: This is the audio buzzer alarm built into the NVR.
- Pop-up Video: Set a certain security camera to pop-up on the live view of the NVR.
- Pop-up Message Box: Setup a custom message to appear on the NVR.
- E-mail: Send an email. Note: I do not recommend using email alerts because you need access to an SMTP mail server. Mobile app push notifications are a much better solution for real time alarm alerts.
When you are done configuring the virtual alarm, click on the Apply button in the lower right of the screen. You can then close the NVRs settings by clicking on the X in the upper right.
Trigger Alarm via Viewtron Security Camera API
Viewtron DVRs, NVRs, and IP cameras have a software development API available to integrate Viewtron security camera systems with third party alarm devices, IoTs, and computers. It is a HTTP Post API, also known as webhooks. The webhook endpoint to trigger the virtual alarms is as follows.
http://your_nvr_ip_address/TriggerVirtualAlarm/17
In the above example, “your_nvr_ip_address” would be replaced with the actual IP address of your NVR and the #17 on the end of the URL would be replaces with the virtual alarm number that you are accessing. On a 16 channel Viewtron NVR, there are 16 physical alarm ports. So, virtual alarm #1 is designated as alarm #17.
The HTTP Post also must send an XML document. It looks like this.
<config version=”2.0.0″ xmlns=”http://www.Sample.ipc.com/ver10″><action><status>true</status></action></config>
You must also send in the userid and password for basic authentication in the HTTP Header. You can see code examples below.
Simple Python App to Trigger Virtual Alarm
I wrote a very simple Python application that developers can use as an example on how to integrate with the virtual alarm on the NVR. I uploaded the Python script to Github here.
https://github.com/mikehaldas/Arduino-Alarm-Button/blob/main/viewtron_alarm_sample.py
Arduino Alarm Button Project
Here is the source code for the Arduino project that I created to demonstrate the Viewtron security camera alarm API.
https://github.com/mikehaldas/Arduino-Alarm-Button
Viewtron IP Camera NVRs
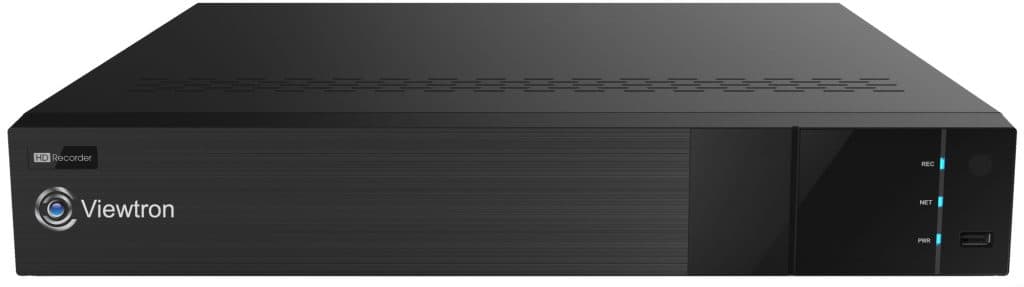
The Viewtron software development API and virtual alarm webhook is available on all Viewtron NVRs.
AI Security Cameras
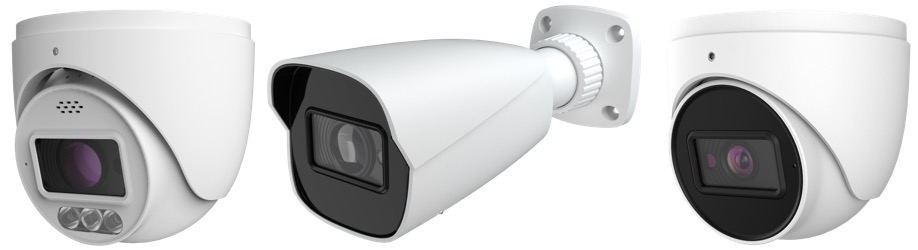
I highly recommend using our Viewtron AI security cameras with Viewtron NVRs.
You can watch all of our Viewtron AI camera video demos here.
Have Questions / Need Help?
If you have any questions or need help designing a security camera system for home, business, or government, please email me anytime at mike@viewtron.com.
Video Transcript
Here is a complete text transcript of the video at the top of this page.
Hey guys. Mike from CCTV Camera Pros here in this video I want to tell you about an awesome new feature on our Viewtron IP camera NVRs. It’s called Virtual Alarm. And so I’ve made a bunch of video demos in the past with our Viewtron DVRs and NVRs with the physical alarm input and alarm outputs. That’s the alarm block on the back where you can hardwire things like door sensors and motion sensors and lights physically to the NVR hardwired. This virtual alarm works over an IP network. So to demonstrate it, I set up this Arduino right here and I programmed a little push button application so that when that button is pressed, it’ll communicate with the Viewtron NVR to tell. it that I push the button and to trigger the virtual alarm. And this is not connected via hardwiring in any way to the NVR.
This little Arduino has a built in WIFI port and it’s connecting to the wireless access point here and communicating over the local area network with the NVR using an HTTP post. HTTP posts, also known as a webhooks. So this basically sends a command over the local area network, but you could do this over the Internet remotely as well, saying hey, this button was pressed, trigger the virtual alarm. Then, on the NVR side you could set up that virtual alarm to trigger actions like mobile app push notification recording on one or more cameras. You can trigger the audio alarm on the NVR. You can trigger physical alarm outputs on the NVR. It’s extremely powerful because all of these new Internet of things that are being created all over the place use this technology called webhooks. When an action takes place, it can send a command to an external system via a webhook endpoint to take some type of action. So I’m going to press the button.
Here right now and I think you’ll hear the alarm on the NVR, have the audio alarm enabled so you can hear the alarm on the NVR. But what also happened is that sent a push notification to my mobile app and it triggered recording on the NVR. And all of those events will be bookmarked on the NVR. So I know any time that button was pressed. Let’s shift over to the NVR real quick. I’m going to show you how the virtual alarm is configured over there and then before wrap up, I’ll tell you a little bit more about this Arduino program. I also wrote a little Python script that runs from my MacBook to demonstrate that you could use any programming language to interact with our Viewtron IP Camera NVRs to do these types of API integrations. Let’s go over to the NVR now and I’ll show you how it’s set up.
Here’s the live security camera view on my Viewtron NVR and to access the menu, I click on this Start button down here and click Settings on the main menu screen. I’m going to go into the Network section first and then click on the port link. So you need to enable this API server. So I check that Enable box and I’m going to leave the authentication type as Basic. I click Apply there and then next I’m going to go into the AI event settings and then I’m going to click on the sensor link.
You will see a list of all of the alarm sensors on the NVR. And the first 16 of them are physical alarm relays on the NVR. And then the virtual alarms are below there. The new 16 channel NVRs, have 16 virtual alarms.
I already named this one “panic button”, but you can name it whatever you want. And then you can set a schedule if you want so that when the Button is pressed, it’ll only trigger the alarm during that time frame in the schedule. And then you could set the duration for the amount of time the alarm goes off for. And then I have mine set up to trigger recording on the front camera on my house. I could set up other cameras too, but I’m not going to.
So I’m going to scroll over here so you can see the rest of these settings. You can set up a snapshot. I have push notifications enabled to the mobile app. If I wanted to, I could trigger alarm outputs either on the NVR or alarm outputs on any of the IP cameras that I have connected to the NVR. And then I have the buzzer alarm on the NVR enabled. I can setup a pop up message and trigger an email alert if I wanted to. So when I’m done, I click Apply. And X out of those settings and now I’m back at the live security camera view.
Let’s take a quick look at the Arduino code, just to go over the variables that need to be configured and a basic understanding of how this works from the programming side. So the first thing at the top of this sketch is the wi fi user ID and password. The Arduino ESP8266 board that I used has built in Wi-Fi and I’m using that to connect to the network so that I can connect to the Viewtron NVR. You’ll need to change that server IP variable to the local IP address of your Viewtron NVR. You can get that from the network settings page right on the NVR. And the default server port is 80 and then the endpoint URL, this is the URL of the HTTP post. The only thing you might need to change here is that that number 17 on the end of the URL endpoint. The 16 channel Viewtron NVR that I was using has 16 physical alarm ports.
So virtual alarm port number one is alarm port 17. And then the user ID and password, that’s just your standard user ID and password that you log into your NVR with. And then you don’t need to change it, but just so you see how it works, that XML payload variable, that’s the XML that’s sent into that URL from the application that triggers the virtual alarm.
Guys, I hope this video has been helpful. This virtual alarm feature and the application programming interface that’s available on the Viewtron NVRs is extremely powerful. I mean this lets you integrate any third party system that can send a webhook out to an endpoint. It allows you to integrate with all kinds of devices and systems that communicate over IP networks. Before starting CCTV Camera Pros with Greg almost 20 years ago, I did software engineering for about 10 years and I do like to get in and tinker with with software code still and these types of projects really get me fired up. I’ll be doing more testing with this as there’s opportunities to integrate other types of devices with the Viewtron NVRs. I definitely want to make more examples. I’ve been researching so far and things like, you know, smart door locks and things like that seem to be a really great fit to be able to bookmark anytime a door lock opens, (is unlocked or locked) on a centralized place on the NVR or you may want to trigger recording on the camera that faces that door.
There’s tons of scenarios like that that I’m really excited to get into. Anyways, if you have any questions about the viewtron virtual alarm feature or anything related to security camera systems in general, if you need help with a system design or really anything, you could reach out to me anytime. I could be reached via email at mike@viewtron.com. I’m going to post all the code for this little Arduino project and also the Python script that I wrote, I’m going to put that on GitHub and I’ll link to it in the blog post that I’m going to make. If you want to jump directly to that blog post at any time and learn more about this, you can. You could go to www.viewtron.com/valarm. Thank you for watching.


